メインコンテンツにスキップ
リペアコミュニティに参加 - アカウントの作成

X-Street STR Viper Remote Control Motherboard Replacement

必要な工具と部品

    1. X-Street STR Viper Remote Control Motherboard Replacement, Remote Control Motherboard: 手順 1、 1の画像 1
      • Turn off the remote control. Flip power switch to the off position.

      • Remove the battery from bottom of the remote control for further safety measures.

      FixBotに聞いてみる

      コメントを追加

    2. X-Street STR Viper Remote Control Motherboard Replacement: 手順 2、 1の画像 1
      • Remove all seven 3mm Phillips #2 screws from the underside panel.

      FixBotに聞いてみる

      コメントを追加

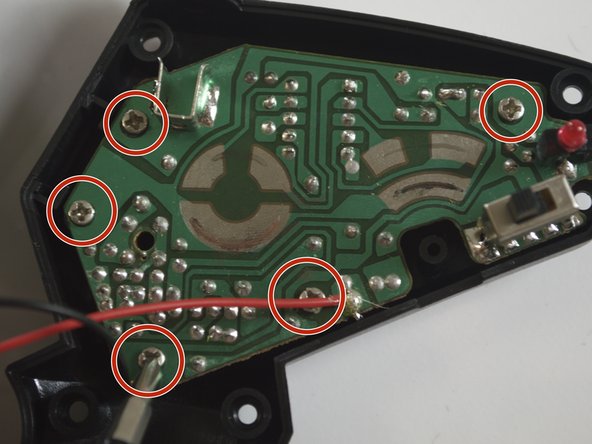
    3. X-Street STR Viper Remote Control Motherboard Replacement: 手順 3、 1の画像 1
      • Remove five 3mm Phillips #2 screws that connect the motherboard to the back outer shell.

      FixBotに聞いてみる

      コメントを追加

    4. X-Street STR Viper Remote Control Motherboard Replacement: 手順 4、 1の画像 1
      • Detach the motherboard. Use soldering tools to desolder the red and black wires from the motherboard. To do this, refer to the how to solder/desolder page.

      FixBotに聞いてみる

      コメントを追加

    5. X-Street STR Viper Remote Control Motherboard Replacement: 手順 5、 1の画像 1
      • Replace the motherboard. Solder the wires back on to the new motherboard using the soldering kit. The black wire should be on the left and the red wire should be on the right.

      FixBotに聞いてみる

      コメントを追加

終わりに

To reassemble your device, follow these instructions in reverse order.

キャンセル: このガイドを終了できませんでした。

ある他の人がこのガイドを完成しました。

作成者

7人の作成者と共同で作成されました。

Cate Kraska

メンバー登録日: 04/01/15

144 ポイント

1ガイドが承認済み

チーム

Cal Poly, Team 12-6, Lancaster Spring 2015 Cal Poly, Team 12-6, Lancaster Spring 2015人のメンバー

CPSU-LANCASTER-S15S12G6

4 メンバー

12のガイドは作成済み

0件のガイドコメント

コメントを追加

統計データ:

過去 24時間: 0

過去 7 日: 9

過去 30 日: 36

今までの合計 1,089