はじめに
Steam Deck LCDのSSDを取り出したり、アップグレードするための修理ガイドです。 Steam DeckのSSDは、シングルサイドのM.2 2230です。
Steam Deck OLEDのSSDを交換する手順については、本ガイドではなくこちらのガイドをご覧下さい。
作業を始まる前に、電源を切り、全てのケーブルをSteam Deckから外してください。デバイスを修理するときは、一般的な静電気放電(ESD)の手順に従うことを忘れないでください。
この手順は、SSDを物理的に取り外して交換する方法のみを説明しています。OSのインストールやSSDの交換には、追加のソフトウェアツールや手順が必要になる場合があります。
StreamOSでSteam DeckのSSDを回復、修復、再現するには、Valve公式の Steam Deckリカバリー手順 を参照してください。 Windowsのインストール方法については、こちらから情報入手できます。
ご注意:Steam Deckのボタン類やサムスティックやタッチパッドは、SSDのイメージ再構成直後に入力を受け付けないかも知れません。SteamOSの初期設定はタッチスクリーンを使って行い、アップデートをダウンロードして下さい。Steam Deckを再起動すればボタン類はまた使えるようになるはずです。
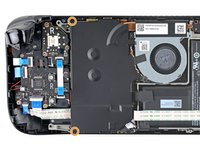
ご注意: Valveは2023年初めに、内部デザインを刷新したSteam Deckの出荷を開始しました。あなたがお持ちのSteam Deckは画像に写っている内部とは異なるかもしれませんが、手順は同じです。バックカバーを外して、所有しているモデルバージョンを確認してください。オリジナルのSteam Deckには、このように、メタル製マザーボードシールドと四角い側面のファンが付いています。アップデートされた新Steam Deckには、こちらのように、黒いマザーボードシールドと湾曲した側面のファンが付いています。
必要な工具と部品
ビデオの概要
-
この手順で使用する道具:FixMat$31.41
-
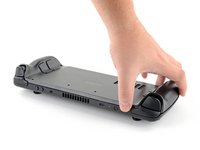
プラスドライバーを使って、バックカバーを固定している8本のネジを外します。
-
長さ9.5mmの粗ネジー4本
-
長さ5.8mmネジー4本
-
-
-
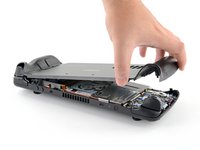
オープニングピックを右側グリップの端に沿って、バックカバーとフロントシェルの間に差し込みます。
-
バックカバーをこじ開けると、ロッキングクリップから外れます。
-
-
-
この手順で使用する道具:Tweezers$4.99
-
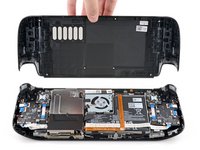
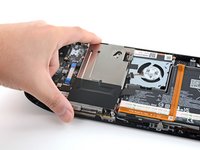
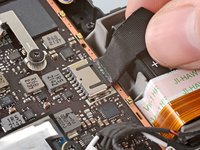
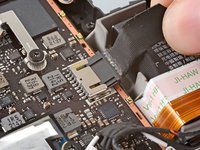
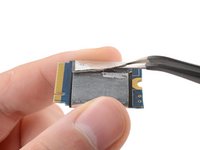
ピンセットを使って、ボードシールド上の隠れたネジを覆っているフォイルテープの一部分を剥がします。
-
-
-
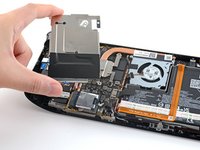
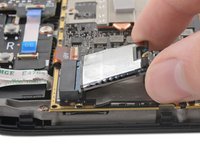
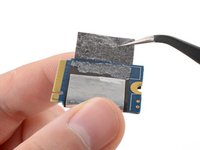
SSDからシールドをスライドさせて取り外します。
-
シールドが固着している場合、ピンセットを使ってシールドを剥がしてください。再利用する場合は、できるだけ良い状態で保管してください。
-
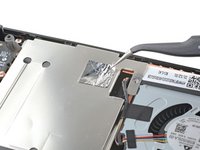
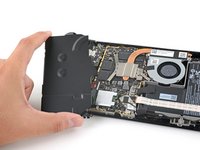
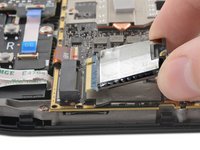
SSDのみが残ります。
-


このデバイスを再組み立てするには、インストラクションを逆の順番に従って作業を進めてください。
StreamOSでSteam DeckのSSDを回復、修復、再現するには、Valveの Steam Deck回復のインストラクション を参照してください。
電子廃棄物(e-waste)は 適切な方法で処分してください。
修理が上手く進みませんか?ベーシックなトラブルシューティングを行うか、 Steam Deckのアンサーコミュニティに尋ねてみましょう。
341 の人々がこのガイドを完成させました。
以下の翻訳者の皆さんにお礼を申し上げます:
100%

これらの翻訳者の方々は世界を修理する私たちのサポートをしてくれています。 あなたも貢献してみませんか?
翻訳を始める ›


70件のガイドコメント
idk why valve couldn't have just made the m.2 slot a 2230/2242/2260 & 2280 m.2 NVMe SSDs support??/ they could have done it! im hoping someone out there can make a new back shell that includes the nvme. m2 adapter riser cable extender that moves the nvme ssd to the back case somewhere else with more room and to also not only allow for better cooling of the SSD but also allows us to use any size m.2 nvme SSDs like 2230 up to 2280 m.2 size ssds as i have tons of gen3 x4 2280 nvme ssd lying around from all my AMD ryzen machines from my 1800X X370 all way up to X570 and 5700X / 5800X & 5800X3D etc..
I think it has to do with power draw... The Steam Deck isn't designed to cope with a incredibly fast (and power hungry) 2280 drive. I learned this the hard way on my laptop. I changed the drive myself to a 5500MB/s one and I could tell that not only did the SSD run hotter but also the components surrounding the SSD, it completely changed the thermal characteristics of the device. I added this drive to my desktop computer instead and bought a low powered one for the laptop. By having a 2230 drive on the Steam Deck, Valve forces users to choose drives that are typically designed for small and low powered devices.
Dennis -
lol thats a massive first world problem. we dont all have "tons" of m2 drives, ya know a reletively new tech, laying around
sk8r2211 -
Why are you complaining about the specs of a Steam Deck on an ifixit guide comment section? If there's a moderator around feel free to remove my and this person's comment.
and possibly even a m.2 door/cover to allow easier m.2 ssd removal W/O having to disassemble our steam deck! if the battery needs unplugged then a battery "KILLSWITCH" or "BATTERY DISCONNECT" Switch be also added to the decks after market backplate/cover to allow the steam decks battery to be disconnected from the unit with a toggle of a switch? allows for safter disassembly and m.2 SSD replacement with out having to repeatedly disassemble the steam deck....(SSD nand flash memory can fail) if i had the tools and capabilities to do this myself i would/ but i still dont even have my steam deck yet (Q3 July -Sept. 2022 ;( my friend just got his (ordered on same day) so WTF is mine valve!?????