この翻訳は、ソースガイドの最新の更新を反映していない可能性があります。 翻訳の更新に協力してください。 または ソースガイドを参照してください。
はじめに
この修理ガイドを参照して、Sony PlayStation 5のDualSenseコントローラーのリアケースを交換しましょう。
必要な工具と部品
-
-
-
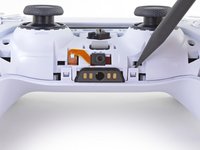
片手でコントローラーを掴んで、親指でトリガーを押し込んで下さい。
-
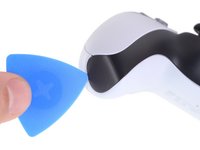
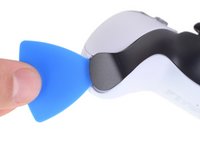
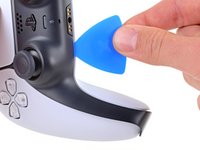
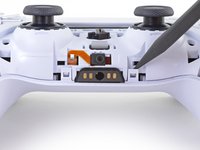
もう片方の手で、スパッジャーの平らな方の先をL1ボタンとL2ボタンの間に差し込みます。
-
スパッジャーで慎重にこじってL1ボタンをコントローラーから外しますが、指先をボタンに添えてどこかに飛んで行かないようにして下さい。
Tried prying from the front of the buttons as pictured and my spudger broke off in the gap. A video I watched showed them being pried off from the back (between the R1/R2 and L1/L2 buttons) which seemed much easier.
Agree with Lora's comment above. I was able to use an old credit card to take L1/R1 out this way. I pressed down the L2/R2 button to create space to work in, then came in from between L1/L2 and R1/R2. It's easy to pop one of the outer corners first then you can work the credit card around the top and the rest falls out.
-
-
-
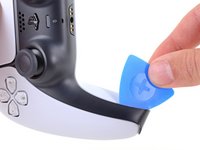
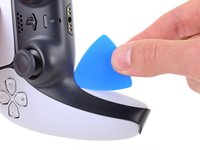
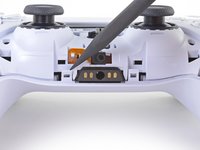
上記の手順と同じようにしてR1ボタンを外して下さい。
What I didn't see addressed anywhere (here or in other similar articles) is that replacement R1 / L1 buttons can be differ enough to be un-usable depending on which model your ps5 controller is. The ones I ordered don't fit and now I can't find a way to be sure I get the right ones because few know there's even a difference.
Did you already figured it out? The version the we need yo use?, We are in the same situation here.
Tried prying from the front of the buttons as pictured and my spudger broke off in the gap. A video I watched showed them being pried off from the back (between the R1/R2 and L1/L2 buttons) which seemed much easier.
-
-
-
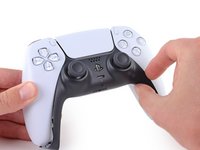
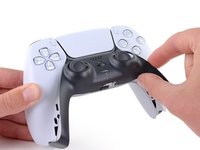
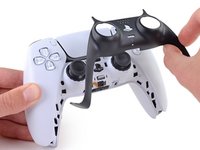
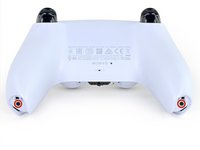
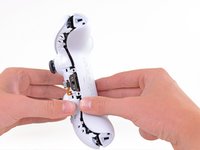
リアケースを外します。
-
あるリビジョン版モデルによっては、リアケースは以前に取り外したバンパーの横に追加の2つのクリップで固定されています。リアケースが自然に開かない場合は、これらのクリップがあるかどうか確認してください。
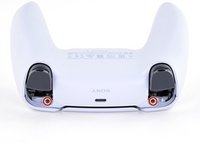
There are four more clips/hooks hidden in the seams along the outer sides of the handles. If you pull open the controller as shown in this step, then you will shear off the two tiny clips which are right next to the R1 and L1 buttons.
Therefore, you should first release those clips by prying the seams open sideways.
I noticed this with the updated design of the controller, not sure whether the hooks are present on the first version.
The hooks are not critical for the integrity of the controller as the two halves are held together by the screws hidden under the buttons. The damage does show that the controller has been taken apart.
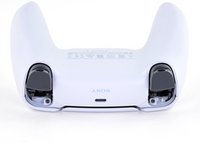
Thought I'd clarify: The clips next to the L1 and R1 are on the outer side from the L1 and R1 buttons, I'd suggest zooming in on the picture to see them. They're quite easy to break, but also easy to remove using the plastic spudger along the seam, bending the bottom cover outwards
I am still strugling to find the clips. Could someone point them out in the image with a screen shot or something like that.
I keep getting stuck at this step too with the new DualSense CFI-ZCT1WA revision. The top and bottom shells seem like they are fused together next to L1/R1 but I can't seem to be able to find where these hidden clips are located. My controller is still in warranty so I don't want to break them in case I can't fix my issue.
but also easy to remove using the plastic spudger along the seam, bending the bottom cover outwards
I tried this but it seems that the you need a lot of force and I ended up bending the tip of my spudger. Are you sure it's not the top cover that you need to pry away? The bottom cover has a ridge to make sure it's under the top cover so it's not easy to bend outwards.
@samomio I think there needs to be a step added for these new clips.
Ok, not seeing a lot of motion on this request, so I've uploaded photos of the hooks to imgur.
Here ya go: https://imgur.io/a/7NWmQi5
This guide really needs an update on this. I had a really hard time getting the forward clips to release even after referring to the comments above. Pretty sure I broke them in the end. No big deal but would be great if the iFixit experts could work out a good method for releasing them.
I finally figure it out!!
The hidden clip is very tricky but once you understand how it works it is easy to remove.
Use Sean's picture: https://imgur.io/a/7NWmQi5
What sean is showing, is actually the bottom shell of the seam.
To disassemble
1. Use the flat side of the spudger, pry the bottom seam OUTWARDS near the R1/L1 button hole.
2. (most important) While prying the bottom shell seam outwards, push your thumb on the upper shell and push outward as well (you can do this by applying pressure from the removed R1/L1 button hole towards the seam. And then it will disassemble automatically
And that's it!
updated instruction:
I finally figure it out!!
The hidden clip is very tricky but once you understand how it works it is easy to remove.
Use Sean's picture: https://imgur.io/a/7NWmQi5
What sean is showing, is actually the bottom shell of the seam.
To disassemble
1. Use the flat side of the spudger, pry the bottom seam OUTWARDS near the R1/L1 button hole.
2. (most important) While prying the bottom shell seam outwards, hold your thumb on the upper shell as anchor and then use your other finger to pry the bottom edge of the controller up away from the shell. If you are doing the first step, then don't worry about breaking the clip, just force it open. And then it will disassemble automatically
And that's it!
Yes! Thanks a bunch Penn. That did the trick! Much appreciated
Sean -
I managed to do it just by pulling harder than what I was already doing. And I don't think I broke anything. So, for me at least, the technique described in this guide worked.
The video linked below clearly shows how to open the controllers with the extra clips near the L1/R1 areas.
See a video here by How To X on YouTube... https://youtu.be/djIvRoclr_E?si=dKFpQCZe...
I really struggled with releasing the rest of the back panel (close to the shoulder buttons.) What finally seemed to do the trick for me, was doing both sides at once with upward turning motion of the back panel with the shoulder buttons approximately at the axis. Trying to release just one side and then the other felt impossible without potentially breaking the case.
This was what did it for me
-


このデバイスを再組み立てするには、インストラクションを逆の順番に従って作業を進めてください。
e-wasteを処理する場合は、認可済みリサイクルセンターR2を通じて廃棄してください。
修理が上手く進みませんか?ベーシックなトラブルシューティングを試してみるか、DualSenseのアンサーコミュニティを参照してください。
このデバイスを再組み立てするには、インストラクションを逆の順番に従って作業を進めてください。
e-wasteを処理する場合は、認可済みリサイクルセンターR2を通じて廃棄してください。
修理が上手く進みませんか?ベーシックなトラブルシューティングを試してみるか、DualSenseのアンサーコミュニティを参照してください。
7 の人々がこのガイドを完成させました。
以下の翻訳者の皆さんにお礼を申し上げます:
50%


これらの翻訳者の方々は世界を修理する私たちのサポートをしてくれています。 あなたも貢献してみませんか?
翻訳を始める ›
