はじめに
Use this guide to replace a worn-out or dead battery in your Galaxy Watch4.
If your battery is swollen, take appropriate precautions. For your safety, discharge your battery below 25% before disassembling Galaxy Watch4. This reduces the risk of a dangerous thermal event if the battery is accidentally damaged during the repair.
必要な工具と部品
-
-
Before starting repairs, take your watch off the charger and power it down.
-
Remove the watch band.
-
-
-
Use a Tri-point Y000 screwdriver to remove the four 4.0 mm-long screws.
-
-
-
Insert an opening tool into the seam between the back cover and the metal housing.
-
Twist the opening tool to create a gap.
-
-
-
Lay the watch face down.
-
Carefully swing open the back cover by folding the back cover to the opposite site of the created gap.
-
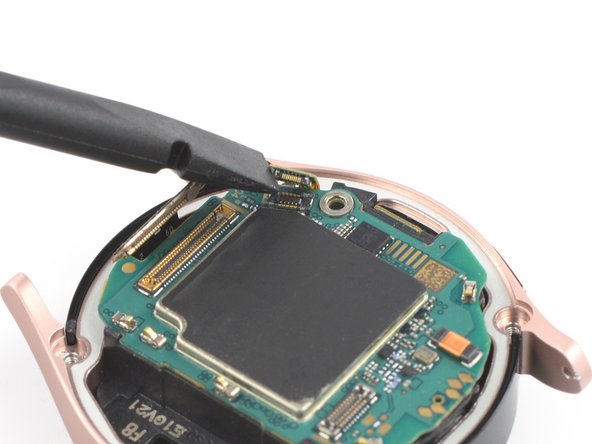
Use the flat end of a spudger to pry up and disconnect the sensor flex cable from the motherboard.
-
-
-
-
Use a Phillips screwdriver to remove the 4.4 mm-long screw securing the motherboard.
-
-
-
Use the flat end of a spudger to disconnect the display flex cable.
-
-
-
Use your fingers to lift the motherboard out from the watch assembly towards the bottom of the watch.
-
-
-
Place the tip of an opening pick in the small gap between the plastic frame and the battery, opposite to the display cable.
-
Carefully lever the battery up and out of its recess.
-
-
-
Lift the battery up a little in order to access its glued down connector cable.
-
Use a pair of blunt tweezers to lift up the battery connector which is secured with some light adhesive.
-


If possible, turn on your device and test your repair before installing new adhesive and resealing.
Secure the new battery with pre-cut adhesive or double-sided adhesive tape. In order to position it correctly, apply the new adhesive into the device at the places where the old adhesive was located, not directly onto the battery. Press the new battery firmly into place.
To reassemble your device, follow these instructions in reverse order.
For optimal performance, calibrate your newly installed battery: Charge it to 100% and keep charging it for at least 2 more hours. Then use your device until it shuts off due to low battery. Finally, charge it uninterrupted to 100%.
Take your e-waste to an R2 or e-Stewards certified recycler.
Repair didn’t go as planned? Try some basic troubleshooting, or ask our Answers community for help.
27 の人々がこのガイドを完成させました。


9 件のコメント
Guide worked very well for me on the Watch4 (not classic). My battery adhesive came off during the replacement, so it was good to have gotten the adhesive card just in case.
My only note is that the Y000 Tri-point was tool small for the 2nd step. I used the Y00 Tri-point and it worked perfectly. The battery did take some effort to get out. I also used the flat edge of the plastic spudger to help lever up the corner to slide the pick in better.
is it still water resistant