メインコンテンツにスキップ

Samsung Galaxy S21 Ultra Rear Camera Replacement

必要な工具と部品

  1. Samsung Galaxy S21 Ultra Rear Camera Replacement, Heat the back cover: 手順 1、 1の画像 1
    • Unplug and power off your phone before you begin.

    • Prepare an iOpener and apply it to the back cover for at least three minutes to loosen the adhesive underneath.

    • A hair dryer, heat gun, or hot plate may also be used, but be careful not to overheat the phone—the display and internal battery are both susceptible to heat damage.

  2. Samsung Galaxy S21 Ultra Rear Camera Replacement, Insert an opening pick: 手順 2、 3の画像 1 Samsung Galaxy S21 Ultra Rear Camera Replacement, Insert an opening pick: 手順 2、 3の画像 2 Samsung Galaxy S21 Ultra Rear Camera Replacement, Insert an opening pick: 手順 2、 3の画像 3
    • Secure a suction handle to the bottom edge of the back cover, as close to the edge as possible.

    • If the back cover is badly cracked, covering it with a layer of clear packing tape may allow the suction cup to adhere. Alternatively, very strong tape may be used instead of the suction cup. If all else fails, you can superglue the suction cup to the broken cover.

    • Lift the back cover with the suction handle to create a small gap between the back cover and the frame.

    • If you have trouble creating a gap, apply more heat to further soften the adhesive. Follow the iOpener instructions to avoid overheating.

    • Insert an opening pick into the gap you created.

    • Slide the opening pick to the bottom left corner to slice the adhesive.

    • Leave the opening pick in place to prevent the adhesive from resealing.

  3. Samsung Galaxy S21 Ultra Rear Camera Replacement, Slice the adhesive: 手順 3、 2の画像 1 Samsung Galaxy S21 Ultra Rear Camera Replacement, Slice the adhesive: 手順 3、 2の画像 2
    • Insert a second opening pick at the bottom edge of your phone.

    • Slide the opening pick to the bottom right corner to slice the adhesive.

    • Leave the opening picks in place to prevent the adhesive from resealing.

  4. Samsung Galaxy S21 Ultra Rear Camera Replacement: 手順 4、 3の画像 1 Samsung Galaxy S21 Ultra Rear Camera Replacement: 手順 4、 3の画像 2 Samsung Galaxy S21 Ultra Rear Camera Replacement: 手順 4、 3の画像 3
    • If the adhesive becomes hard to cut, it has most likely cooled down. Use your iOpener for two to three minutes to reheat it.

    • Insert a third opening pick at the bottom right corner of your phone.

    • Slide the opening pick along the right edge of your phone to slice the adhesive.

    • Leave the opening pick in the top right corner to prevent the adhesive from resealing.

  5. Samsung Galaxy S21 Ultra Rear Camera Replacement: 手順 5、 3の画像 1 Samsung Galaxy S21 Ultra Rear Camera Replacement: 手順 5、 3の画像 2 Samsung Galaxy S21 Ultra Rear Camera Replacement: 手順 5、 3の画像 3
    • When you slice near the camera assembly, insert only the tip of the opening pick (~ 4-5 mm) to avoid damaging or smearing the camera.

    • Insert a fourth opening pick underneath the top right corner of your phone.

    • Slide the opening pick along the top edge to slice the adhesive.

    • Leave the opening pick in the top left corner to prevent the adhesive from resealing.

  6. Samsung Galaxy S21 Ultra Rear Camera Replacement: 手順 6、 3の画像 1 Samsung Galaxy S21 Ultra Rear Camera Replacement: 手順 6、 3の画像 2 Samsung Galaxy S21 Ultra Rear Camera Replacement: 手順 6、 3の画像 3
    • Insert a fifth opening pick underneath the top left corner.

    • Slide the opening pick along the left edge of the back cover to slice the remaining adhesive.

    • When you slice near the power button, insert only the tip of the opening pick (~ 3-4 mm) to avoid damaging the power and volume button flex cable.

  7. Samsung Galaxy S21 Ultra Rear Camera Replacement, Remove the back cover: 手順 7、 2の画像 1 Samsung Galaxy S21 Ultra Rear Camera Replacement, Remove the back cover: 手順 7、 2の画像 2
    • Remove the back cover.

    • During reassembly:

    • This is a good point to power on your phone and test all functions before sealing it up. Be sure to power your phone back down completely before you continue working.

    • Remove any adhesive chunks with a pair of tweezers or your fingers.

    • Use some high concentration (over 90%) isopropyl alcohol to wipe away any adhesive residue.

    • If you're using Samsung custom-cut adhesives, follow this guide.

    • If you're using double-sided tape, follow this guide.

  8. Samsung Galaxy S21 Ultra Rear Camera Replacement, Slice the adhesive: 手順 8、 2の画像 1 Samsung Galaxy S21 Ultra Rear Camera Replacement, Slice the adhesive: 手順 8、 2の画像 2
    • Insert an opening pick underneath the left bottom end of the NFC antenna and charging coil assembly.

    • Carefully slide the opening pick along the bottom left edge of the assembly to separate it from the battery.

  9. Samsung Galaxy S21 Ultra Rear Camera Replacement: 手順 9、 3の画像 1 Samsung Galaxy S21 Ultra Rear Camera Replacement: 手順 9、 3の画像 2 Samsung Galaxy S21 Ultra Rear Camera Replacement: 手順 9、 3の画像 3
    • Insert an opening pick underneath the bottom end of the NFC antenna and charging coil assembly.

    • Carefully slide the opening pick along the bottom of the assembly to separate it from the loudspeaker.

  10. Samsung Galaxy S21 Ultra Rear Camera Replacement, Disconnect the charging coil: 手順 10、 2の画像 1 Samsung Galaxy S21 Ultra Rear Camera Replacement, Disconnect the charging coil: 手順 10、 2の画像 2
    • Use a spudger to disconnect the charging coil by prying the connector straight up from its socket.

  11. Samsung Galaxy S21 Ultra Rear Camera Replacement, Disconnect the NFC antenna: 手順 11、 2の画像 1 Samsung Galaxy S21 Ultra Rear Camera Replacement, Disconnect the NFC antenna: 手順 11、 2の画像 2
    • Use a spudger to disconnect the NFC antenna by prying the connector straight up from its socket.

  12. Samsung Galaxy S21 Ultra Rear Camera Replacement, Unfasten the NFC antenna & charging coil assembly screws: 手順 12、 1の画像 1
    • Use a Phillips screwdriver to remove the five 3.9 mm-long screws securing the NFC antenna and charging coil assembly.

  13. Samsung Galaxy S21 Ultra Rear Camera Replacement, Remove the NFC antenna & charging coil assembly: 手順 13、 3の画像 1 Samsung Galaxy S21 Ultra Rear Camera Replacement, Remove the NFC antenna & charging coil assembly: 手順 13、 3の画像 2 Samsung Galaxy S21 Ultra Rear Camera Replacement, Remove the NFC antenna & charging coil assembly: 手順 13、 3の画像 3
    • Use a pair of tweezers or your fingers to carefully remove the NFC antenna and charging coil assembly.

  14. Samsung Galaxy S21 Ultra Rear Camera Replacement, Disconnect the battery cable: 手順 14、 2の画像 1 Samsung Galaxy S21 Ultra Rear Camera Replacement, Disconnect the battery cable: 手順 14、 2の画像 2
    • Use a spudger to disconnect the battery cable by prying the connector straight up from its socket.

  15. Samsung Galaxy S21 Ultra Rear Camera Replacement, Unfasten the loudspeaker assembly screws: 手順 15、 1の画像 1
    • Use a Phillips screwdriver to remove the four 3.9 mm-long screws securing the loudspeaker assembly.

  16. Samsung Galaxy S21 Ultra Rear Camera Replacement, Pry up the loudspeaker assembly: 手順 16、 2の画像 1 Samsung Galaxy S21 Ultra Rear Camera Replacement, Pry up the loudspeaker assembly: 手順 16、 2の画像 2
    • Insert a spudger into the gap between the top edge of the loudspeaker assembly and the midframe.

    • Use your spudger to pry up the loudspeaker assembly by tilting it downwards.

  17. Samsung Galaxy S21 Ultra Rear Camera Replacement, Remove the loudspeaker assembly: 手順 17、 2の画像 1 Samsung Galaxy S21 Ultra Rear Camera Replacement, Remove the loudspeaker assembly: 手順 17、 2の画像 2
    • Remove the loudspeaker assembly.

    • During reassembly apply new adhesive where it's necessary after cleaning the relevant areas with isopropyl alcohol (>90%).

  18. Samsung Galaxy S21 Ultra Rear Camera Replacement, Disconnect the display flex cable: 手順 18、 2の画像 1 Samsung Galaxy S21 Ultra Rear Camera Replacement, Disconnect the display flex cable: 手順 18、 2の画像 2
    • If you're not planning to remove the motherboard or to replace the battery, you can skip this step and continue with the next one.

    • Use a spudger to disconnect the display flex cable by prying the connector straight up from its socket.

  19. Samsung Galaxy S21 Ultra Rear Camera Replacement, Disconnect the main & interconnect flex cables: 手順 19、 3の画像 1 Samsung Galaxy S21 Ultra Rear Camera Replacement, Disconnect the main & interconnect flex cables: 手順 19、 3の画像 2 Samsung Galaxy S21 Ultra Rear Camera Replacement, Disconnect the main & interconnect flex cables: 手順 19、 3の画像 3
    • Use a spudger to disconnect the main and interconnect flex cables from the motherboard by prying their upper connectors straight up from their sockets.

  20. Samsung Galaxy S21 Ultra Rear Camera Replacement, Remove the interconnect flex cable: 手順 20、 3の画像 1 Samsung Galaxy S21 Ultra Rear Camera Replacement, Remove the interconnect flex cable: 手順 20、 3の画像 2 Samsung Galaxy S21 Ultra Rear Camera Replacement, Remove the interconnect flex cable: 手順 20、 3の画像 3
    • Use a spudger to disconnect the interconnect flex cable from the daughterboard by prying its bottom connector straight up from its socket.

    • Use your fingers or a pair of tweezers to carefully remove the interconnect flex cable.

  21. Samsung Galaxy S21 Ultra Rear Camera Replacement, Remove the main flex cable: 手順 21、 3の画像 1 Samsung Galaxy S21 Ultra Rear Camera Replacement, Remove the main flex cable: 手順 21、 3の画像 2 Samsung Galaxy S21 Ultra Rear Camera Replacement, Remove the main flex cable: 手順 21、 3の画像 3
    • Use a spudger to disconnect the main flex cable from the daughterboard by prying its bottom connector straight up from its socket.

    • Use your fingers or a pair of tweezers to carefully remove the main flex cable.

  22. Samsung Galaxy S21 Ultra Rear Camera Replacement, Unfasten the earpiece and laser AF module assembly screws: 手順 22、 1の画像 1
    • Use a Phillips screwdriver to remove the four 3.9 mm-long screws securing the earpiece speaker and laser AF module assembly.

  23. Samsung Galaxy S21 Ultra Rear Camera Replacement, Disconnect the laser AF module and earpiece speaker  flex cable: 手順 23、 3の画像 1 Samsung Galaxy S21 Ultra Rear Camera Replacement, Disconnect the laser AF module and earpiece speaker  flex cable: 手順 23、 3の画像 2 Samsung Galaxy S21 Ultra Rear Camera Replacement, Disconnect the laser AF module and earpiece speaker  flex cable: 手順 23、 3の画像 3
    • Use a spudger to disconnect the laser AF module and earpiece speaker flex cables by prying the connectors straight up from their socket.

  24. Samsung Galaxy S21 Ultra Rear Camera Replacement, Remove the earpiece speaker and laser AF module assembly: 手順 24、 3の画像 1 Samsung Galaxy S21 Ultra Rear Camera Replacement, Remove the earpiece speaker and laser AF module assembly: 手順 24、 3の画像 2 Samsung Galaxy S21 Ultra Rear Camera Replacement, Remove the earpiece speaker and laser AF module assembly: 手順 24、 3の画像 3
    • Grab the bottom right corner of the earpiece speaker and laser AF module assembly with a pair of blunt nose tweezers and carefully lift it upwards.

    • Remove the earpiece speaker and laser AF module assembly.

  25. Samsung Galaxy S21 Ultra Rear Camera Replacement, Disconnect the in-display fingerprint and  antenna flex cables: 手順 25、 3の画像 1 Samsung Galaxy S21 Ultra Rear Camera Replacement, Disconnect the in-display fingerprint and  antenna flex cables: 手順 25、 3の画像 2 Samsung Galaxy S21 Ultra Rear Camera Replacement, Disconnect the in-display fingerprint and  antenna flex cables: 手順 25、 3の画像 3
    • Use a spudger to disconnect the in-display fingerprint and antenna flex cables by prying the connectors straight up from their socket.

    • Carefully bend both connectors to the side to free the motherboard.

    • Do not fold the cables sharply and only bend them to avoid cable damage.

  26. Samsung Galaxy S21 Ultra Rear Camera Replacement, Disconnect the front facing camera: 手順 26、 2の画像 1 Samsung Galaxy S21 Ultra Rear Camera Replacement, Disconnect the front facing camera: 手順 26、 2の画像 2
    • Use a spudger to disconnect the front facing camera cable by prying the connector straight up from its socket.

  27. Samsung Galaxy S21 Ultra Rear Camera Replacement, Disconnect the power button flex cable: 手順 27、 3の画像 1 Samsung Galaxy S21 Ultra Rear Camera Replacement, Disconnect the power button flex cable: 手順 27、 3の画像 2 Samsung Galaxy S21 Ultra Rear Camera Replacement, Disconnect the power button flex cable: 手順 27、 3の画像 3
    • Use a spudger to disconnect the power button flex cable by prying the connector straight up from its socket.

    • Carefully bend the connector to the side to free the motherboard.

  28. Samsung Galaxy S21 Ultra Rear Camera Replacement, Unfasten the camera module screw: 手順 28、 1の画像 1
    • Use a Phillips screwdriver to remove the 3.9 mm-long screw securing the camera module.

  29. Samsung Galaxy S21 Ultra Rear Camera Replacement, Pry up the motherboard: 手順 29、 2の画像 1 Samsung Galaxy S21 Ultra Rear Camera Replacement, Pry up the motherboard: 手順 29、 2の画像 2
    • Avoid damaging the flex cables surrounding the motherboard during the following procedure.

    • Insert an spudger underneath the top edge of the motherboard next to the vibration motor.

    • Use your spudger to pry up the motherboard by tilting it downwards and twisting it to the side at the same time.

  30. Samsung Galaxy S21 Ultra Rear Camera Replacement, Remove the motherboard: 手順 30、 2の画像 1 Samsung Galaxy S21 Ultra Rear Camera Replacement, Remove the motherboard: 手順 30、 2の画像 2
    • Carefully remove the motherboard.

    • Avoid any abrupt movements during the removal and make sure none of the flex cables are entangled in the motherboard to avoid tearing them.

  31. Samsung Galaxy S21 Ultra Rear Camera Replacement, Disconnect the ultra wide camera: 手順 31、 2の画像 1 Samsung Galaxy S21 Ultra Rear Camera Replacement, Disconnect the ultra wide camera: 手順 31、 2の画像 2
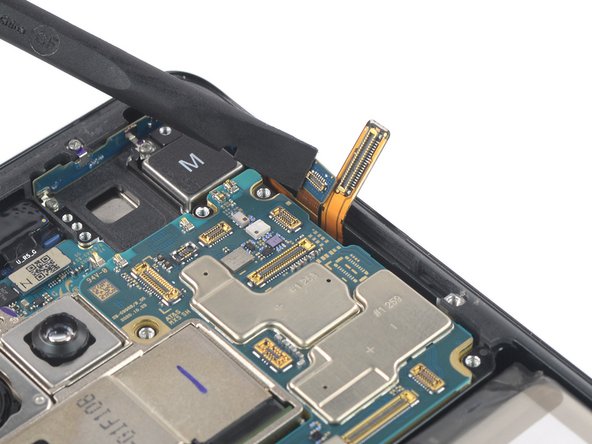
    • Use a spudger to disconnect the ultra wide camera flex cable by prying its connector straight up from its socket.

  32. Samsung Galaxy S21 Ultra Rear Camera Replacement, Disconnect the telephoto camera: 手順 32、 2の画像 1 Samsung Galaxy S21 Ultra Rear Camera Replacement, Disconnect the telephoto camera: 手順 32、 2の画像 2
    • Use a spudger to disconnect the telephoto camera flex cable on the rear side of the motherboard by prying its connector straight up from its socket.

  33. Samsung Galaxy S21 Ultra Rear Camera Replacement, Disconnect the wide and second telephoto camera: 手順 33、 3の画像 1 Samsung Galaxy S21 Ultra Rear Camera Replacement, Disconnect the wide and second telephoto camera: 手順 33、 3の画像 2 Samsung Galaxy S21 Ultra Rear Camera Replacement, Disconnect the wide and second telephoto camera: 手順 33、 3の画像 3
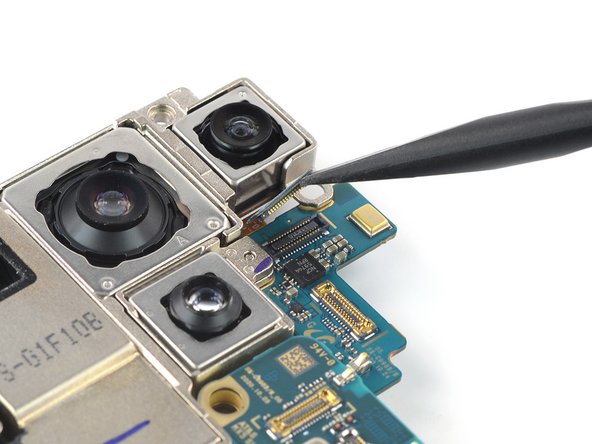
    • Use a spudger to disconnect the wide and the second telephoto camera flex cables by prying their connectors straight up from their sockets.

  34. Samsung Galaxy S21 Ultra Rear Camera Replacement, Remove the rear camera assembly: 手順 34、 3の画像 1 Samsung Galaxy S21 Ultra Rear Camera Replacement, Remove the rear camera assembly: 手順 34、 3の画像 2 Samsung Galaxy S21 Ultra Rear Camera Replacement, Remove the rear camera assembly: 手順 34、 3の画像 3
    • Use a pair of tweezers to separate the motherboard from the rear camera assembly.

    • During reassembly apply new adhesive where it's necessary after cleaning the relevant areas with isopropyl alcohol (>90%).

  35. Samsung Galaxy S21 Ultra Rear Camera Replacement, Unfasten the camera assembly screw: 手順 35、 1の画像 1
    • Use a Phillips screwdriver to remove the 3.5 mm-long screw securing the rear camera assembly.

  36. Samsung Galaxy S21 Ultra Rear Camera Replacement, Separate the camera lenses: 手順 36、 3の画像 1 Samsung Galaxy S21 Ultra Rear Camera Replacement, Separate the camera lenses: 手順 36、 3の画像 2 Samsung Galaxy S21 Ultra Rear Camera Replacement, Separate the camera lenses: 手順 36、 3の画像 3
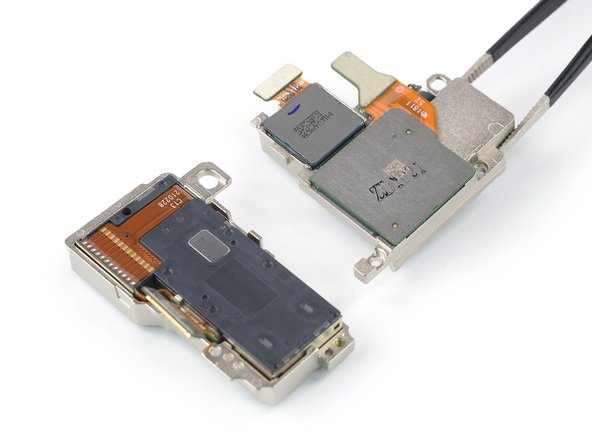
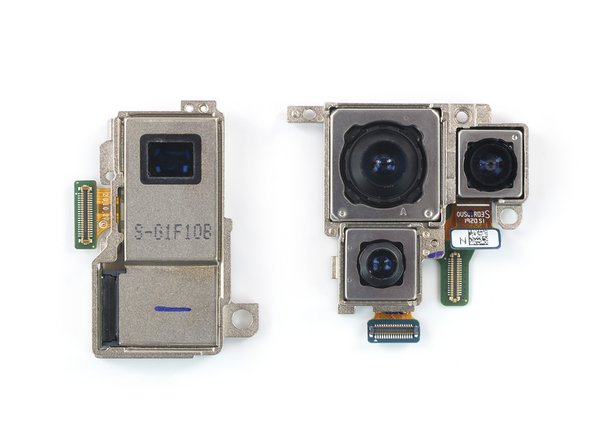
    • Use a pair of blunt tweezers or your fingers to carefully separate the triple lens assembly from the telephoto camera.

    • If you want to replace a single lens of the triple lens assembly, you can apply a heated iOpener to the assembly to loosen the camera adhesive and gently press it through the camera assembly frame. Avoid straining or tearing the camera cables during this procedure.

    • During reassembly apply new adhesive where it's necessary after cleaning the relevant areas with isopropyl alcohol (>90%).

終わりに

If possible, turn on your device and test your repair before installing new adhesive and resealing.

Compare your new replacement part to the original part—you may need to transfer remaining components or remove adhesive backings from the new part before installing.

To reassemble your device, follow these instructions in reverse order.

After you've completed the repair, follow this guide to test your repair.

Take your e-waste to an R2 or e-Stewards certified recycler.

Repair didn’t go as planned? Try some basic troubleshooting, or ask our Answers community for help.

ある他の人がこのガイドを完成しました。

作成者

3人の作成者と共同で作成されました。

Dominik Schnabelrauch

メンバー登録日: 11/23/16

202,558 ポイント

682のガイドは作成済み

チーム

iFixit iFixit人のメンバー

Staff

135 メンバー

16,718のガイドは作成済み

6 件のコメント

does 3x camera can be seperated too?

The Watcher - 返信

Hi Watcher,

you can detach the telephoto camera from the assembly easily including its frame. It is only held to the assembly by a small metal pin. However separating the cameras from their frame is very difficult. The frame sits very tight around them and in case of the ultra-wide and wide cameras you risk damaging both when trying to remove one.

Dominik Schnabelrauch -

Dominik, your repair guide is excellent. Thank you. Can you or ifixit recommend a reputible source for the camera components for the S21 Ultra? I read of bad experiences with parts sourced through ebay, and ifixit doesn't offer the needed parts for sale on their site. I wish they would!

Tom - 返信

hey, can you please tell me where I can buy these cameras?

unfortunately I was taking a video of a stone blast which shattered all three camera glasses and the lenses were damaged too. even though all three cameras are working but the pictures come out blur, so I need to purchase the whole set of cameras so I can replace them with the old ones.

Im from Pakistan!!

Nauman Hunzai - 返信

The telephoto camera has a real mechanical assembly that moves a physical lens according to the zoom setting, up to 100x. I took a picture of the August 2023 Blue Supermoon with it. The image on the screen is about 2.5 inches or 63 mm in diameter. This is excellent for a smartphone with no added lenses.

raymondjram - 返信

コメントを追加

統計データ:

過去 24時間: 12

過去 7 日: 138

過去 30 日: 656

今までの合計 13,390