メインコンテンツにスキップ

Samsung Galaxy Book Pro 360 15" Heat Sink Replacement

必要な工具と部品

  1. Samsung Galaxy Book Pro 360 15" Heat Sink Replacement, Access the rubber feet: 手順 1、 2の画像 1 Samsung Galaxy Book Pro 360 15" Heat Sink Replacement, Access the rubber feet: 手順 1、 2の画像 2
    • Before you begin, shut down your laptop and unplug it.

    • Close the screen and lay your laptop down with the rear case facing up to access the four rubber feet.

  2. Samsung Galaxy Book Pro 360 15" Heat Sink Replacement, Remove the rubber feet: 手順 2、 3の画像 1 Samsung Galaxy Book Pro 360 15" Heat Sink Replacement, Remove the rubber feet: 手順 2、 3の画像 2 Samsung Galaxy Book Pro 360 15" Heat Sink Replacement, Remove the rubber feet: 手順 2、 3の画像 3
    • Insert an opening pick between the rear case and the rubber foot.

    • Pry up with the pick and dislodge the foot from the rear case.

    • Use tweezers or your fingers to remove the rubber foot.

    • Repeat this process on the remaining rubber feet.

    • There are two types of rubber feet for this laptop. During reassembly, make sure the top feet say "M4" and the bottom feet say "M1".

    • To reinstall a rubber foot, align it over the recess and push down until it's secured.

  3. Samsung Galaxy Book Pro 360 15" Heat Sink Replacement, Unfasten the rear case: 手順 3、 2の画像 1 Samsung Galaxy Book Pro 360 15" Heat Sink Replacement, Unfasten the rear case: 手順 3、 2の画像 2
    この手順で使用する道具:
    Magnetic Project Mat
    $19.95
    購入する
    • Use a Phillips screwdriver to remove the four 4.5 mm screws securing the rear case.

    • Throughout this repair, keep track of each screw and make sure it goes back exactly where it came from.

    • If you're reassembling with the Samsung Self-Repair kit, be sure to replace the screws with new ones labeled #3313.

  4. Samsung Galaxy Book Pro 360 15" Heat Sink Replacement, Insert an opening pick: 手順 4、 3の画像 1 Samsung Galaxy Book Pro 360 15" Heat Sink Replacement, Insert an opening pick: 手順 4、 3の画像 2 Samsung Galaxy Book Pro 360 15" Heat Sink Replacement, Insert an opening pick: 手順 4、 3の画像 3
    • Apply a suction handle to the middle of the rear case's bottom edge, as close to the edge as possible.

    • Pull up on the handle with a strong, steady force to create a small gap between the rear case and the frame.

    • This may take significant force and multiple tries.

    • Insert an opening pick into the gap you created.

  5. Samsung Galaxy Book Pro 360 15" Heat Sink Replacement, Release the clips: 手順 5、 3の画像 1 Samsung Galaxy Book Pro 360 15" Heat Sink Replacement, Release the clips: 手順 5、 3の画像 2 Samsung Galaxy Book Pro 360 15" Heat Sink Replacement, Release the clips: 手順 5、 3の画像 3
    • Slide the opening pick along the bottom edge to release the clips securing the rear case.

    • Continue sliding the pick along the perimeter of the laptop until all the clips securing the rear case have been released.

  6. Samsung Galaxy Book Pro 360 15" Heat Sink Replacement, Remove the rear case: 手順 6、 3の画像 1 Samsung Galaxy Book Pro 360 15" Heat Sink Replacement, Remove the rear case: 手順 6、 3の画像 2 Samsung Galaxy Book Pro 360 15" Heat Sink Replacement, Remove the rear case: 手順 6、 3の画像 3
    • Lift the rear case up and away from the laptop and remove it.

    • During reassembly, this is a good point to power on your laptop and test all functions before sealing it up. Be sure to power your laptop back down before you continue working.

  7. Samsung Galaxy Book Pro 360 15" Heat Sink Replacement, Remove the battery connector's tape: 手順 7、 2の画像 1 Samsung Galaxy Book Pro 360 15" Heat Sink Replacement, Remove the battery connector's tape: 手順 7、 2の画像 2
    • Use tweezers or your fingers to peel up and remove the tape covering the battery connector.

    • Set the tape aside. You'll reuse it during reassembly.

  8. Samsung Galaxy Book Pro 360 15" Heat Sink Replacement, Disconnect the battery: 手順 8、 2の画像 1 Samsung Galaxy Book Pro 360 15" Heat Sink Replacement, Disconnect the battery: 手順 8、 2の画像 2
    • Insert the flat end of a spudger under the battery cables, as close to the connector as possible.

    • Gently pry up and disconnect the battery connector from its socket.

  9. Samsung Galaxy Book Pro 360 15" Heat Sink Replacement, Unfasten the heat sink: 手順 9、 2の画像 1 Samsung Galaxy Book Pro 360 15" Heat Sink Replacement, Unfasten the heat sink: 手順 9、 2の画像 2
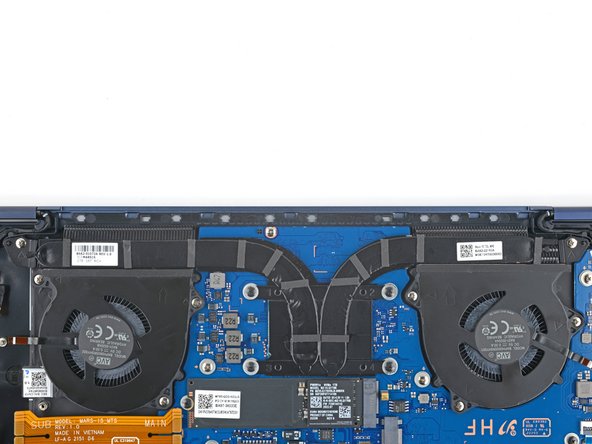
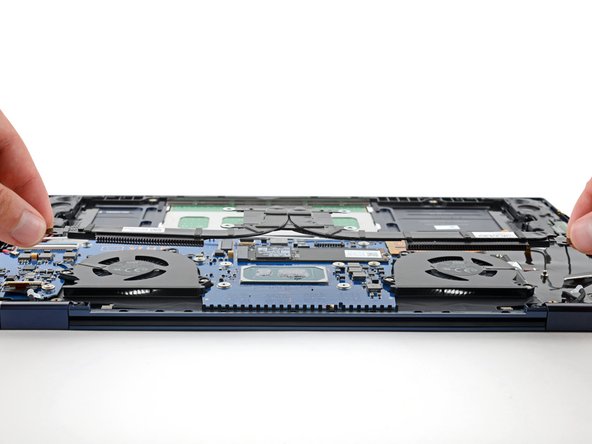
    • Use a Phillips screwdriver to remove the screws securing the heat sink:

    • Two 3.5 mm screws

    • Four 3.1 mm screws

    • During reassembly, make sure to tighten the screws in a cross pattern: top left, bottom right, top right, bottom left.

  10. Samsung Galaxy Book Pro 360 15" Heat Sink Replacement, Remove the heat sink: 手順 10、 3の画像 1 Samsung Galaxy Book Pro 360 15" Heat Sink Replacement, Remove the heat sink: 手順 10、 3の画像 2 Samsung Galaxy Book Pro 360 15" Heat Sink Replacement, Remove the heat sink: 手順 10、 3の画像 3
    • Lift the heat sink straight up and remove it.

    • You may feel a bit of resistance. This is normal, since the heat sink is slightly bonded to the motherboard with thermal paste.

  11. Samsung Galaxy Book Pro 360 15" Heat Sink Replacement, Remove the thermal paste: 手順 11、 2の画像 1 Samsung Galaxy Book Pro 360 15" Heat Sink Replacement, Remove the thermal paste: 手順 11、 2の画像 2
    この手順で使用する道具:
    Microfiber Cleaning Cloths
    $3.99
    購入する
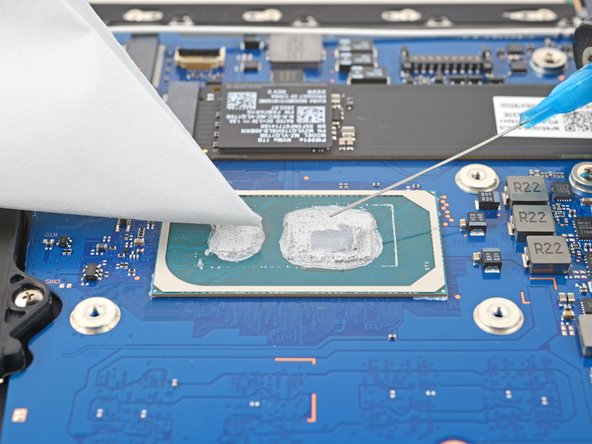
    • Scrape off the old thermal paste from the processor and heat sink with a spudger.

    • Remove any remaining thermal paste with isopropyl alcohol and a coffee filter or microfiber cloth.

    • Apply new thermal paste to the processor before reassembly.

終わりに

To reassemble your device, follow the instructions in reverse order and perform the opposite actions, e.g., "reattach" instead of "removing." Skip steps that use heating and prying, and pay close attention to the 📌 bullets as you work through the steps.

Take your e-waste to an R2 or e-Stewards certified recycler.

Repair didn’t go as planned? Check out our Answers community for troubleshooting help.

作成者

2人の作成者と共同で作成されました。

Spencer Day

メンバー登録日: 09/14/22

53,712 ポイント

394のガイドは作成済み

チーム

iFixit iFixit人のメンバー

Staff

135 メンバー

17,180のガイドは作成済み

0 件のコメント

コメントを追加

統計データ:

過去 24時間: 1

過去 7 日: 5

過去 30 日: 30

今までの合計 484