メインコンテンツにスキップ

Samsung Galaxy A52 Screen Replacement

必要な工具と部品

  1. Samsung Galaxy A52 Screen Replacement, Heat the back cover: 手順 1、 1の画像 1
    • Prepare an iOpener and apply it to the back cover for at least two minutes to loosen the adhesive underneath.

    • A hair dryer, heat gun, or hot plate may also be used, but be careful not to overheat the phone—the display and internal battery are both susceptible to heat damage.

  2. Samsung Galaxy A52 Screen Replacement, Insert an opening pick: 手順 2、 2の画像 1 Samsung Galaxy A52 Screen Replacement, Insert an opening pick: 手順 2、 2の画像 2
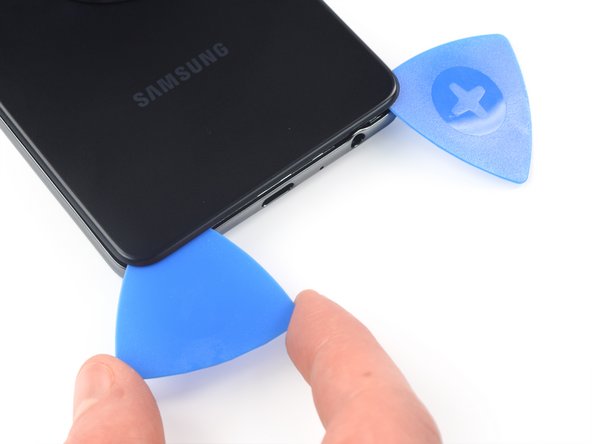
    • Secure a suction handle to the right edge of the back cover, as close to the edge as possible.

    • If the back cover is damaged, the suction handle may not stick. Try lifting it with strong tape, or superglue the suction handle in place and allow it to cure so you can proceed.

    • Lift the back cover with the suction handle to create a small gap between the back cover and the frame.

    • In case you have trouble creating a gap, apply more heat to further soften the adhesive. Follow the iOpener instructions to avoid overheating.

    • Insert an opening pick into the gap you created.

  3. Samsung Galaxy A52 Screen Replacement, Slice the adhesive: 手順 3、 2の画像 1 Samsung Galaxy A52 Screen Replacement, Slice the adhesive: 手順 3、 2の画像 2
    • Slide the opening pick to the top right corner to slice the adhesive.

    • Leave the opening pick in its place to prevent the adhesive from resealing.

  4. Samsung Galaxy A52 Screen Replacement: 手順 4、 3の画像 1 Samsung Galaxy A52 Screen Replacement: 手順 4、 3の画像 2 Samsung Galaxy A52 Screen Replacement: 手順 4、 3の画像 3
    • Insert a second opening pick underneath the top right edge of your phone.

    • Slide the opening pick to the bottom right corner to slice the adhesive.

    • Leave the opening pick in place to prevent the adhesive from resealing.

  5. Samsung Galaxy A52 Screen Replacement: 手順 5、 2の画像 1 Samsung Galaxy A52 Screen Replacement: 手順 5、 2の画像 2
    • If the adhesive becomes hard to cut, it has most likely cooled down. Use your iOpener to reheat it.

    • Insert a third opening pick at the bottom edge of your phone.

    • Slide the opening pick along the bottom edge of your phone to slice the adhesive.

    • Leave the opening pick in the bottom left corner to prevent the adhesive from resealing.

  6. Samsung Galaxy A52 Screen Replacement: 手順 6、 3の画像 1 Samsung Galaxy A52 Screen Replacement: 手順 6、 3の画像 2 Samsung Galaxy A52 Screen Replacement: 手順 6、 3の画像 3
    • Insert a fourth opening pick underneath the bottom left corner of your phone.

    • Slide the opening pick along the left edge to slice the adhesive.

    • Leave the opening pick in the top left corner to prevent the adhesive from resealing.

  7. Samsung Galaxy A52 Screen Replacement: 手順 7、 2の画像 1 Samsung Galaxy A52 Screen Replacement: 手順 7、 2の画像 2
    • Insert a fifth opening pick underneath the top left corner.

    • Slide the opening pick along the top edge of the back cover to slice the remaining adhesive.

  8. Samsung Galaxy A52 Screen Replacement, Remove the back cover: 手順 8、 1の画像 1
    • Remove the back cover.

    • Apply new adhesive where necessary after cleaning the relevant areas with isopropyl alcohol (>90%).

    • Secure the new back cover with pre-cut adhesive or double-sided adhesive tape. After installing the back cover, apply strong, steady pressure to your phone for several minutes to help the adhesive form a good bond—a stack of heavy books works well.

  9. Samsung Galaxy A52 Screen Replacement, Unscrew the motherboard cover: 手順 9、 1の画像 1
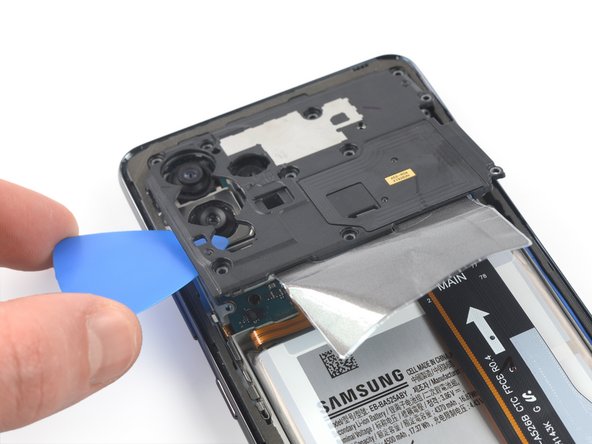
    • Use a Phillips screwdriver to remove the ten 4.4 mm-long screws securing the motherboard cover.

  10. Samsung Galaxy A52 Screen Replacement, Pry up the motherboard cover: 手順 10、 3の画像 1 Samsung Galaxy A52 Screen Replacement, Pry up the motherboard cover: 手順 10、 3の画像 2 Samsung Galaxy A52 Screen Replacement, Pry up the motherboard cover: 手順 10、 3の画像 3
    • Insert an opening pick underneath the left edge of the motherboard cover.

    • Use the opening pick to pry up the motherboard cover.

    • Remove the motherboard cover.

  11. Samsung Galaxy A52 Screen Replacement, Disconnect the battery: 手順 11、 2の画像 1 Samsung Galaxy A52 Screen Replacement, Disconnect the battery: 手順 11、 2の画像 2
    • Use a spudger to disconnect the battery cable by prying the connector straight up from its socket.

  12. Samsung Galaxy A52 Screen Replacement, Disconnect the interconnect cable: 手順 12、 3の画像 1 Samsung Galaxy A52 Screen Replacement, Disconnect the interconnect cable: 手順 12、 3の画像 2 Samsung Galaxy A52 Screen Replacement, Disconnect the interconnect cable: 手順 12、 3の画像 3
    • Use the flat end of a spudger to disconnect the right connector of the interconnect cable from the daugtherboard.

    • Carefully bend the cable to the top of the phone to get access to the screen connector socket.

  13. Samsung Galaxy A52 Screen Replacement, Pry up the screen connector: 手順 13、 3の画像 1 Samsung Galaxy A52 Screen Replacement, Pry up the screen connector: 手順 13、 3の画像 2 Samsung Galaxy A52 Screen Replacement, Pry up the screen connector: 手順 13、 3の画像 3
    • The screen connector is adhered to the daughterboard with mild adhesive.

    • Insert an opening pick underneath the screen connector.

    • Pry up the screen connector.

  14. Samsung Galaxy A52 Screen Replacement, Heat the screen: 手順 14、 1の画像 1
    • Apply a heated iOpener or a heat gun to the screen to loosen the adhesive underneath. Apply the iOpener for at least two minutes.

  15. Samsung Galaxy A52 Screen Replacement, Create a gap: 手順 15、 3の画像 1 Samsung Galaxy A52 Screen Replacement, Create a gap: 手順 15、 3の画像 2 Samsung Galaxy A52 Screen Replacement, Create a gap: 手順 15、 3の画像 3
    • Apply a suction handle to the right edge of the screen.

    • If your screen is badly cracked, covering it with a layer of clear packing tape may allow the suction handle to adhere. Alternatively, very strong tape may be used instead of the suction handle. If all else fails, you can superglue the suction handle to the screen.

    • Lift the screen with the suction handle to create a small gap between the screen and the frame.

    • Insert an opening pick into the gap between the midframe and the screen.

    • Slide the opening pick to the top right corner to slice the adhesive.

    • Leave the opening pick in its place to prevent the adhesive from resealing.

  16. Samsung Galaxy A52 Screen Replacement, Slice the adhesive: 手順 16、 3の画像 1 Samsung Galaxy A52 Screen Replacement, Slice the adhesive: 手順 16、 3の画像 2 Samsung Galaxy A52 Screen Replacement, Slice the adhesive: 手順 16、 3の画像 3
    • Insert a second opening pick underneath the top right corner and slide it along the right edge to the bottom right corner of the screen to cut the adhesive.

    • Leave the opening pick in place to prevent the adhesive from resealing.

  17. Samsung Galaxy A52 Screen Replacement: 手順 17、 3の画像 1 Samsung Galaxy A52 Screen Replacement: 手順 17、 3の画像 2 Samsung Galaxy A52 Screen Replacement: 手順 17、 3の画像 3
    • If the adhesive becomes hard to cut, it has most likely cooled down. Use your iOpener or heat gun to for 1-2 minutes to reheat it.

    • Insert a third opening underneath the bottom right corner.

    • Slide the opening pick to the bottom left corner.

    • Leave the opening pick in its place to prevent the adhesive from resealing.

  18. Samsung Galaxy A52 Screen Replacement: 手順 18、 3の画像 1 Samsung Galaxy A52 Screen Replacement: 手順 18、 3の画像 2 Samsung Galaxy A52 Screen Replacement: 手順 18、 3の画像 3
    • Insert a fourth opening pick underneath the bottom left corner and slide it along the left edge of the phone to the top left corner.

    • Leave the opening pick in its place to prevent the adhesive from resealing.

  19. Samsung Galaxy A52 Screen Replacement: 手順 19、 2の画像 1 Samsung Galaxy A52 Screen Replacement: 手順 19、 2の画像 2
    • Insert a fifth opening pick underneath the top left corner and slide it along the top edge to cut the adhesive.

    • When you slice near the front facing camera, insert only the tip of the opening pick (about 3 to 4 mm) to avoid damaging or smearing the camera.

  20. Samsung Galaxy A52 Screen Replacement, Reheat the screen: 手順 20、 2の画像 1 Samsung Galaxy A52 Screen Replacement, Reheat the screen: 手順 20、 2の画像 2
    • Reapply a heated iOpener to the screen to loosen the adhesive underneath.

    • In preparation for the following step, take note of the rectangular-shaped adhesive placed underneath the screen.

  21. Samsung Galaxy A52 Screen Replacement, Insert the plastic card: 手順 21、 3の画像 1 Samsung Galaxy A52 Screen Replacement, Insert the plastic card: 手順 21、 3の画像 2 Samsung Galaxy A52 Screen Replacement, Insert the plastic card: 手順 21、 3の画像 3
    この手順で使用する道具:
    Plastic Cards
    $2.99
    購入する
    • Insert a plastic card on the right edge into the gap between display and the phone assembly.

    • Press the plastic card in and slide it back and forth until you cut through the entire adhesive.

    • Once you are sure you cut through the adhesive, remove the four opening picks from the corners.

    • Do not remove the screen completely yet. The display cable is still threaded through the frame.

  22. Samsung Galaxy A52 Screen Replacement, Remove the screen: 手順 22、 3の画像 1 Samsung Galaxy A52 Screen Replacement, Remove the screen: 手順 22、 3の画像 2 Samsung Galaxy A52 Screen Replacement, Remove the screen: 手順 22、 3の画像 3
    • Carefully thread the screen cable through the frame.

    • Remove the screen.

    • Apply new adhesive where it's necessary after cleaning the relevant areas with isopropyl alcohol (>90%).

    • During reassembly, follow this guide in case you're using a pre-cut adhesive card.

終わりに

If possible, turn on your device and test your repair before installing new adhesive and resealing.

Compare your new replacement part to the original part—you may need to transfer remaining components or remove adhesive backings from the new part before installing.

To reassemble your device, follow these instructions in reverse order. Apply new adhesive where necessary after cleaning the relevant areas with isopropyl alcohol (>90%).

The best way to secure the new screen is to apply a sheet of custom-cut double-sided tape to the back of the screen.

Take your e-waste to an R2 or e-Stewards certified recycler.

Repair didn’t go as planned? Try some basic troubleshooting, or ask our Answers community for help.

14 の人々がこのガイドを完成させました。

作成者

1人の作成者と共同作成されました。

Adriana Zwink

メンバー登録日: 12/18/19

47,656 ポイント

167のガイドは作成済み

チーム

iFixit iFixit人のメンバー

Staff

136 メンバー

16,573のガイドは作成済み

4 件のコメント

I can't get the screen removed has anyone tips on how to do this

Seppe De Schutter - 返信

My replacement display did not come with adhesive backing. Other than that everything worked out great. Just waiting on some adhesive strips to arrive before I get my Samsung back into service

Shannon Bish - 返信

This guide is good but don't use a card use something thinner like a thin piece of metal. The thing that says "follow this guide for reassembly" shows a screen with a new frame replacement. I pulled the LCD LIKE THIS GUIDE SAID....Now idk what to do so I guess ill wing it...this guide needs work, Adriana Zwink.

Zach Benson - 返信

Is the 4g model use same screen with the 5g model?

Jacki Naly Sam - 返信

コメントを追加

統計データ:

過去 24時間: 59

過去 7 日: 387

過去 30 日: 1,551

今までの合計 39,780