はじめに
このガイドはPlayStation 5の拡張ストレージをインストールしする方法です。
このガイドを始める前に、お使いのM.2ブレードSSDがSonyの仕様と互換性があることを確認してください。画像に写っているSSDブレードは、「PlayStation 5」の拡張ストレージスロットには適しません。
また、PlayStationが最新のシステムソフトウェアに更新されていることを確認してください。
このガイドを始める前に、コンソールから全てのケーブルの接続を外して、電源を切ってください。コンソールを修理する際は、一般的な静電気放電(ESD)の安全手順に従うことを忘れないでください。
必要な工具と部品
ビデオの概要
-
-
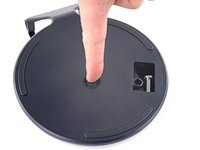
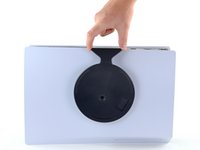
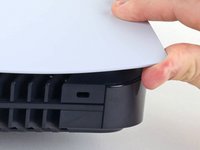
PlayStation 5が縦置きの場合は、スタンドが上を向くように逆さまにしてください。
-
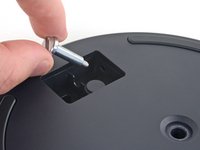
コインもしくはマイナスドライバーを使って、長さ26.5mmのスタンドネジを外します。
-
-
この手順で使用する道具:Tweezers$4.99
-
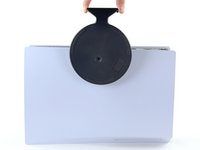
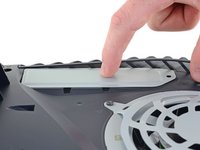
ピンセットもしくは指先を使って、立方形の溝からキャップを取り出します。
-
指先を使って、キャップをネジ穴に押し込みます。
-
-
-
-
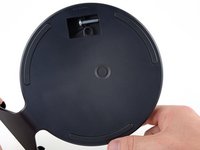
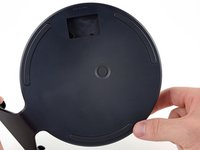
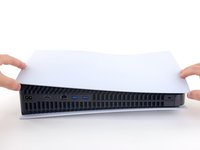
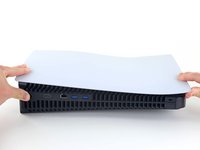
PlayStation 5が横向きに配置されている場合、充電ポートが上向きに配置されるように設置します。
-
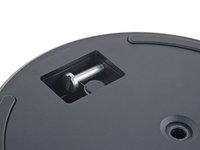
スタンドをまっすぐ持ち上げて、取り出します。
Do you guys sell the stand
-
-
-
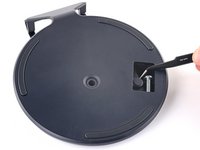
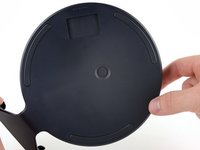
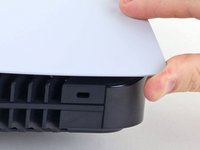
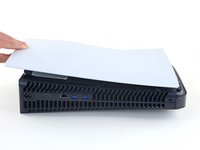
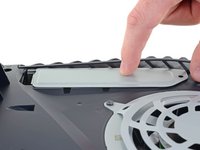
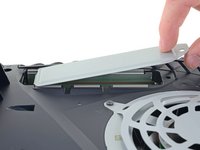
デバイスを裏返して、USBとイーサネットポートが自分から見て左側になるように配置します。
-
フェースプレートの角を持ち上げて、ケースからクリップを外します。
-
-
-
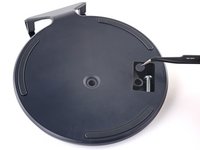
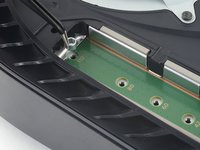
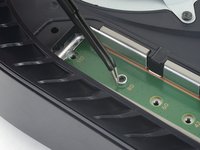
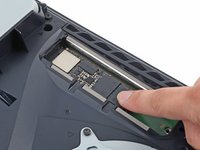
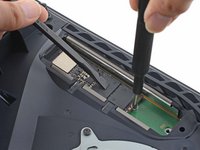
プラスドライバーを使って、SSDを固定している11mmネジを外します。
The screw in my PS5 was too tight and I can no longer get it off. Is there any replacement screws and spacers that anyone can recommend on Amazon UK? Many thanks in advance.
I have the same problem and need a replacement for the screw and spacer.
-
-
この手順で使用する道具:Tweezers$4.99
-
ピンセットを使ってスペーサーを持ち上げ、選んだM.2 SSDの適切なスロットに移動させてください。
What are the physical dimensions of the spacer and the screw (saw the screw is 11mm, wondering the thread size and length of the threaded portion)? Looking to buy replacements online from someone other than from Sony.
I sent my PS5 back for RMA service for visual artifacts, and it was returned to me without the screw and spacer (I had checked before sending it that the hardware was there). Seems silly to have to send the console back for replace these components, but every time I’ve called technical support - I’ve been on over hour-long wait times (haven’t gotten through to an agent yet).
-
-
-
SSDにヒートシンクが必要な場合は、この修理ガイドを参照して、作業を進めてください。
-
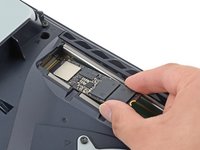
SSDを浅い角度でM.2ソケットに挿入します。
It should be noted here that the Samsung 970 Evo Plus is NOT a PCIE 4.0 SSD (It is NOT fast enough for the PS5)
Yes! Thank you, Rowan. I added a blurb addressing that in the introduction.
-
-
-
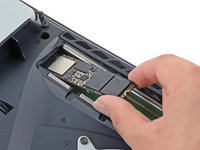
指でSSDを押して、端がスペーサー上に重なるようにします。
-
SSDをスペーサー上に重ねた状態で、SSDネジをスペーサーに通してネジ止めし、SSDの端を固定します。
-
-
-
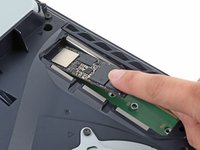
プラスドライバーを使って、SSDの端に11mmネジを留めます。
Forgot one last step:
- Re-attach the SSD slot cover, as per Sony's instructions: https://www.playstation.com/en-us/suppor...
-


このデバイスを再組み立てするには、インストラクションを逆の順番に従って作業を進めてください。
e-wasteを処理する場合は、認可済みリサイクルセンターR2を通じて廃棄してください。
修理が上手く進みませんか?基本的なトラブルシューティングを試してみるか、PlayStation 5のアンサーコミュニティを参照してください。
このデバイスを再組み立てするには、インストラクションを逆の順番に従って作業を進めてください。
e-wasteを処理する場合は、認可済みリサイクルセンターR2を通じて廃棄してください。
修理が上手く進みませんか?基本的なトラブルシューティングを試してみるか、PlayStation 5のアンサーコミュニティを参照してください。
29 の人々がこのガイドを完成させました。
以下の翻訳者の皆さんにお礼を申し上げます:
100%

Midori Doiさんは世界中で修理する私たちを助けてくれています! あなたも貢献してみませんか?
翻訳を始める ›

4 件のコメント
Hello!
The 11m screw that keeps the SSD in place is totally stripped -- any tips for how to remove it? I've tried the rubber band and duct tape over the screw methods, with no luck.
Se puede cortar para extraerlo con un 🪛 plano