はじめに
This is a guide on how to replace the speakers on a Philips DS3000/37 Audio Dock. Because this repair requires soldering, the soldering technique page linked here might be helpful. はんだ付けとはんだ除去の作業ガイド
必要な工具と部品
-
この手順で使用する道具:iFixit Opening Tool$1.99
-
Insert an opening tool between the gray front casing and white back casing.
-
Pry the gray casing away from the white casing.
-
-
この手順で使用する道具:Phillips #1 Screwdriver$5.49
-
Position the white casing so that the black internal housing is facing upwards.
-
Remove the four 8 mm Phillips #1 screws using a Phillips #1 Screwdriver.
-
Remove the six 10 mm Phillips #1 screws using a Phillips #1 Screwdriver.
-
-
この手順で使用する道具:iFixit Opening Tool$1.99
-
Slowly pry around the black internal housing using an opening tool.
-
Pull the loosened black lid away from the back housing.
-
-
この手順で使用する道具:Phillips #1 Screwdriver$5.49
-
Locate the green circuit board on the back of the black lid.
-
Remove the four 8 mm Phillips #1 screws securing the circuit board using a Phillips #1 Screwdriver. The screws are located at the four corners of the board.
-
-
この手順で使用する道具:Phillips #1 Screwdriver$5.49
-
Remove the single 8 mm Phillips #1 screw using a Phillips #1 Screwdriver.
-
Pull the speaker port (the large black tube) off the main black housing.
-
-
この手順で使用する道具:Phillips #1 Screwdriver$5.49
-
Remove the four 7 mm Phillips #1 screws holding the speaker in place using a Phillips #1 Screwdriver.
-
-
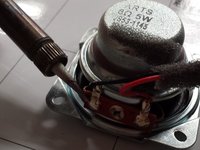
この手順で使用する道具:Soldering Iron 60w Hakko 503F$19.99
-
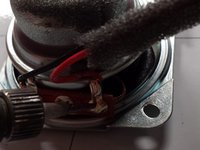
Heat up the solder securing the red wire using a soldering iron.
-
Remove the red wire.
-
Remove the black wire through the same process.
-
-
この手順で使用する道具:Soldering Iron 60w Hakko 503F$19.99
-
Strip a quarter inch of rubber insulation from each of the speaker wires (red and black) using a wire stripper’s 0.80 mm wire gauge.
-


To reassemble your device, follow these instructions in reverse order.
To reassemble your device, follow these instructions in reverse order.
ある他の人がこのガイドを完成しました。
チーム

Michigan Tech, Team 5-7, Lauer Spring 2014 Michigan Tech, Team 5-7, Lauer Spring 2014人のメンバー
MTU-LAUER-S14S5G7
3 メンバー
2のガイドは作成済み
1件のガイドコメント
i hardly difficult to treat 2 defective speakers. i find the flat cable a little loose on the main plate. thank you!!!
araujojraa - 返信