メインコンテンツにスキップ

必要な工具と部品

この分解は修理ガイドでは ありません。 お持ちのNintendo Wiiを修理する際は、iFixitの修理ガイドをご利用ください。

  1. Nintendo Wiiの分解, Nintendo Wiiの分解: 手順 1、 3の画像 1 Nintendo Wiiの分解, Nintendo Wiiの分解: 手順 1、 3の画像 2 Nintendo Wiiの分解, Nintendo Wiiの分解: 手順 1、 3の画像 3
    • Wiiコンソールからすべての外部コードの接続を外します。

    • 作業に使用する全てのツールです。

  2. Nintendo Wiiの分解: 手順 2、 3の画像 1 Nintendo Wiiの分解: 手順 2、 3の画像 2 Nintendo Wiiの分解: 手順 2、 3の画像 3
    • 1本の小さなネジでBIOSメモリバッテリーが固定されています。

    • このネジを外したら、プラスチック製のスロットを引き出します。

  3. Nintendo Wiiの分解: 手順 3、 2の画像 1 Nintendo Wiiの分解: 手順 3、 2の画像 2
    • 黒い3本のねじを取り外します。右側のネジは他のネジと比べて数mm長いです。これらのネジは、Game Cubeポート用の黒いプラスチックカバーを固定しています。

  4. Nintendo Wiiの分解: 手順 4、 2の画像 1 Nintendo Wiiの分解: 手順 4、 2の画像 2
    • 黒いプラスチックプレートを持ち上げて外します。

    • 4本のネジがあります。2本のプラス#00と2本のトライウィングです。

  5. Nintendo Wiiの分解: 手順 5、 3の画像 1 Nintendo Wiiの分解: 手順 5、 3の画像 2 Nintendo Wiiの分解: 手順 5、 3の画像 3
    • ケースからすべてのネジを外します。

    • 一部のねじはゴム足の下にあるか、もしくは小さくて正方形の紙ねじ用カバー(赤い正方形)の下に装着されています。鋭利な金属工具を使用して、ネジカバーの下に差し込みました。 X-actoナイフも使用できます。

    • いくつかのケースのネジには、トライウイングネジ用ドライバーが必要です。

    • 次の手順では、ゴム足とその下にあるネジを外した写真を表示します。フットとネジカバーは粘着式ですが、すべてのフットまたはネジカバーにネジが付いているわけではありません。

  6. この手順は未翻訳です。 翻訳を手伝う。

    Nintendo Wiiの分解: 手順 6、 3の画像 1 Nintendo Wiiの分解: 手順 6、 3の画像 2 Nintendo Wiiの分解: 手順 6、 3の画像 3
    • Remove rubber feet and screws underneath.

  7. この手順は未翻訳です。 翻訳を手伝う。

    Nintendo Wiiの分解: 手順 7、 3の画像 1 Nintendo Wiiの分解: 手順 7、 3の画像 2 Nintendo Wiiの分解: 手順 7、 3の画像 3
    • Careful! If you don't remove the feet and the screws underneath before you try to pull off the front panel, the tab can split!

    • Once all screws are removed, you should be able to pull off the front drive panel.

    • The wire connecting the front panel (green squares in the third image) can be pulled out gently by hand or with the help of a spudger.

  8. この手順は未翻訳です。 翻訳を手伝う。

    Nintendo Wiiの分解: 手順 8、 3の画像 1 Nintendo Wiiの分解: 手順 8、 3の画像 2 Nintendo Wiiの分解: 手順 8、 3の画像 3
    • Now the case can be pulled apart.

  9. この手順は未翻訳です。 翻訳を手伝う。

    Nintendo Wiiの分解: 手順 9、 3の画像 1 Nintendo Wiiの分解: 手順 9、 3の画像 2 Nintendo Wiiの分解: 手順 9、 3の画像 3
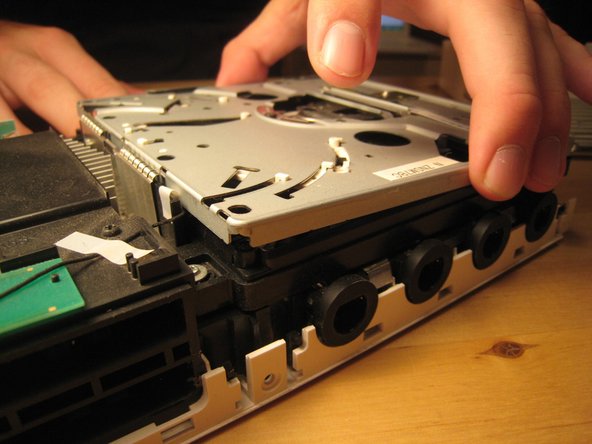
    • We lifted up the cover of the optical drive by removing the six Phillips #00 screws. These are all labeled on the previous image.

    • Because of a secured wire leading to the drive, we reattached the cover to facilitate the remove of the entire drive assembly without harming any of the electronics.

    • There are a ton of parts in the optical drive, but there is nothing very fancy about this drive compared to other slot-loading drives, so I didn't take it apart completely. There are also a ton of gears and levers that I did not want to deal with.

  10. この手順は未翻訳です。 翻訳を手伝う。

    Nintendo Wiiの分解: 手順 10、 3の画像 1 Nintendo Wiiの分解: 手順 10、 3の画像 2 Nintendo Wiiの分解: 手順 10、 3の画像 3
    • The screws holding in the drive were deep within the casing.

    • Once those screws were removed, the entire case could be lifted off.

    • Don't pull too hard! There are two cables attaching the drive to the logic board underneath.

    • This wire slid out from its horizontal slot. Once it was detached, the ribbon cable came out as well.

  11. この手順は未翻訳です。 翻訳を手伝う。

    Nintendo Wiiの分解: 手順 11、 2の画像 1 Nintendo Wiiの分解: 手順 11、 2の画像 2
    • With those wires detached, the optical drive came off completely.

  12. この手順は未翻訳です。 翻訳を手伝う。

    Nintendo Wiiの分解: 手順 12、 2の画像 1 Nintendo Wiiの分解: 手順 12、 2の画像 2
    • We begin trying to get to the logic board by removing this small black plastic rim.

    • Once within the case, all screws are Phillips #00. There are marked on the logic board with arrows, triangles, boxes, and crosses. From what I can tell, an arrow means that it just goes through the logic board cover. A triangle means that it is a longer logic board cover screw. A cross means that it holds on a plastic piece, and a box means that it holds on another EM shield / or heat sink.

  13. この手順は未翻訳です。 翻訳を手伝う。

    Nintendo Wiiの分解: 手順 13、 3の画像 1 Nintendo Wiiの分解: 手順 13、 3の画像 2 Nintendo Wiiの分解: 手順 13、 3の画像 3
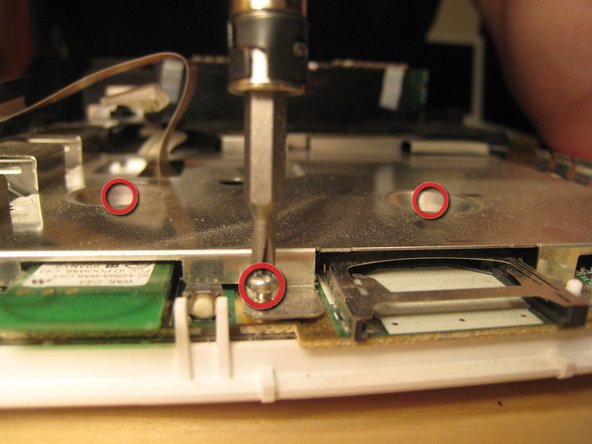
    • Remove all screws from the logic board cover. Two are recessed in the middle; others are along the edge. More will become visible as other parts are removed. It's like a game! You can start with the screws holding in the black plastic pieces, but I started with the most visible and went from there.

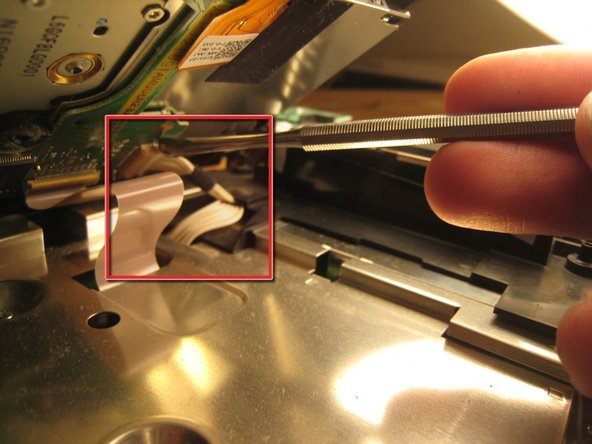
    • There are two wires (shown in the third picture) coming from the logic board and connected to the Wi-Fi antennas. These are delicate. Do not break them.

  14. この手順は未翻訳です。 翻訳を手伝う。

    Nintendo Wiiの分解: 手順 14、 2の画像 1 Nintendo Wiiの分解: 手順 14、 2の画像 2
    • Take out these screws in the black plastic casing.

  15. この手順は未翻訳です。 翻訳を手伝う。

    Nintendo Wiiの分解: 手順 15、 2の画像 1 Nintendo Wiiの分解: 手順 15、 2の画像 2
    • Detach the case fan. There are two screws holding it in.

    • You must detach the power connector for the fan if you want to remove it completely.

  16. この手順は未翻訳です。 翻訳を手伝う。

    Nintendo Wiiの分解: 手順 16、 2の画像 1 Nintendo Wiiの分解: 手順 16、 2の画像 2
    • If your screwdriver is not magnetized, you will need a magnet to get out some of the embedded screws. You can hold a magnet against your screwdriver shaft to temporarily magnetize it.

    • Once all the screws out, you can begin to remove the black casing.

  17. この手順は未翻訳です。 翻訳を手伝う。

    Nintendo Wiiの分解: 手順 17、 3の画像 1 Nintendo Wiiの分解: 手順 17、 3の画像 2 Nintendo Wiiの分解: 手順 17、 3の画像 3
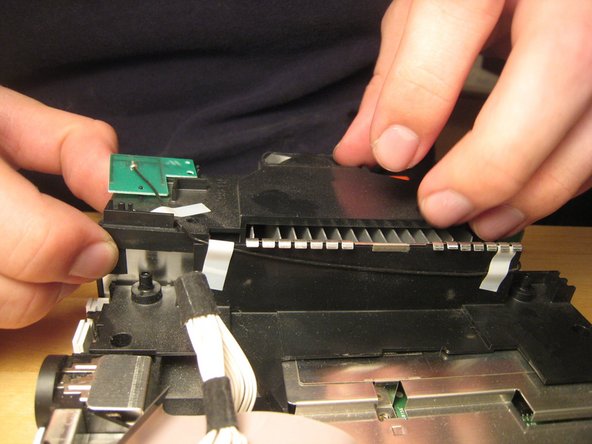
    • With the black plastic covers off, we can see all the screw holes. Most of the screws are out by now, but once the rest of them are out, you can lift off the logic board cover.

    • Note that at least one part is thermal padded to the logic board cover. You might have to replace this thermal pad, but I didn't. I just pushed them back together. Oh well!

    • Remove any remaining screws in the logic board cover.

  18. この手順は未翻訳です。 翻訳を手伝う。

    Nintendo Wiiの分解: 手順 18、 3の画像 1 Nintendo Wiiの分解: 手順 18、 3の画像 2 Nintendo Wiiの分解: 手順 18、 3の画像 3
    • Once all screws are removed, lift off the logic board cover.

  19. この手順は未翻訳です。 翻訳を手伝う。

    Nintendo Wiiの分解: 手順 19、 3の画像 1 Nintendo Wiiの分解: 手順 19、 3の画像 2 Nintendo Wiiの分解: 手順 19、 3の画像 3
    • Look around.

    • This is the thermal padding.

    • We opted not to remove the heat sink from the logic board, but it certainly could be removed.

  20. この手順は未翻訳です。 翻訳を手伝う。

    Nintendo Wiiの分解: 手順 20、 3の画像 1 Nintendo Wiiの分解: 手順 20、 3の画像 2 Nintendo Wiiの分解: 手順 20、 3の画像 3
    • Take some more awesome photos.

  21. この手順は未翻訳です。 翻訳を手伝う。

    Nintendo Wiiの分解: 手順 21、 3の画像 1 Nintendo Wiiの分解: 手順 21、 3の画像 2 Nintendo Wiiの分解: 手順 21、 3の画像 3
    • And take a couple more photos.

  22. この手順は未翻訳です。 翻訳を手伝う。

    Nintendo Wiiの分解: 手順 22、 2の画像 1 Nintendo Wiiの分解: 手順 22、 2の画像 2
    • We stopped there.

    • A muffin tin worked really well to organize all the screws.

    • Putting the Wii back together took only about half an hour, and it works perfectly. We improved Nintendo's design by three or four screws and one square nut, but worsened their design by one piece of duct tape (to hold in the bios battery).

以下の翻訳者の皆さんにお礼を申し上げます:

en jp

29%

これらの翻訳者の方々は世界を修理する私たちのサポートをしてくれています。 あなたも貢献してみませんか?
翻訳を始める ›

27 件のコメント

I was kinda hoping you would take apart the optical drive assembly, you said there is "nothing fancy" about it, but since Nintendo designed this drive to be able to take the "mini" discs from GameCube, they have to work out a mechanism to center the disc before loading it onto the motor, hence "a ton of gear and levers" and that's the exact thing I actually wanted to see, I really wanted to know how they made it work..

:P

Steven - 返信

Maybe I can make a guide for you with it like that. I plan to replace the Hard Drive in my wii so ill make a guide.

ZeldaAwesome -

@zeldaawesome It is not a hard drive, it is NAND. In fact, that’s about as far away from a hard drive as you can get.

Xu Xian -

I have a dud drive, so i might just do this.

Nosh Ware -

Nice guide. I have one suggestion and one comment to add.

Suggestion: a different color circle in the pictures for the Tri tip screws would speed up re-installation.

Comment: the extra square nut holds in the BIOS battery cover which is quite inconvenient to discover as it is the last screw you reinstall.

AD Kocher - 返信

コメントを追加

統計データ:

過去 24時間: 90

過去 7 日: 536

過去 30 日: 2,339

今までの合計 358,434