メインコンテンツにスキップ
リペアコミュニティに参加 - アカウントの作成

Nintendo WaveBird Wireless Controller Buttons Replacement

必要な工具と部品

  1. Nintendo WaveBird Wireless Controller Buttons Replacement, Batteries: 手順 1、 2の画像 1 Nintendo WaveBird Wireless Controller Buttons Replacement, Batteries: 手順 1、 2の画像 2
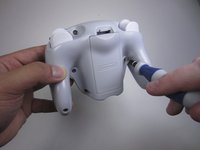
    • Pull down on the battery cover release lever and pull back to remove the cover.

    FixBotに聞いてみる
  2. Nintendo WaveBird Wireless Controller Buttons Replacement: 手順 2、 1の画像 1
    • Remove both batteries from the device.

    FixBotに聞いてみる
  3. Nintendo WaveBird Wireless Controller Buttons Replacement, Front Panel: 手順 3、 2の画像 1 Nintendo WaveBird Wireless Controller Buttons Replacement, Front Panel: 手順 3、 2の画像 2
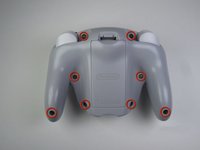
    • Remove the eight 9 mm screws from the back panel using the Tri-point Y1 screwdriver.

    • During reassembly, firmly hold the panels of the controller together while replacing the screws so the panels do not separate.

    FixBotに聞いてみる
  4. Nintendo WaveBird Wireless Controller Buttons Replacement: 手順 4、 2の画像 1 Nintendo WaveBird Wireless Controller Buttons Replacement: 手順 4、 2の画像 2
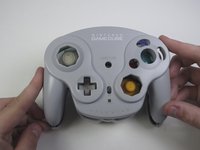
    • Carefully turn over the controller and place it on a flat surface.

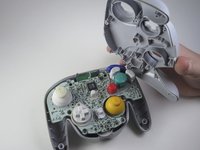
    • Slowly separate the top panel from the bottom panel.

    • The buttons are loose and may fall off the motherboard.

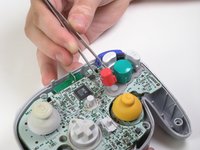
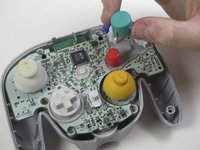
    • Once separated, set aside the top panel.

    • During reassembly, make sure the front panel lines up with the buttons so they slide back into place.

    FixBotに聞いてみる
  5. Nintendo WaveBird Wireless Controller Buttons Replacement, Buttons: 手順 5、 3の画像 1 Nintendo WaveBird Wireless Controller Buttons Replacement, Buttons: 手順 5、 3の画像 2 Nintendo WaveBird Wireless Controller Buttons Replacement, Buttons: 手順 5、 3の画像 3
    この手順で使用する道具:
    Tweezers
    $4.99
    • Use tweezers to remove the buttons.

    • It may be easier to remove the A button off of the pad by lifting it with your fingers.

    • During reassembly, make sure all buttons are in their respective sockets so they match up with the front panel.

    FixBotに聞いてみる
終わりに

To reassemble your device, follow these instructions in reverse order.

6 の人々がこのガイドを完成させました。

作成者

9人の作成者と共同で作成されました。

Douglas

メンバー登録日: 04/15/13

62 ポイント

1ガイドが承認済み

チーム

Cal Poly, Team 10-40, Amido Spring 2013 Cal Poly, Team 10-40, Amido Spring 2013人のメンバー

CPSU-AMIDO-S13S10G40

4 メンバー

37のガイドは作成済み

0件のガイドコメント

コメントを追加

統計データ:

過去 24時間: 2

過去 7 日: 19

過去 30 日: 100

今までの合計 4,184