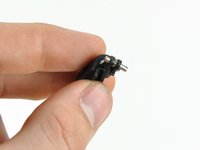
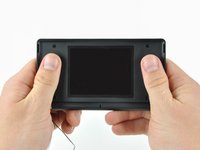
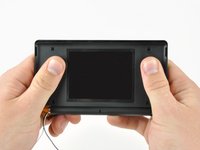
はじめに
お持ちのNintendo DS Liteの上部LCDを交換しましょう。
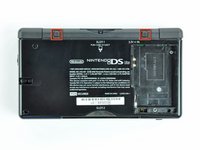
必要な工具と部品
-
-
下部ケースをDS Lite本体に固定している次のネジを外します。
-
4.3mmプラスネジ(ゴールド) 2本
-
3.9mmトライウィングネジ(黒) 1本
-
3.3mmプラスネジ(シルバー) 1本
-
5.5mmトライウィングネジ(シルバー) 3本
I cannot remove the tri-wing screws.
Zach Smith - 返信
Same to me. I tried opening the case by force. Broke several parts of the motherboard…
Leon -
I can't remove the final tri wing screw in the battery section and it looks like I grinded the screw out too much for any screwdriver to work.Is there anything I can do?
From what I know, the only solution is to drill the screw out with a very small-headed drill :/
Polaris -
-
-
-
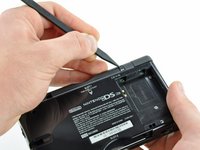
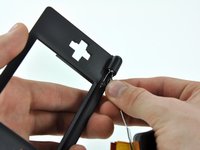
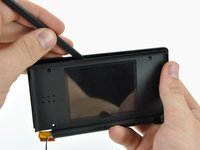
作業を続ける前に、Game Pakからカバーを外します。
-
DS Liteの右上角付近の上下ケースの間にスパッジャーの先端を差し込みます。
-
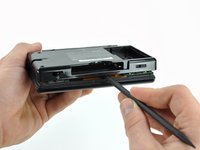
DS Liteの右端に沿って注意深くスパッジャーを動かし、開口のきっかけを作ります。
-
上部ケースから下部ケースの大部分が外れるまで、DS Liteの裏側に沿ってスパッジャーをスライドします。
Don’t forget to remove the GBA cartridge placeholder before removing the backside
You forgot to mention to remove the battery compartment Phillips screw.
-
-
-
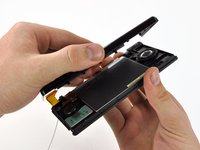
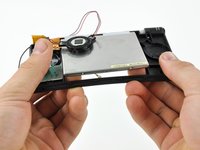
DS Lite本体から下部ケースを持ち上げて外します。
When you reassemble, make sure that you have the volume and power buttons in place, and make sure they are in the right position to line up with the switches on the motherboard. If they are not aligned, you risk snapping off the tiny switches on the motherboard (in which case, you are in for some soldering work).
I should have read the comments first - broke off the power switch because I didn't know about aligning it. No way I can do soldering, guess it's for the dustbin :-(
Emma -
Whoops, remembered the power button but forgot the volume slider.
I'll do it later.
There is no way that the fact you have to line up the volume and power switch toggles upon reassembly is not in this guide. I just carefully followed this guide to replace the shoulder buttons but ruined my DS lite because I didn’t read these (practically hidden comments due to the design of the website) comments and broke the power switch. Thankfully there are 150 million DS I can buy second hand but “repeat the steps backwards” wasn’t sufficient in this repair. And that’s what this website is for.
Watch out with the shoulder buttons. The spring jumped out and I have to clear my entire room to find it ;_;
Joshu-chan - 返信
-
-
-
DS Liteから2つのトリガーボタンを持ち上げます。
Anything after step 7 is unnecessary if having to replace the left or right trigger button(s).
Nate River - 返信
-
-
-
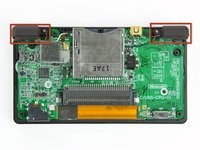
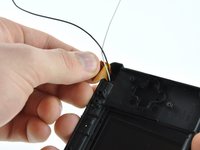
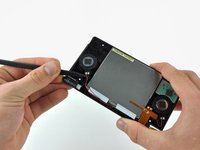
スパッジャーの平面側先端を使って、Wi-Fiボード上のソケットからWi-Fiアンテナコネクタをまっすぐ持ち上げます。
There is absolutely no need to follow steps 8-13 if like me, all you needed to do was access the face buttons for cleaning/replacement. Once you have unscrewed the motherboard from the front casing you can just flip it up, making sure you take the front screen with it. You will have full access to the buttons and all of their contacts. No need to remove the wifi board and microphone cable, etc. Also, replacing the ribbon cables for the screen is especially frustrating. Avoid taking them out at all costs, if you can.
what is the "etc."?
Rita Cao -
For those replacing the bottom screen, you can just skip to step 13 and go from there. No need to remove the wifi board, antenna, etc.
-
-
-
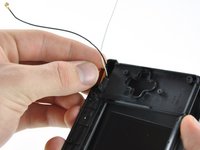
スパッジャーの平面側先端を使って、マザーボード上のソケットからWi-Fiボードコネクタをまっすぐ持ち上げます。
Do you have to put back in the WiFi board? As far as I know it does not require it to play games.
With the Nintendo servers now off, and all the games are playable without WiFi. That being said, I don’t know what is used for local multiplayer.
Polaris -
-
-
-
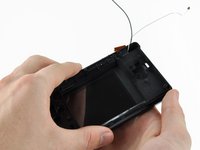
スパッジャーの平面側先端を使って、マザーボードからWi-Fiボードの右端を持ち上げます。
-
DS LiteからWi-Fiボードを取り外します。
I took it apart successfully and I replaced the screen but I've put it back together and it the green light turns on for about 2seconds quiet dim, brighter for about 1 and then it turns off... I then took the wifi board out, and it turned on! What have I done to it and why doesn't it work with it and only without?!
Brianlewis - 返信
Exact same symptoms for me : on boot up, green light would stay on for 1 second, then shut down. Without wifi, green light would stay on, but blank screens. In fact, it's because on boot up, DS will check if wifi is present, and stop if there is an error. Then, it checks for upper screen, and after that, for lower screen. If one of these is not responding, DS will turn off. I check my cables (upper screen) and DS started again with no problem.
-
-
-
-
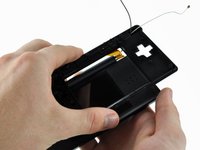
スパッジャーを使って、マザーボード上のチップ間の溝を軽く押さえながら、コネクタが上向きになるようにアンテナケーブルの位置を変え、マザーボードから離します。
-
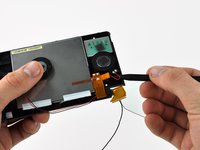
ケーブルコネクタがDS Liteのゲームカートリッジリーダーの下に来るまで、アンテナケーブルをゆっくりと注意深く引っ張ります。
-
続けて、ケーブルコネクタが右側のゲームカートリッジリーダーの下からケーブルコネクタが外れるまで、ケーブルを引っ張ります。
I can't for the life of me get this freaking antenna cable back when putting everything together, it keeps getting stuck under slot-1 ... how do you aid it through? I'm just pushing it through using the cable itself, but the connector gets stuck somewhere close to the other side and the cable pushing won't do anything but flex the cable.
I had some .015" solder that I fed through the other side and wrapped around the antenna cable to help guide it when I was feeding it back through.
Fantastic guide, although you !@#$%^&* :P forgot to add that you need a Soldiering Kit at the LAST step, thanks..
Nate River - 返信
I did mine without have to soldier, but then again I was cannibalizing the upper screen from one DS to another.
Tried to add this but unsure if it will stay but here is my advice for the cable feeding.
When reassembling and attempting to feed the antenna cable back under the DS Lite game cartridge reader the cable will likely kink and be difficult to feed through.
Therefore tie a piece of white cotton (or another visible colour) thread tightly around the cable, just below the connector. Then feed the cotton under the DS Lite game cartridge reader and through to the other side. Then gently guide the connector back through by pulling on the white thread and moving either up or down to clear obstacles.
Attach a thread to the antenna wire BEFORE removing the antenna. Pull the antenna throught with the thread attached. After you get the antenna out, cut the thread from the antenna but LEAVE THE THREAD threaded thru the cartridge slot. Tape it to the cartridge slot so it doesn't fall out while you're working on the DS. After repairing, re-tie the thread to the antenna and use the thread to pull the antenna back thru to where it belongs. PULL GENTLY!
it was ez until i tried to put it back >:(
Light the space behind the card slot with a light source, cut a plastic straw the necessary size and feed it through the space where there are no components, feed the antenna cable through the plastic straw and then pull the straw on the other side while holding the cable to remove it. Worked fine for me and I keep the cut straw in my DS maintenance kit so I can quickly open it to clean the buttons contact when needed for the disassembly.
I just decided to cut it and replace it with a wifi antenna connector instead.
-
-
-
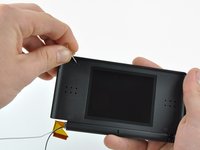
指の爪やスパッジャーの先端を使って、タッチスクリーンリボンケーブルの固定フラップを注意深く跳ね上げます。
-
スパッジャーの先端を使って、ソケットからタッチスクリーンリボンケーブルをまっすぐ引き抜きます。
The little black ribbon clip broke off and now I can't put it back on. What do I do now???
Peter Diaz - 返信
Same Problem here :( touc dosnt work anymore
Mine did the same thing, will it still work?
If I take it to a shop could they fix it????
There should be an added caution remark when removing the ribbon cable from the connector. If the black clip breaks, you're screwed. I have found the connector on another website for about $6. Then the issue is having the right tools to remove the broken connector and soldering on the new one.
How in the world do you get the ribbion cable back in there?
This requires care to make sure the black clip does not break off. If it does, replacing that connector will be a microsoldering job likely to exceed the value of the board.
It is also worth noting, that you can simply leave this connector as you found it and not remove the ribbon cable, and still complete this repair. Unless you intend to remove the lower LCD from the mainboard or if it is interfering with the microphone cable (white) routing, it will not be an issue.
Leaving this connected will also help keep the lower LCD from flopping around when you remove the mainboard.
This is tricky! I used my finger nail to open it since I was scared to put too much strenght with a spudger. Be really careful when moving the retaining flap. Just open it 90°, no more or you’ll breack it!
Putting back the ribbon of the (new) touch screen was the hardest part. The ribbon was bent to the side and my fingers too big to grab it withouth bumping on the mother board.
I finally found that holding the mobo with my left hand, looking at the ribbon from behind and pushing it with my index was more convenient, although my index was bumping on the retaining flap, thus partially closing it. After many trials and sweat, I finally inserted it and closed the flap! But the ribbon detached from te slot! :’( I put it back easily this time (after reopening the flap of course). And closed the retaining flap, pushing a bit harder this time, making sure I could feel a “click” confirming the proper closing. Don’t put too much strenght on it though!
The slot to insert it is so tiny! Use a magnifying glass if you can.
The microscopic flap came off in this step and I think you can’t ever put it back on, given you have no space to work with. This should really be explained better.
Has anyone had any luck replacing the retaining flap if it just falls out? Mines not broken, I just can't figure out how to get it back in.
You don’t need to remove this flap if you’re not removing the touchscreen (and even so, you can do it later). The touch and LCD screen can come out with the motherboard, so this cable doesn’t interfere with the disassembly.
The cable won’t go back in, and got damaged whilst I attempted to put it in.
This step didn't warn that the black retaining flap is easily breakable. Not only can it come off easily but hinges can break off. Unknown if kapton tape will be able to hold this in or if this part can be ordered third party. Very stupid explanation of the step. Broke my digitizer permanently while only trying to make a minor repair. Looks like this is a common complaint and the guide should be immediately taken down, edited, and then only put back up when it is safe.
Guide should have to explain how to mend or replace this part if it breaks since it's such a common problem.
Try snapping it back into place, making sure you do not break it.
-
-
-
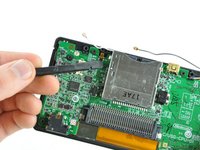
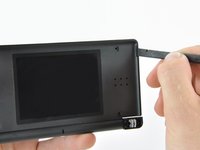
マザーボードを上部ケースに固定している3.4mmプラスネジを2本外します。
This has changed since, the right hand screw has been replaced by a screw under the battery, I didn’t have this screw in mine
-
-
-
指の爪やスパッジャーの平面側先端を使って、上部LCDリボンケーブルの固定フラップを注意深く跳ね上げます。
-
DS Liteからマザーボードを引き離し、マザーボード上のソケットから上部LCDリボンケーブルの接続を外します。
-
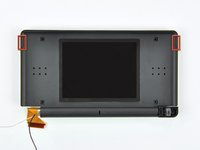
DS Liteからマザーボードを取り外します。
-
これで、同じ方法で、下部LCDスクリーン用の固定フラップを解放して、マザーボードから下部LCDスクリーンを取り外せます。
this part on putting it back together is a straight nightmare, anyone got some tips on doing this quickly? i'm just getting a flickering bottom screen which is supposed to be an upper display connection problem, not sure if i'm getting the ribbon cable in deep enough. or an up close view of it in there so i know im not forcing it
I don't think there's a quick way for this, but I can tell you that the piece at the end is supposed to fit in all the way, and stop when you get to the corners of the bottom of it. A better way to explain this: put it in until you no longer see the gold part of it, or until it reaches the orange part of it.
After my first reassembly, the top screen was not working (bottom screen briefly flashind and DS turning off imediatly after swithcing on).
I found out it is the top screen that is not connected correctly.
You have to insert the ribbon until the part which is wider than the rest of the ribbon, almost bumps on the white connector.
This was too difficult with just my (too big) fingers. I used the spudger to push the ribbon from behind and maintain it when closing the retaining flap. This is kinda tricky, but it worked!
Guilhem's point is crucial - the ribbon connectors wider wings must be only a miniscule fraction away from the connector, or you'll get the flash screen of death. This is well worth checking especially as the later stages of manipulating the ribbon through the silver ring (if doing a full shell replacement) can make you feel like you're damaging the ribbon cable. Also check to make sure the black clip is fully closed, otherwise even the smallest movement during reassembly will pull it back out.
-
-
-
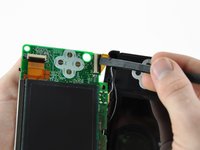
上部ケースをディスプレイアセンブリに固定している8.3mmプラスネジを2本外します。
-
-
-
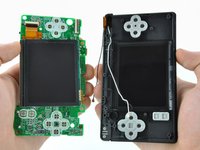
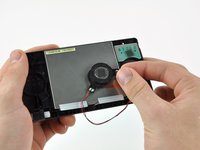
両手を使って、リアベゼルを慎重に上部に向けてスライドします。
I wish I would have read this guide instead of watching videos that did not show this part. Because of this the rear bezel's tabs got deformed and now i can't put it back on. Trying to remove those tabs and just screw it in once its in place
-
-
-
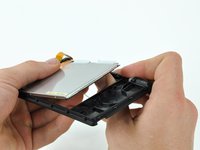
作業は右側上部端から初めて、両手でフロントディスプレイベゼルからLCDをゆっくりと外します。
-
LCDの上部から左側端に沿って押し出します。
-
最後に、LCDをフロントディスプレイベゼル全体から押し出します。
Any recommendations for where to get a good functioning LCD replacement?
HandheldLegend has a good one
Nicholas -
-
-
-
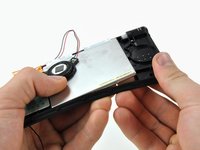
はんだごてで半田接合部を熱して、上部LCDからスピーカーの半田を除去しながら、リボンケーブルからスピーカーワイヤーを引き離します。
-
上部LCDが残ります。
You may NOT need to desoldier the speakers.
I was cannibalizing the upper screen from my daughter's DS to my son's DS and was able to carefully roll the ribbon up and slide it through the hole. Was only going to replace the screen, but ended up replacing both the screen and the speakers.
A note to anyone replacing the LCD screen: Your replacement screen will have one or two overlays on top. If it has a thin clear plastic overlay you can remove it from the screen; this overlay is for protection only. There is always a thicker, see-through black plastic overlay (you won't be able to tell it's black unless you remove it). DO NOT REMOVE THE SECOND OVERLAY. You will know if you're removing the wrong overlay because this overlay is rather difficult to remove. If you make the mistake of removing it, stick it back on using a credit card to remove air bubbles. It's also possible to use the overlay off of the original screen, but the adhesive on that overlay is even stronger, making removal tricky.
-
-
-
リボンの先端をディスプレイのヒンジに通してカールさせるために、小さなフックを使用します。このようなハンダの切れ端(画像)が効果的です。
-


デバイスを再度組み立てるには、この説明書の逆の順番で組み立ててください。
デバイスを再度組み立てるには、この説明書の逆の順番で組み立ててください。
104 の人々がこのガイドを完成させました。
以下の翻訳者の皆さんにお礼を申し上げます:
100%

これらの翻訳者の方々は世界を修理する私たちのサポートをしてくれています。 あなたも貢献してみませんか?
翻訳を始める ›

10 件のコメント
This is a very concise and accurate guide! I found this repair to be very difficult, especially so due to the aftermarket Chinese screen I installed that required me to solder on the speaker wires. Ugh! If you can, get a replacement with the speakers attached. I also can't stress enough how annoying threading the ribbon cable through the case is. DS is a great platform, but product design left a lot to be desired.
This repair is somewhat difficult. There are a couple of points to be careful about:
1) The display ribbon cable is fairly easy to remove from the hinge, but somewhat difficult to route through it once the new display is in place. It is easier to do if the antenna/microphone wires are out of the way.
2) The ribbon connector is fairly short and difficult to manipulate so that it mates securely to the socket on the motherboard. If it isn't seated properly the DS will not boot. So test it first (by temporarily pressing the battery against the battery connectors and turning power on) before re-assembly.
Make a note of where the Wi-Fi antenna connector, microphone, and speaker wires are positioned in the DS Lite housing. If they are not placed back in the correct location, the case will not close. If you force it closed you will squash the wiring which could lead to problems later on. Also be sure the speakers are placed back in correctly. If you can see metal through the speaker holes in the case then you've done it wrong (flip the speakers over). Lastly, when trying to maneuver the antenna connector back under the game cartridge reader, make sure the connector head is face down so that it does not get stuck (happened to me). If you look at the picture in Step 7, it's a straight shot from right to left when running the wire through. Use a paperclip and a flashlight to help you if you get stuck and most importantly, do not try to yank it free!
Funny how these things give you instructions for taking things apart , but not for installing and putting back together. I found routing the screen ribbon through the hinge to be especially difficult and I think I might have damaged it in the process. I wish i would have known that its best to make sure this is done before trying lock the screen case back up.
This was a very difficult but fun and satisfying repair to do. The hardest part was definitely putting the display ribbon cable through the small tube to the bottom of the unit. One thing that could be done to make this easier, I would suggest having a small set of tweezers to help assist with pulling the cable through . One thing you can also do is to wrap the ribbon wire around the microphone and antenna wires a few time, then guide the orange ribbon cable about halfway out of the tube, and then attach the bottom part to it, and then pull the rest of the cable through with the tweezers. This helps a lot with preventing stress on those small, delicate cables, and can make life much easier.
For everyone having issues routing the ribbon cable through the tube, I found a solution that was very easy. I slipped some skinny tweezers through the tube and grabbed the edge of the cable. Then I rotated it like you would with spaghetti around a fork so that it became a small tube itself and pulled it through. I had difficulty with the tiny touchscreen cable though.
Does anyone know where to buy the ribbon connectors ??
But how do you remove the rest of the ribbon from the screen after removing the speakers? It doesn’t just pull out and I don’t see how the new ribbon could be added unless the metal plate comes off the back of the screen.
Bom dia. Troquei a Tela com a de outro DS LITE. Só que depois de montada, a Tela superior ficou esbranquiçada. Não sei porque, só troquei as Telas. Será que estragou o Flat Cable???
A Phillips #000 (PH000) seems to give a more secure fit (no slipping) than the stated Phillips #00.
Ritchie - 返信
This will be good for mods
Matthew Bevins - 返信
I'm having a problem getting the screw to unscrew. I have the right Phillips ( it was included with all the stuff I got this) Any tips. it doesn't look like the screw is spinning but i haven't played my Nintendo DS Lite for 3 years.
whittlegirls - 返信
bonjour j’ai une petite question pour vous fais trés longtemps que j’ai pas utiliser mon nintendo ds lite et quand je le branche il allume 1 fois orange après il s’enteint même s’il est brancher ça veux tu dire qu’il faut que je change de batterie ? Merci
Marie-Julie Richer - 返信
Soit un changement de batterie, soit la carte-mère a peut-être un court-circuit :/
Polaris -