メインコンテンツにスキップ

Motorola Moto E4 Plus LCD and Digitizer Replacement

必要な工具と部品

  1. Motorola Moto E4 Plus LCD and Digitizer Replacement, Remove the back cover: 手順 1、 3の画像 1 Motorola Moto E4 Plus LCD and Digitizer Replacement, Remove the back cover: 手順 1、 3の画像 2 Motorola Moto E4 Plus LCD and Digitizer Replacement, Remove the back cover: 手順 1、 3の画像 3
    • Power off your phone before beginning disassembly.

    • Insert the edge of the spudger into the notch on the bottom right corner of the phone.

    • Twist the spudger to start releasing the back cover from the phone.

    • Slide the spudger along the bottom edge to separate the back cover from the phone.

  2. Motorola Moto E4 Plus LCD and Digitizer Replacement: 手順 2、 2の画像 1 Motorola Moto E4 Plus LCD and Digitizer Replacement: 手順 2、 2の画像 2
    • Lift the phone unit out of the back cover.

  3. Motorola Moto E4 Plus LCD and Digitizer Replacement, Remove the midframe screws: 手順 3、 1の画像 1
    • Remove the nineteen 3.2 mm long T3 screws securing the plastic midframe.

  4. Motorola Moto E4 Plus LCD and Digitizer Replacement, Release the midframe clips: 手順 4、 2の画像 1 Motorola Moto E4 Plus LCD and Digitizer Replacement, Release the midframe clips: 手順 4、 2の画像 2
    • The plastic midframe is still held in place with clips.

    • Insert the flat end of a spudger into the midframe seam at the bottom left corner of the phone (near the microphone hole).

    • Twist the spudger to release the plastic clip.

    • Repeat the process for the clip near the top right corner of the phone.

  5. Motorola Moto E4 Plus LCD and Digitizer Replacement, Remove the midframe: 手順 5、 2の画像 1 Motorola Moto E4 Plus LCD and Digitizer Replacement, Remove the midframe: 手順 5、 2の画像 2
    • Lift the bottom edge of the plastic midframe upwards until the clips along the top edge release.

    • Remove the plastic midframe.

    • To reattach the plastic midframe, line up the midframe to the phone and squeeze along the edges to engage the clips.

  6. Motorola Moto E4 Plus LCD and Digitizer Replacement, Disconnect the battery: 手順 6、 2の画像 1 Motorola Moto E4 Plus LCD and Digitizer Replacement, Disconnect the battery: 手順 6、 2の画像 2
    • Use the point of a spudger to pry up and disconnect the battery connector from its motherboard socket.

  7. Motorola Moto E4 Plus LCD and Digitizer Replacement, Disconnect the display cable: 手順 7、 2の画像 1 Motorola Moto E4 Plus LCD and Digitizer Replacement, Disconnect the display cable: 手順 7、 2の画像 2
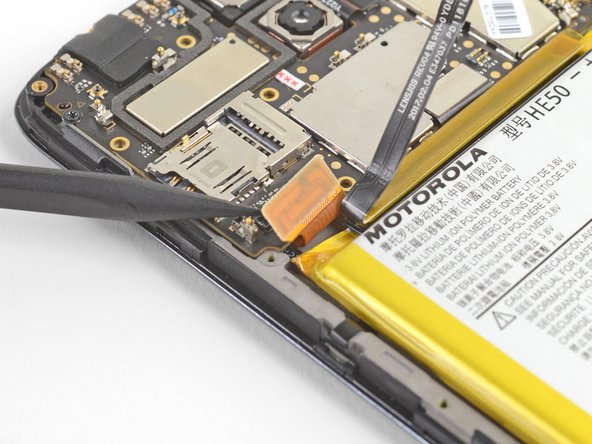
    • Use the point of a spudger to pry up and disconnect the display cable from its motherboard socket, near the bottom left corner of the motherboard.

  8. Motorola Moto E4 Plus LCD and Digitizer Replacement, Disconnect the antenna cable: 手順 8、 2の画像 1 Motorola Moto E4 Plus LCD and Digitizer Replacement, Disconnect the antenna cable: 手順 8、 2の画像 2
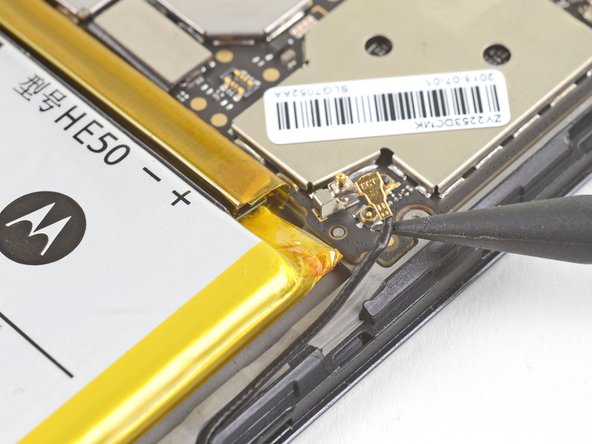
    • Use the point of a spudger to pry up and disconnect the antenna cable from its motherboard socket.

  9. Motorola Moto E4 Plus LCD and Digitizer Replacement, Disconnect the interconnect cable: 手順 9、 2の画像 1 Motorola Moto E4 Plus LCD and Digitizer Replacement, Disconnect the interconnect cable: 手順 9、 2の画像 2
    • Use the point of a spudger to pry up and disconnect the interconnect cable from its motherboard socket.

  10. Motorola Moto E4 Plus LCD and Digitizer Replacement, Remove the motherboard screws: 手順 10、 1の画像 1
    • Remove the two black 3.2 mm long T3 screws securing the motherboard.

  11. Motorola Moto E4 Plus LCD and Digitizer Replacement, Remove the motherboard: 手順 11、 2の画像 1 Motorola Moto E4 Plus LCD and Digitizer Replacement, Remove the motherboard: 手順 11、 2の画像 2
    • Grasp the motherboard by the top corners and lift it out of the phone.

    • Remove the motherboard.

  12. Motorola Moto E4 Plus LCD and Digitizer Replacement, Disconnect the antenna: 手順 12、 2の画像 1 Motorola Moto E4 Plus LCD and Digitizer Replacement, Disconnect the antenna: 手順 12、 2の画像 2
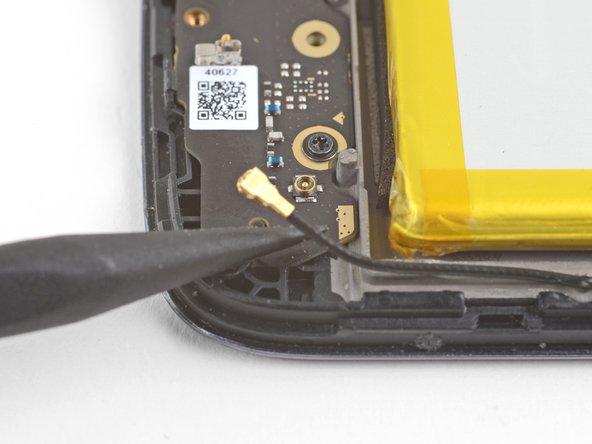
    • Use the point of a spudger to pry up and disconnect the antenna cable from its daughterboard socket.

  13. Motorola Moto E4 Plus LCD and Digitizer Replacement, Disconnect the daughterboard connectors: 手順 13、 3の画像 1 Motorola Moto E4 Plus LCD and Digitizer Replacement, Disconnect the daughterboard connectors: 手順 13、 3の画像 2 Motorola Moto E4 Plus LCD and Digitizer Replacement, Disconnect the daughterboard connectors: 手順 13、 3の画像 3
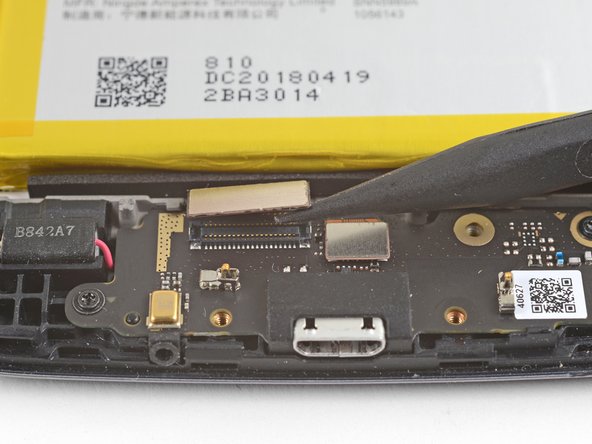
    • Use the point of a spudger to pry up and disconnect the interconnect cable from its daughterboard socket.

    • Pry up and disconnect the fingerprint sensor cable next to it from the daughterboard.

  14. Motorola Moto E4 Plus LCD and Digitizer Replacement, Remove the daughterboard screws: 手順 14、 1の画像 1
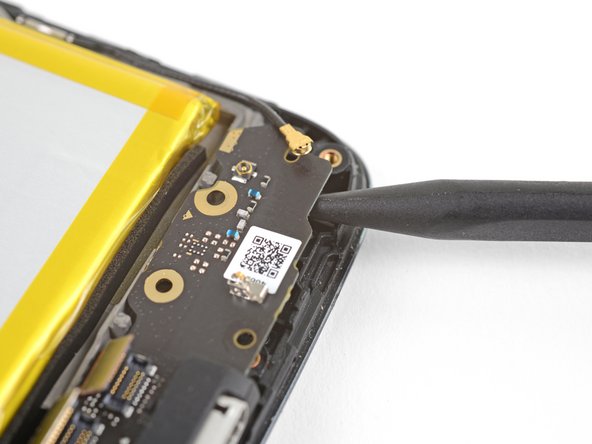
    • Remove the two 3.2 mm long T3 screws securing the daughterboard.

  15. Motorola Moto E4 Plus LCD and Digitizer Replacement, Loosen the daughterboard: 手順 15、 2の画像 1 Motorola Moto E4 Plus LCD and Digitizer Replacement, Loosen the daughterboard: 手順 15、 2の画像 2
    • Insert the point of a spudger under the bottom right corner of the daughterboard and pry up to loosen the daughterboard.

  16. Motorola Moto E4 Plus LCD and Digitizer Replacement, Loosen the vibration motor: 手順 16、 2の画像 1 Motorola Moto E4 Plus LCD and Digitizer Replacement, Loosen the vibration motor: 手順 16、 2の画像 2
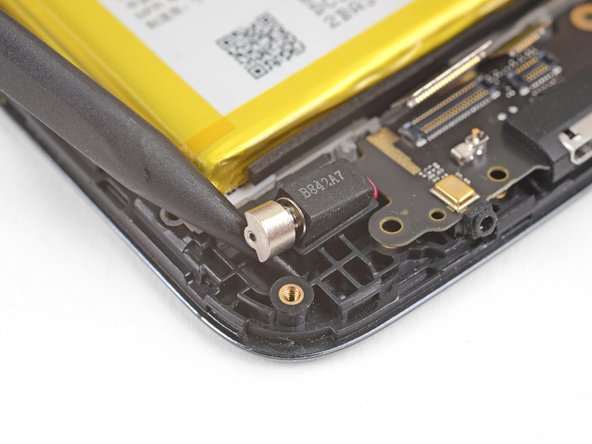
    • Insert the point of a spudger underneath the vibration motor and pry upwards to loosen it.

  17. Motorola Moto E4 Plus LCD and Digitizer Replacement, Remove the daughterboard: 手順 17、 2の画像 1 Motorola Moto E4 Plus LCD and Digitizer Replacement, Remove the daughterboard: 手順 17、 2の画像 2
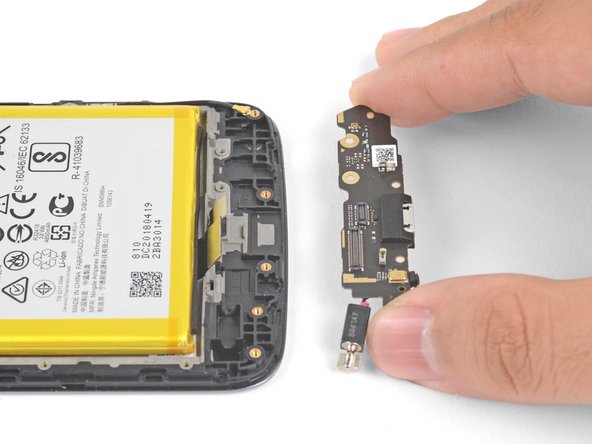
    • Grasp the daughterboard by the edges and lift it out of its recess.

    • Remove the daughterboard. The vibration motor will be attached to it.

  18. Motorola Moto E4 Plus LCD and Digitizer Replacement, Disconnect the display ground: 手順 18、 2の画像 1 Motorola Moto E4 Plus LCD and Digitizer Replacement, Disconnect the display ground: 手順 18、 2の画像 2
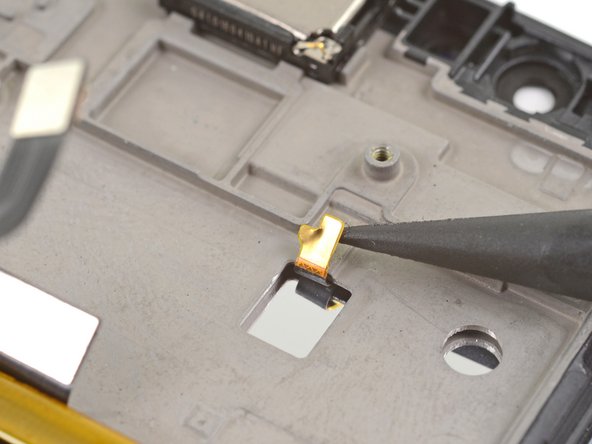
    • Use the point of a spudger to pry up and disconnect the display grounding cable from the frame.

    • When you install the replacement cable, be sure that it is properly positioned with the gold side facing up.

  19. Motorola Moto E4 Plus LCD and Digitizer Replacement, Heat the display adhesive: 手順 19、 1の画像 1
    • Prepare an iOpener and apply it to the display for at least two minutes to loosen the adhesive underneath.

  20. Motorola Moto E4 Plus LCD and Digitizer Replacement, Loosen the display: 手順 20、 3の画像 1 Motorola Moto E4 Plus LCD and Digitizer Replacement, Loosen the display: 手順 20、 3の画像 2 Motorola Moto E4 Plus LCD and Digitizer Replacement, Loosen the display: 手順 20、 3の画像 3
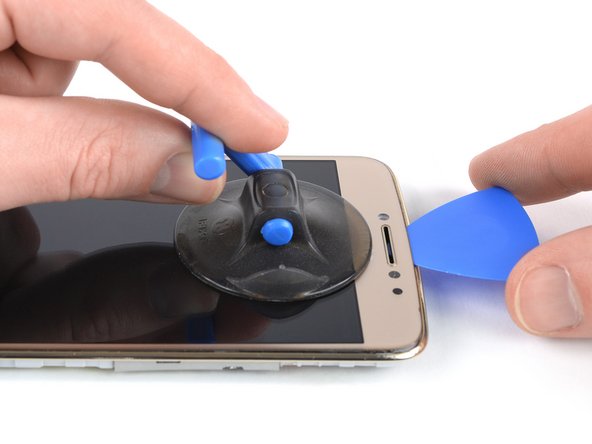
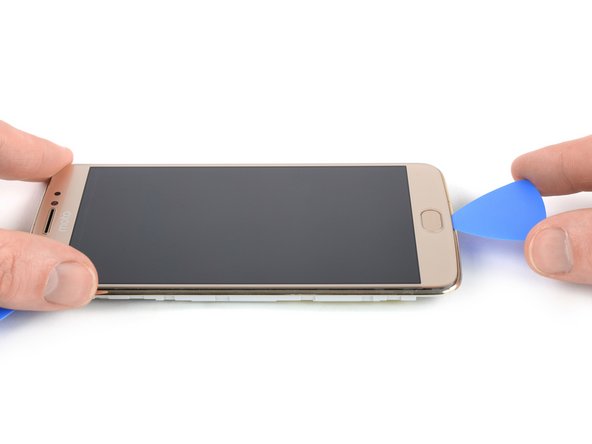
    • Once the screen is warm to the touch, apply a suction cup near the top edge of the phone below the earpiece speaker.

    • If the phone's screen is cracked, the suction cup may not stick. Try lifting it with strong tape, or superglue the suction cup in place and allow it to cure so you can proceed.

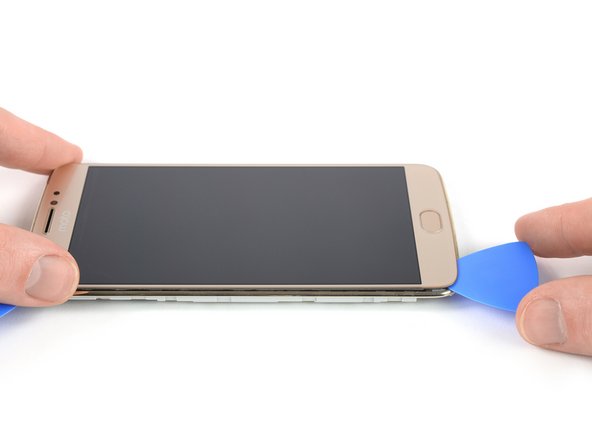
    • Pull up the suction cup, and insert the tip of an opening pick under the display where the earpiece speaker is located.

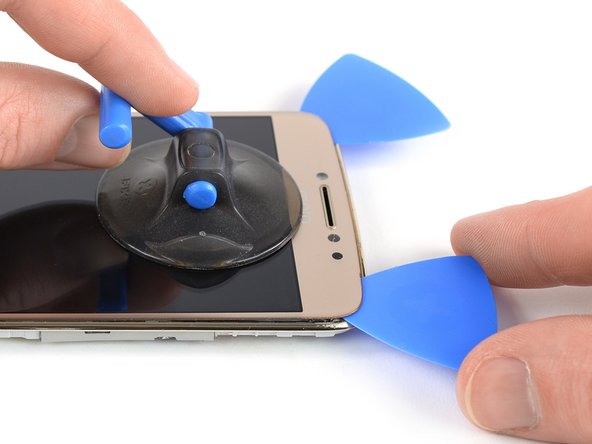
    • Slide the opening pick to the top left corner of the phone to cut the adhesive.

  21. Motorola Moto E4 Plus LCD and Digitizer Replacement: 手順 21、 2の画像 1 Motorola Moto E4 Plus LCD and Digitizer Replacement: 手順 21、 2の画像 2
    • Insert a second opening pick and slide it to the top right corner of the phone.

  22. Motorola Moto E4 Plus LCD and Digitizer Replacement: 手順 22、 3の画像 1 Motorola Moto E4 Plus LCD and Digitizer Replacement: 手順 22、 3の画像 2 Motorola Moto E4 Plus LCD and Digitizer Replacement: 手順 22、 3の画像 3
    • If cutting becomes too difficult, reheat and reapply the iOpener to the screen.

    • Slide the opening pick from the top right corner down the right edge of the phone and cut the adhesive with it.

    • While cutting, make sure the pick slides under the display panel and not just between the display and the front glass.

    • Continue sliding the opening pick around the bottom right corner of the phone.

  23. Motorola Moto E4 Plus LCD and Digitizer Replacement: 手順 23、 3の画像 1 Motorola Moto E4 Plus LCD and Digitizer Replacement: 手順 23、 3の画像 2 Motorola Moto E4 Plus LCD and Digitizer Replacement: 手順 23、 3の画像 3
    • Slide the opening pick along the bottom edge of the phone and cut the adhesive.

    • Be careful around the home button, inserting only the tip of the opening pick to prevent damaging the button.

  24. Motorola Moto E4 Plus LCD and Digitizer Replacement: 手順 24、 2の画像 1 Motorola Moto E4 Plus LCD and Digitizer Replacement: 手順 24、 2の画像 2
    • Repeat the previous heating and cutting procedure on the left edge of the phone to cut the remaining adhesive.

    • Don't completely remove the display yet! The fingerprint and display flex cables are still threaded through the midframe.

  25. Motorola Moto E4 Plus LCD and Digitizer Replacement, Remove the LCD and digitizer: 手順 25、 3の画像 1 Motorola Moto E4 Plus LCD and Digitizer Replacement, Remove the LCD and digitizer: 手順 25、 3の画像 2 Motorola Moto E4 Plus LCD and Digitizer Replacement, Remove the LCD and digitizer: 手順 25、 3の画像 3
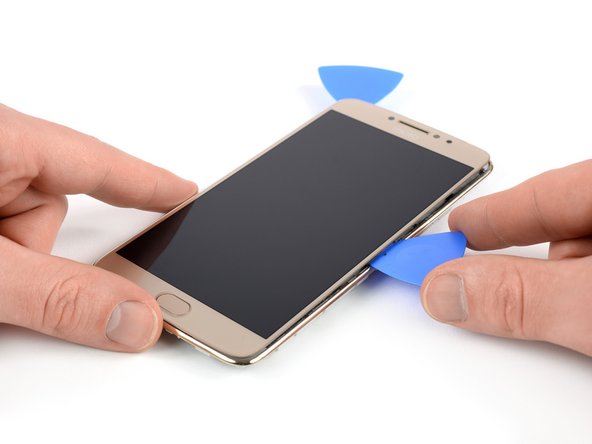
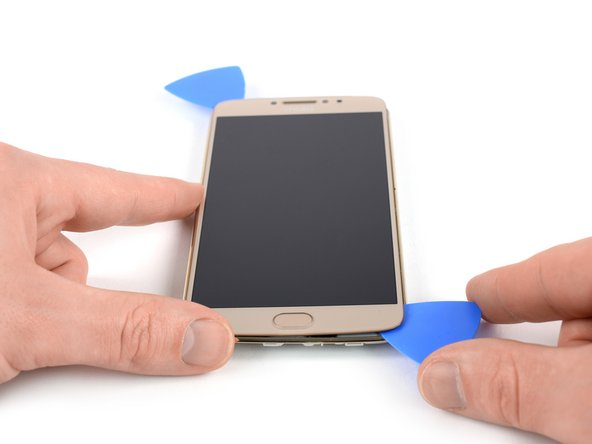
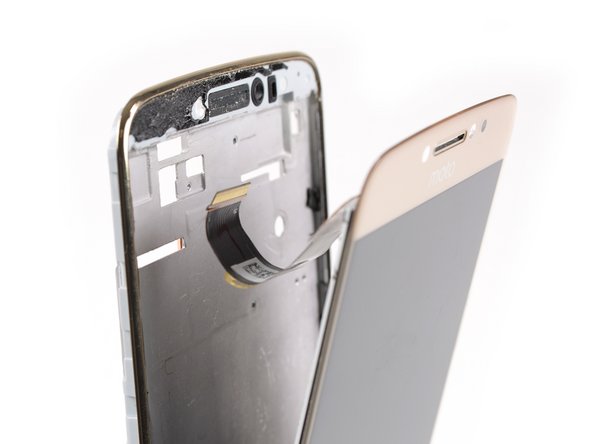
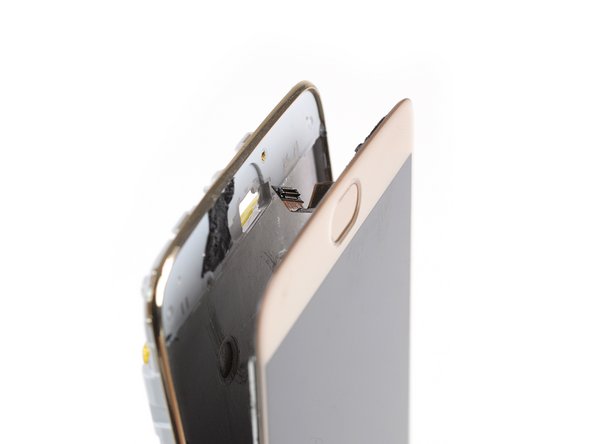
    • Carefully thread the display cable at the top and the fingerprint sensor cable on the bottom through their gaps in the midframe.

    • Remove the LCD and digitizer.

    • Remove any remaining adhesive from the midframe, and clean the glued areas with isopropyl alcohol and a lint-free cloth.

    • In case your new LCD and digitizer doesn't include the fingerprint sensor, you will need to continue with the fingerprint sensor guide to transfer it to the new LCD and digitizer.

    • Carefully compare your replacement part with your screen. You may need to transfer minor parts such as earpiece bezel to the new part.

終わりに

To reassemble your device, follow these instructions in reverse order.

If possible, turn on your phone and test your repair before installing new adhesive and resealing the phone.

Take your e-waste to an R2 or e-Stewards certified recycler.

Repair didn’t go as planned? Try some basic troubleshooting, or ask our Moto E4 Plus Answers community for help.

2 の人々がこのガイドを完成させました。

作成者

2人の作成者と共同で作成されました。

Arthur Shi

メンバー登録日: 01/03/18

252,729 ポイント

526のガイドは作成済み

チーム

iFixit iFixit人のメンバー

Staff

135 メンバー

16,817のガイドは作成済み

0 件のコメント

コメントを追加

統計データ:

過去 24時間: 0

過去 7 日: 4

過去 30 日: 14

今までの合計 3,376