メインコンテンツにスキップ

MacBook Pro 15" Unibody Mid 2009 LCDの交換

必要な工具と部品

  1. MacBook Pro 15" Unibody Mid 2009 LCDの交換, 底ケース: 手順 1、 1の画像 1
    • 底ケースを固定している以下の10本のネジを外します。

    • 3 mm プラスネジー7本

    • 13.5 mm プラスネジー3本

    May be helpful to have more distinct colors to identify the different screws.

    Victor Caamano - 返信

  2. MacBook Pro 15" Unibody Mid 2009 LCDの交換: 手順 2、 2の画像 1 MacBook Pro 15" Unibody Mid 2009 LCDの交換: 手順 2、 2の画像 2
    • 両手を使用して排気口の近くから底ケースを持ち上げて、上部ケースに固定している2本のクリップを外します。

    • 底ケースを取り外して脇に置きます。

  3. MacBook Pro 15" Unibody Mid 2009 LCDの交換, バッテリー: 手順 3、 1の画像 1
    この手順で使用する道具:
    P6 Pentalobe Screwdriver 2009 15" MacBook Pro Battery
    $5.49
    購入する
    • バッテリ上端の、2本のペンタローブネジを外します。

    • ハードディスクドライブを交換する場合は、手順3〜6をスキップしてください。しかし、作業する前にすべての電源を取り外しておくことをお勧めします。

    Question: why do you remove the battery? According to Apple's official manual, this is not required (not for the mid-2009 and not for the mid-2010 15-inch MacBook Pro) - see pages 37 ff:

    http://manuals.info.apple.com/en_US/MacB...

    http://manuals.info.apple.com/en_US/MacB...

    alexkli - 返信

    alexkliからの引用:

    Question: why do you remove the battery? According to Apple's official manual, this is not required (not for the mid-2009 and not for the mid-2010 15-inch MacBook Pro) - see pages 37 ff:

    http://manuals.info.apple.com/en_US/MacB...

    http://manuals.info.apple.com/en_US/MacB...

    I'm interested by your experience.

    Did you have removed the optical drive without removing the battery ?

    I'm just in this step now and if it is possible I would proceed like you because removing the battery void the warranty (and there is a sticker).

    Thanks in advance.

    youyou - 返信

    Looks like my note to step 3 appears on all repair guides that have the same step. I meant that in the context of the hard drive replacement only.

    Did you have removed the optical drive without removing the battery ?

    I haven't yet done anything, waiting for my MacBook Pro 15 inch mid-2010 to arrive.

    alexkli - 返信

    I missed the notes and went ahead and purchased the 5 point driver for the battery before I realized it was not necessary.

    I've edited the repair guide to remove the section on the battery, but I don't have the points to approve the changes.

    Chris Davis -

    Please note - the step about removing the battery is part of a pre-requisite guide, that is used for many of the guides, most that do require removal of the battery. Also, working inside a disassembled laptop with the battery still connected risks damaging/shorting out very expensive parts.

    Eric Essen - 返信

    Absolutely. To be clear -- ALL of the above discussion is ONLY in reference to replacing the hard drive.

    Chris Davis -

    I replaced a hard drive in a MacBook Pro of an earlier model than this without removing the battery. The hard drive wasn't right. It only worked at about half speed, and I had to replace it once more. The second time I removed the battery and all went well. The recommendation by the iFixit staff to remove the battery before working on electronic equipment is a good one.

    doug - 返信

    What is the size of those screws... I have rounded off the socket on mine and would like to replace them.

    Ghatothkach Yadav - 返信

    I measured the screw size, using a micrometer, its about 1.523mm in diameter and 3.186mm in length. Not sure what screw size that is. They are not easily available I guess, unless someone is selling used ones on ebay

    Ghatothkach Yadav - 返信

  4. MacBook Pro 15" Unibody Mid 2009 LCDの交換: 手順 4、 1の画像 1
    • ナイロンスパッジャーの先端を使って、「警告:バッテリーを取り外さないでください」と記載のあるステッカーの先端を折曲げ、下に隠れている3本目のペンタローブネジを外して下さい。

  5. MacBook Pro 15" Unibody Mid 2009 LCDの交換: 手順 5、 2の画像 1 MacBook Pro 15" Unibody Mid 2009 LCDの交換: 手順 5、 2の画像 2
    • バッテリー上部についているプラスチックのプルタブを使って、上部ケースからバッテリーを上へスライドさせてずらします。

    • まだバッテリーを完全に取り外そうとしないでください。 この時点ではまだメイン基板に接続されたままです。

    Removing the battery is not necessary for the hard drive removal/replacement procedures.

    Erik - 返信

    My T6 (appears to be same screw driver you have - $6 on amazon for 20piece set) did NOT fit int he battery screws...not sure if I had the wrong screws or what, but I went ahead w/o battery steps and it was pretty easy.

    Anthony Ettinger - 返信

    I also noticed that the new SDD (from crucial) didn't have the 4 screws, so I had to move those off the old HD and onto the new one.

    Anthony Ettinger -

    Just had the same issue: T6 does not fit the battery screws ;-( ... but with a little bit more preassure it was possible to remove the screws.

    dirkvloenwagner -

  6. MacBook Pro 15" Unibody Mid 2009 LCDの交換: 手順 6、 1の画像 1
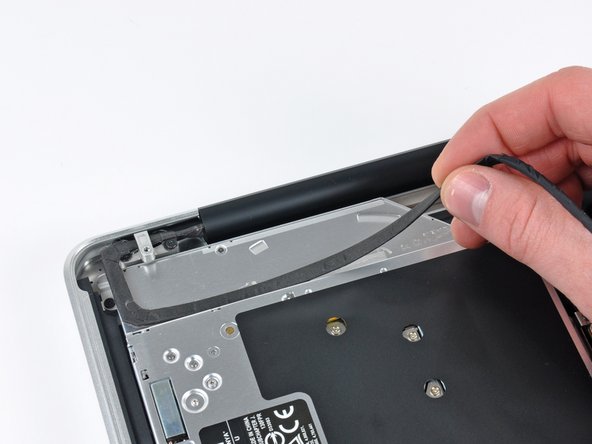
    • バッテリーケーブルコネクターの接続を切る際には、バッテリーを十分に傾けて下に隙間を作ってください。

    • バッテリーケーブルのコネクターをメイン基板のソケットから手前に引いて接続を切り、バッテリーを上部ケースから取り外します。

    • この修理ガイドを完成したら、新しく装着したバッテリーのカリブレーションを行なってください。

  7. MacBook Pro 15" Unibody Mid 2009 LCDの交換, ディスプレイ: 手順 7、 1の画像 1
    • Appleは、片側に接着剤付きの透明プラスチックの小さなストリップを、カメラケーブルコネクタ裏側のロジックボードのソケットに固定するため、ロジックボードに貼り付けています。 作業の邪魔にならない場所にこのストリップを移すときは、ロジックボードに実装されたコンポーネントを破損しないようにしてください。

    • スパッジャーの先端を使って、カメラケーブルコネクタからプラスチックのリテイナーを回転させて外します。

  8. MacBook Pro 15" Unibody Mid 2009 LCDの交換: 手順 8、 2の画像 1 MacBook Pro 15" Unibody Mid 2009 LCDの交換: 手順 8、 2の画像 2
    • ロジックボード上のソケットからカメラケーブルを引き抜きます。

    • コネクタをロジックボード表面と並行に引き抜きます。引き上げないでください。

  9. MacBook Pro 15" Unibody Mid 2009 LCDの交換: 手順 9、 1の画像 1
    • 光学ドライブにカメラケーブルを固定している接着剤からケーブルを剥がします。

  10. MacBook Pro 15" Unibody Mid 2009 LCDの交換: 手順 10、 2の画像 1 MacBook Pro 15" Unibody Mid 2009 LCDの交換: 手順 10、 2の画像 2
    • この手順では、防眩ディスプレイが搭載されているモデルにのみ必要です。ノングレアタイプのディスプレイの方は手順12までスキップしてください。

    • Bluetoothケーブルのオスの先端をソケットからまっすぐ引き抜いて、接続を外します。

    • コネクタをロジックボードの表面に沿って並行に引き抜きます。上向きに引き上げないでください。

    • スパッジャーの平面側先端を使って、ボード上のソケットからBluetoothアンテナケーブルを持ち上げます。

  11. MacBook Pro 15" Unibody Mid 2009 LCDの交換: 手順 11、 2の画像 1 MacBook Pro 15" Unibody Mid 2009 LCDの交換: 手順 11、 2の画像 2
    • 防眩ディスプレイ用の作業です。

    • Bluetooth/カメラケーブルのリテイナーと上部ケースを固定している、8mmプラスネジを2本外します。

    • Bluetooth/カメラケーブルのアースループ内にネジが1本が付けられている場合があります。 ディスプレイを交換する場合は、このネジを新しいユニットに移植してください。

    • Bluetooth /カメラケーブルリテイナーアセンブリを上部ケースから持ち上げて、取り出します。

  12. MacBook Pro 15" Unibody Mid 2009 LCDの交換: 手順 12、 2の画像 1 MacBook Pro 15" Unibody Mid 2009 LCDの交換: 手順 12、 2の画像 2
    • この手順では防眩ディスプレイ用モデルのみ対象です。ノングレアタイプのディスプレイをお持ちの方は、この手順をスキップしてください。

    • 上部ケースにカメラケーブルのリテイナーを固定している8 mmプラスネジを2本外します。

    • カメラケーブルのアースループ内にネジが1本が付けられている場合があります。 ディスプレイを交換する場合は、このネジを新しいユニットに移植してください。

    • カメラケーブルのリテイナーを上部ケースから持ち上げて、取り出します。

  13. MacBook Pro 15" Unibody Mid 2009 LCDの交換: 手順 13、 2の画像 1 MacBook Pro 15" Unibody Mid 2009 LCDの交換: 手順 13、 2の画像 2
    • ディスプレイデータケーブルロックに付けられたプラスチックのプルタブを摘んで、コンピューターのDC-Inサイドに向けて回転させます。

  14. MacBook Pro 15" Unibody Mid 2009 LCDの交換: 手順 14、 2の画像 1 MacBook Pro 15" Unibody Mid 2009 LCDの交換: 手順 14、 2の画像 2
    • 上部ケースにディスプレイデータケーブルのリテイナーを固定している7 mmプラスネジを1本外します。

    • このネジが、データケーブルのアースループ内に付けられている場合があります。 ディスプレイを交換する場合は、このネジを新しいユニットに移植してください。

    • ディスプレイデータケーブルのリテイナーを上部ケースから取り出します。

  15. MacBook Pro 15" Unibody Mid 2009 LCDの交換: 手順 15、 1の画像 1
    • 作業を進める前に、ディスプレイデータケーブルのロックをDC-in側に回転されているか確認してください。

    • ディスプレイデータケーブルのコネクタをソケットからまっすぐ引き抜きます。

    • コネクタをロジックボードの表面と並行に引いてください。ソケットから引き上げないでください。

  16. MacBook Pro 15" Unibody Mid 2009 LCDの交換: 手順 16、 2の画像 1 MacBook Pro 15" Unibody Mid 2009 LCDの交換: 手順 16、 2の画像 2
    • 上部ケースと両側のディスプレイヒンジを固定している、外向きのT6トルクスネジを合計4本外します。

  17. MacBook Pro 15" Unibody Mid 2009 LCDの交換: 手順 17、 1の画像 1
    • MacBookのディスプレイを開きます。ディスプレイと上部ケースがほぼ直角になるようにします。

    • 画像のように、MacBookを配置します。

    • ディスプレイと上部ケースを左手で同時に固定しながら、下側ディスプレイブラケットから残りのT6トルクスネジを取り出します。

  18. MacBook Pro 15" Unibody Mid 2009 LCDの交換: 手順 18、 1の画像 1
    • ディスプレイと上部ケースを左手で同時にしっかりと持ちます。謝ってディスプレイ/上部ケースを落下させてしまうと、両コンポーネントに致命的なダメージを与えてしまうことがあります。

    • 上部ケースとディスプレイを固定しているT6トルクスネジの残りを外します。

  19. MacBook Pro 15" Unibody Mid 2009 LCDの交換: 手順 19、 3の画像 1 MacBook Pro 15" Unibody Mid 2009 LCDの交換: 手順 19、 3の画像 2 MacBook Pro 15" Unibody Mid 2009 LCDの交換: 手順 19、 3の画像 3
    • 右手で上部ケースを持ち、時計周りにディスプレイ上側に向かってデバイスを回します。するとディスプレイケーブルと上部ケースの端が離れます。

    • ディスプレイをわずかに上部ケースから離します。

    • ブラケットやケーブルが絡まないように注意しながら、上部ケースからディスプレイを引っ張りながら離します。

  20. MacBook Pro 15" Unibody Mid 2009 LCDの交換, フロントディスプレイガラス: 手順 20、 2の画像 1 MacBook Pro 15" Unibody Mid 2009 LCDの交換, フロントディスプレイガラス: 手順 20、 2の画像 2
    • 次の手順では、フロントガラスパネルの底側とディスプレイ周辺の外側の黒い淵に沿って留められている接着剤を柔らかくするため、ヒートガンが必要です。接着剤が留められているエリアは2番目の画像で赤く印しています。

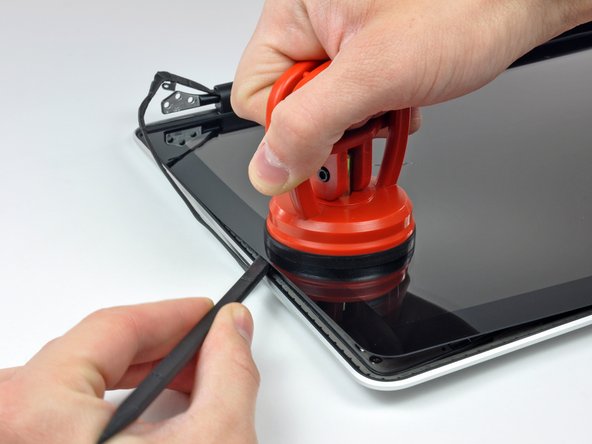
    • 作業を始める前に、ディスプレイガラスを湿らせたリントフリーの布で綺麗に拭き取ってください。こうすることで、吸盤カップが装着しやすくなり、再組み立ての際、汚れチェックが簡単になります。

    • ヒートガンを弱にして、ガラスパネルの上部右側端附近の黒色ボーダーの外側から温めます。

    • ディスプレイガラス周辺に留められた柔らかいゴム製ストリップから離して温めるよう注意してください。ゴムを温めてしまうとわずかに溶けてしまい、オリジナルのマット加工がグロス仕様に変化してしまいます。また加熱しすぎたゴムに接触してしまうと、永続的なゴムの変形につながります。

    • 熱が当てられるため、ガラスパネル内側および/もしくはLCD外側に結露層が生じてしまいます。ディスプレイからガラスが外れると、ガラスクリーナーで拭き取れます。

    Another caution is needed - the heat gun is capable of discoloring the LCD panel (giving uneven coloration) if it overheats. This is possible on the low setting. Proceed cautiously, heating in increments until the glass releases.

    Alden Stradling - 返信

    I was wondering the same, is absolutely necessary to disassemble the screen to change the glass? Can I jump to step 21?

    caholzmann - 返信

    To change just the glass I used a hair dryer it gives off enough heat to do the job. Stand the computer up on its cover with the key board standing up.start at a corner heat the adhesive as you go along. I Put credit cards in as I went along so the adhesive doesn't stick again. take your time . Its easy.

    Robert Lachman - 返信

  21. MacBook Pro 15" Unibody Mid 2009 LCDの交換: 手順 21、 3の画像 1 MacBook Pro 15" Unibody Mid 2009 LCDの交換: 手順 21、 3の画像 2 MacBook Pro 15" Unibody Mid 2009 LCDの交換: 手順 21、 3の画像 3
    この手順で使用する道具:
    Heavy-Duty Suction Cups (Pair)
    $14.95
    購入する
    • パネルに十分熱が当てられたら、重量用吸盤カップをディスプレイガラスの上部右側端にしっかりと取り付けます。

    • ディスプレイガラス端周辺のゴムストリップの上に吸盤カップを取り付けないでください。

    • iFixit製吸盤カップを取り付けるには、取り付けハンドルをガラスパネルの表面に対して水平の開いた状態にします。吸盤をガラスに対して軽く持ちながら、取り付けハンドルの両側が合わさるまで、垂直に持ち上げます。

    • ディスプレイアセンブリからディスプレイガラスをゆっくりと丁寧に引き上げます。

    • ガラスの上部端のみ持ち上げる場合(3番目の画像参照)、パネルの角が持ち上がるまで、手順1と2を複数回繰り返してください。

    Sufficiently heated is a meaningless phrase here. Is it two minutes? Three? Fifteen? An hour? I have tried doing this for increasing amounts of time while avoiding doing damage to the machine, and nothing is working. Sufficient heating needs definition.

    Keith McComb - 返信

    Hi Keith, the key here is that you want to warm the adhesive that's spread thoroughly behind the masked-black area of the glass around the screen to release, but not put enough heat at the rubber gasket that seals the closed top lid to the base. Too much heat, too soon, will deform the rubber. Too much and you'll never get the glass to release. The 2x that I have done this, however, even with sufficient (and significant) heat, I remember the glass taking a surprising amount of leverage to pull clear. A tactic: using your heat gun warm all the sides of the display from the front, in a circulating/racetrack fashion - about 20 rpm. After 30sec, focus on the left and top sides, seesawing from bottom left, to top left, to top right, and back. Do that at the same pace, about 5-10 passes. Then spend about 10 sec waving over the whole top left corner. That should get enough heat to enough places to help the glass separate to start placing picks, and you can continue to heat the margins as you progress.

    johnkimmel - 返信

  22. MacBook Pro 15" Unibody Mid 2009 LCDの交換: 手順 22、 3の画像 1 MacBook Pro 15" Unibody Mid 2009 LCDの交換: 手順 22、 3の画像 2 MacBook Pro 15" Unibody Mid 2009 LCDの交換: 手順 22、 3の画像 3
    • ディスプレイガラスの角を丁寧に持ち上げて、ディスプレイアセンブリとディスプレイガラスの間にスパッジャーを差し込みます。

    • スパッジャーの平面側先端を使って、ディスプレイとフロントガラスを固定している接着剤をこじ開けます。

    • 右側上部の角からディスプレイ上部と右側端に沿って、ガラスパネルを約4〜5cm持ち上げて外します。

    Be careful with the spudger and the soft rubber strip around the glass. Since the rubber strip has been heated up by the heat gun, it is easily smushed and deformed by the spudger.

    Rob - 返信

    Be patient and work slowly or else you will crack the glass like me.

    BillyRachel1 - 返信

    I can not get the glass to come up despite two tries and dicsoloring the LCD with too much heat. Why can't I get the glass to budge at all?

    bollucks66 - 返信

    It is better , instead of using the suction cup , to use small flat end spudger . The suction cup should be used first to detach the window from the gasket , not furthermore as it may brake the glass.

    Thierry de Montblanc - 返信

    I didn’t have large suction cups and the small ones didn’t work for me. Instead, I used an opening tool to pry up the glass slightly and got a guitar pick under it. Then I slowly worked the pick around the top three sides of the glass, heating sections of glue as I went.

    Daniel Arnfield - 返信

    I’ve managed to do it using hair dryer on max. First corner was though and took a lot of time to lift it. I decided to heat not only a corner but whole length and then it came off. I’ve put so much heat that was afraid I’ve damaged LCD, but it works fine. As BillyRachel1 said: patience is the way. In order to assemble it back I used old glue heated again. It’s easy but takes time.

    Note: Don’t do this at home if you have cats otherwise you going to spend next hour or so trying to remove their fur from between glass and LCD. It’s because they all levitate after using hot air and just wait to stick to the screen again.

    To be honest hardest thing was replacing clutch cover, took me so much time and I eventually cracked it.

    D. K. Labudek - 返信

  23. MacBook Pro 15" Unibody Mid 2009 LCDの交換: 手順 23、 2の画像 1 MacBook Pro 15" Unibody Mid 2009 LCDの交換: 手順 23、 2の画像 2
    • ヒートガンを使って、フロントガラスパネルの右側に沿って熱を当て、黒いストリップの下に留められた接着剤を柔らかくします。

    • 吸盤カップをフロントガラスパネルの右側沿いに取り付けます。

    • スパッジャーの平面側先端を使ってディスプレイアセンブリの残り部分からガラスパネルを外しながら、パネルを引き上げます。

    • ディスプレイからフロントディスプレイガラスが外れるまで、ディスプレイガラス右側端に沿ってスパッジャーでこじ開けます。

    • 外れたフロントガラスパネルがディスプレイアセンブリに再装着するのを防ぐため、上部右側端にギターのピックや薄いプラスチックカードなどを差し込んでおくと便利です。

    If you don't have a guitar pick, playing cards works too.

    Rob - 返信

    I used old credit cards

    Robert Lachman - 返信

  24. MacBook Pro 15" Unibody Mid 2009 LCDの交換: 手順 24、 2の画像 1 MacBook Pro 15" Unibody Mid 2009 LCDの交換: 手順 24、 2の画像 2
    • ヒートガンを使って、ガラスディスプレイパネルの上部端に沿って留められた黒いストリップ下の接着剤を柔らかくします。

    • ガラスディスプレイパネルの上部端附近に吸盤カップを取り付けて、ディスプレイからガラスパネルを引き上げます。

    • 必要に応じてスパッジャーの平面側先端を使い、注意しながら接着剤を剥がしてガラスパネルの上部端をこじ開けていきます。

  25. MacBook Pro 15" Unibody Mid 2009 LCDの交換: 手順 25、 2の画像 1 MacBook Pro 15" Unibody Mid 2009 LCDの交換: 手順 25、 2の画像 2
    • ヒートガンを使って、ガラスディスプレイパネルの上部左端附近の黒いストリップに留められた接着剤を柔らかくします。

    • ガラスディスプレイパネルの上部左端付近に吸盤カップを取り付けます。

    • 吸盤カップを引き上げて、ディスプレイアセンブリとガラスディスプレイパネルの間に出来た隙間に差し込み、こじ開けます。

    • 上部左側の端がディスプレイから外れたら、再装着を防ぐため、ギターのピックもしくは薄いプラスチックカードを差し込んでおくと便利です。

  26. MacBook Pro 15" Unibody Mid 2009 LCDの交換: 手順 26、 2の画像 1 MacBook Pro 15" Unibody Mid 2009 LCDの交換: 手順 26、 2の画像 2
    • ヒートガンを使って、フロントガラスパネルの左側に沿って黒いストリップ下に留められた接着剤を柔らかくします。

    • 吸盤カップをフロントガラスパネルの左側に沿って取り付けます。

    • スパッジャーの先端を使いながら、ガラスパネルを引き上げて、ディスプレイアセンブリの残りから外します。

    • 続けて、フロントディスプレイガラスの左側がディスプレイから外れるまで作業を続けてください。

  27. MacBook Pro 15" Unibody Mid 2009 LCDの交換: 手順 27、 2の画像 1 MacBook Pro 15" Unibody Mid 2009 LCDの交換: 手順 27、 2の画像 2
    • これでガラスの上部、左、右がディスプレイから解放されました。ゆっくりとガラスパネルの上部端を持ち上げて、ディスプレイから外します。

    • 必要に応じて、スパッジャーの平面側先端を使ってディスプレイアセンブリからガラスディスプレイパネルの下側端を外してください。

    • 再組み立ての前に、ガラスディスプレイパネルとLCDの両側を綺麗に拭き取ってください。指紋などが残っていると、デバイスが稼働した際に視界を妨げてしまうことがあります。

    If you will be reusing the glass, with new adhesive, then you will want to remove the old adhesive. This is a bit of a pain, as alcohol doesn't work, and you need to be careful to avoid damaging the black screen border, which is black paint on the back (adhesive) side of the glass.

    To remove the adhesive, note that it is actually a thin film with rubber cement on both sides. First, use a razor to carefully pull up one corner of the film and gently peel it off of the glass. If you are gentle and slow, the underlying adhesive may also come off; if not, then rubbing with your finger or a hard rubber eraser will do the trick.

    griscom - 返信

    what to do when new glass starts to peel after a week ?

    labig - 返信

    If this is a rubber cement based glue, then would rubber solvent / thinner like N-Heptane help the removal process without damaging the black paint ?

    Sandman619 - 返信

    Don’t remove glue. Just reuse it by heating and sticking it again.

    D. K. Labudek - 返信

  28. MacBook Pro 15" Unibody Mid 2009 LCDの交換: 手順 28、 2の画像 1 MacBook Pro 15" Unibody Mid 2009 LCDの交換: 手順 28、 2の画像 2
    • プラスチックの開口ツールの先端をディスプレイガラスとカメラブラケットの間に差し込み、カメラブラケットの周辺まで動かして、ディスプレイガラスから外してください。

    • 再組み立ての前に、新しい交換用のディスプレイガラスにカメラブラケットを取り付ける事を忘れないでください。

    This step is only needed if replacing the glass. If you are only replacing the LCD, there is no need to do this step

    Rob - 返信

  29. MacBook Pro 15" Unibody Mid 2009 LCDの交換: 手順 29、 3の画像 1 MacBook Pro 15" Unibody Mid 2009 LCDの交換: 手順 29、 3の画像 2 MacBook Pro 15" Unibody Mid 2009 LCDの交換: 手順 29、 3の画像 3
    • ガラスの取り外し作業中、パネルが持ち上げられてカメラ用基板からカメラケーブルが接続が外れているため、ガラスパネル上の接着剤に付いてしまうことがあります。カメラケーブルがカメラの基板に接続された状態のままであれば、この手順をスキップしてください。

    • ケーブルを再接続するには、まずスパッジャーの先端を使ってカメラケーブルのZIFソケット上のフォーム製テープを外してください。

    • スパッジャーの先端を使って、カメラのケーブルソケット上のZIFケーブルのリテイナーを裏返します。

    • カメラケーブルをカメラ用基板のソケットに差し込み、スパッジャーの先端を使ってZIFケーブルリテイナーをカチッと音がするまで押し込んでケーブルを固定します。

    • カメラケーブル用ソケットを覆っているテープを再装着します。

  30. MacBook Pro 15" Unibody Mid 2009 LCDの交換, LCD: 手順 30、 2の画像 1 MacBook Pro 15" Unibody Mid 2009 LCDの交換, LCD: 手順 30、 2の画像 2
    • ディスプレイの右側端に向けてクラッチカバーをスライドします。

    • クラッチカバーを約0.5cm動かして止めます。右側へこれ以上無理やりスライドしないでください。

    • クラッチカバーを再装着する際は、ディスプレイ下端からディスプレイ端の取り付け位置右に約0.5cm突出したコンポーネントの上に滑り込ませます。

    Do you necessarily need to remove the glass before you can remove the clutch cover?

    aye oh - 返信

  31. MacBook Pro 15" Unibody Mid 2009 LCDの交換: 手順 31、 2の画像 1 MacBook Pro 15" Unibody Mid 2009 LCDの交換: 手順 31、 2の画像 2
    • 左側先端から初めて、クラッチカバーを長辺側の軸に沿って揺り動かし、クラッチヒンジから引き離します。

    • ディスプレイアセンブリの下側端に沿って右側から左側に向けて動かしていき、ゆっくりとクラッチを剥がし続けながら、外します。

    • クラッチカバーを正面ベゼルから持ち上げて、傍に寄せます。

    • クラッチカバーを再装着する際は、小さな黒いプラスチックカバーの上に滑り込ませるときに開口部が十分広く開いているか確認してください。カバーは非常に薄く繊細なプラスチックが付いており、これが右側のクラッチヒンジに付けられています。

  32. MacBook Pro 15" Unibody Mid 2009 LCDの交換: 手順 32、 1の画像 1
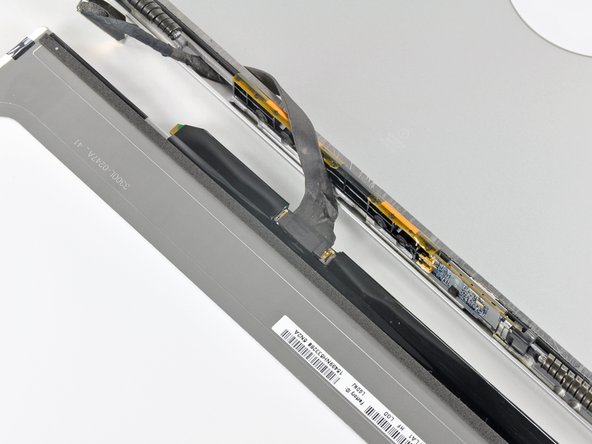
    • フロントベゼルにLCDパネルを取り付けている2.9 mmプラスネジを6本外します。

    Hey guys, I need to get the part where the screws are on, whats its name or where could I find it? That part on my Computer broke.... Do you guys think its possible to guet it somewhere?

    diegoantegr31 - 返信

  33. MacBook Pro 15" Unibody Mid 2009 LCDの交換: 手順 33、 1の画像 1
    • LCDをアルミ製ディスプレイアセンブリの奥からLCDの下側端に沿って電気回路をスライドするため、Lディスプレイの上部端に向けて引っ張ります。

    • 片方でディスプレイの上部端に向かってLCDを引っ張りながら、もう一方の手で、アルミ製ディスプレイアセンブリのチャンネルにディスプレイデータケーブルを取り付けると作業がしやすいです。

  34. MacBook Pro 15" Unibody Mid 2009 LCDの交換: 手順 34、 1の画像 1
    • LCDに一番近い端からディスプレイデータケーブルコネクタを覆っているテープの一片を剥がします。

  35. MacBook Pro 15" Unibody Mid 2009 LCDの交換: 手順 35、 2の画像 1 MacBook Pro 15" Unibody Mid 2009 LCDの交換: 手順 35、 2の画像 2
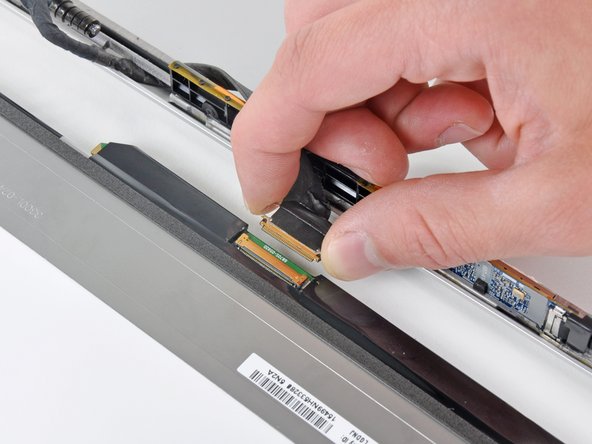
    • スパッジャーの先端を使って、LCD上のソケットにディスプレイのデータケーブルを固定している薄いスチール製の固定クリップを裏返します。

    • ディスプレイデータケーブルをLCD上のソケットからまっすぐ引き抜きます。

    • LCDをディスプレイアセンブリから持ち上げて、デバイスの脇に置きます。

    • LVDS/ディスプレイデータケーブルを交換する場合は、ディスプレイのケースにある隙間からケーブルを通してください。

    Danke für das Bereitstellen der Anleitung dadurch konnte ich mein MacBook nach 12 Jahren Einsatz, für die nächsten Jahre fit machen.

    Thanks you for providing this Manuel. It helped me, after 12 year of use to make my MacBook fit for the coming years.

    Albert Zweistein - 返信

終わりに

デバイスを再組み立てする際は、これらの手順を逆の順番に従って作業を進めてください。

34 の人々がこのガイドを完成させました。

以下の翻訳者の皆さんにお礼を申し上げます:

en jp

100%

Midori Doiさんは世界中で修理する私たちを助けてくれています! あなたも貢献してみませんか?
翻訳を始める ›

作成者

5人の作成者と共同で作成されました。

Andrew Bookholt

586,296 ポイント

619のガイドは作成済み

9 件のコメント

General : Is there instruction available if you have the anti-glare displays? Or do you officially recommand to change the LCD AND THE GLASS, if we want to keep the anti-glare displays? Can we order the anti-glare displays here? Thanks! =)

ginacouture - 返信

I have a Macbook Pro Unibody 15" (2009) can I switch the whole display and lid with a Macbook Pro 15" (2011)and is the airport card piece for both models in the display?...

MichaelJrRekson - 返信

No, you can’t, because of the camera cable connector, different from the 2011 model.

Fran Werttt -

Where can i get the metal frame that runs through the LCD assembly.

Brayan Almonte - 返信

Same question for me!

Fran Werttt -

Its not a replaceable part

Dan -

Where is wifi module and its antenna?

vniyazov - 返信

Both are well hidden! They are located within the Black Clutch cover within the lid assembly.

Dan -

in Step 15 i think I may have damaged the logic board while pull the cable out. Is there a fix for this?

thrandall - 返信

コメントを追加

統計データ:

過去 24時間: 1

過去 7 日: 9

過去 30 日: 51

今までの合計 72,458