はじめに
このマザーボードには左側に付けられた全てのポートを含みます。
必要な工具と部品
-
-
ケースを閉じた状態で、平らな作業台の上にUnibodyの上部を下側に向けて配置します。
-
アクセスドアの取り外しラッチの溝のある側を押して、飛び出した側の先端を掴んでください。取り出しラッチを垂直になるまで持ち上げます。
-
-
-
半透明のプラスチックタブを掴んで、バッテリーをUnibodyから引き上げます。
-
ラッチが押されると、バッテリーが所定の位置にロックされます。
Do I need to wait for the battery to charge completely before using the computer (while plugged in)?
No. You do not need to charge it completely before removing it.
-
-
-
下部ケースにカシス(筐体)を固定している次の8本のネジを外します。
-
5.4 mmプラスネジー1本
-
14 mmプラスネジー3本
-
3.5 mmプラスネジー4本
Hi, My name is Jess I need help asap I accidentally dropped my macbook Pro and i cant find the silver screw for the top left back side, Does any one know if I can replace it with an eye glass screw?? If you can help at all Please e-mail me at Chambliss_jess@yahoo.com thx please help me my bf is going off... ;(
The fixit PH00 is the wrong screw driver for this entire job. It did not fit in the screws, it was too pointy and caused screws to be rounded off.
-
-
-
両手を使って、上部ケースから下部ケースを持ち上げて取り出します。
About midway along each edge is a snap. To release each snap, gently slide the flat edge of a Spudger under the lower case, then lift the lower case away.
-
-
-
右側・左側ファンと基板を固定している次の6本のネジを外します。
-
3.5 mmプラスネジー4本
-
3.2 mmプラスネジー2本
Pry under the side where the wires connect.
I think this the screw dimensions may be reversed. My late 2008 Unibody had four 3.2mm and two 3.5mm.
-
-
-
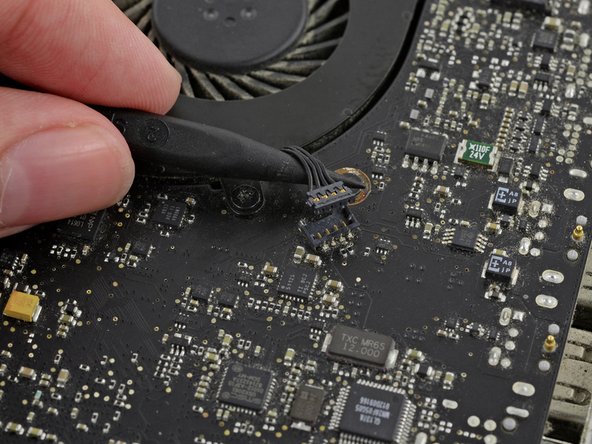
スパッジャーの先端を使って、右側ファンのコネクタを基板上のソケットからまっすぐ引き上げます。
-
ケースから右側ファンを取り出します。
Be really gentle and patient with this connector, I popped the socket right off of the logic board (thankfully the already broken one that I was replacing). It actually shouldn't take much force, and just gently work on it until it comes out.
-
-
-
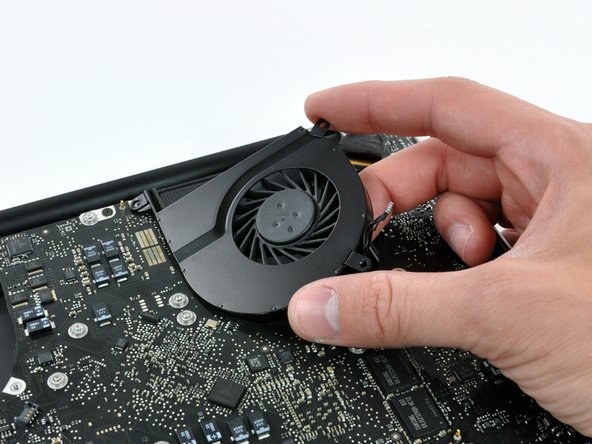
スパッジャーの先端を使って、基板上のソケットから左側ファンのコネクタをまっすぐ引き抜きます。
-
ケースから左側ファンを取り出します。
I unfortunately broke the fan receptacle connector (2 pin) on the board. How do I order a new connector and how do I put it on?
-
-
-
カメラケーブルのコネクタから接着剤を剥がします。
-
ケーブルのオス型の先端をソケットから引っ張り、カメラケーブルの接続を外します。上向きに引っ張らず、基板と水平に引っ張ります。
There's a little shiny piece of plastic holding this item in place to keep it from sliding out of it's slot. It's glued on and if you don't take it off first, you'll likely bend the connector so that it won't work anymore. Ruined a motherboard because this step was missing.
maccentric - 返信
It is not necessary to disconnect the camera cable to remove/replace the left speaker. You can leave the cable connected to save you from damaging it.
-
-
-
-
スパッジャーの平面側先端を使って、基板上のソケットからサブウーファーのコネクタをまっすぐ引き抜きます。
I Broke the subwoofer socket on the logic board. Can I use without subwoofer, or do I now have to replace the logic board?
Sorry to hear this. Yes, you can use the machine without the subwoofer. To be safe, cover the subwoofer plug with some electrical tape so that it can't cause a short circuit somewhere.
-
-
-
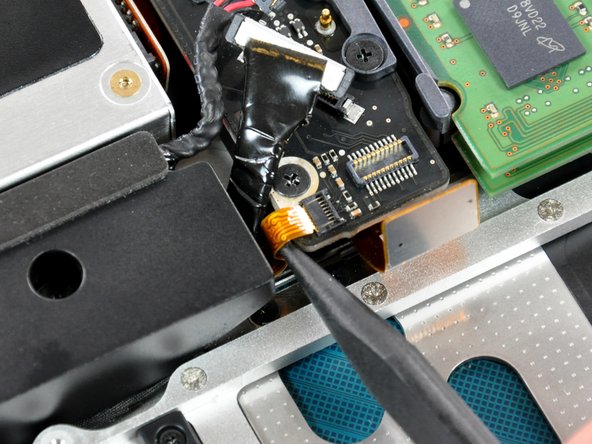
スパッジャーの先端を使って、赤外線/スリープLEDリボンケーブルの固定フラップを裏返します。
-
赤外線/スリープLEDリボンケーブルをソケットからまっすぐ引き抜きます。
Hi, thanks for this tutorial: it solved my problem.
But unfortunately I have broken the IR/sleep LED ribbon cable socket on motherboard (cable is ok, socket crumbled): computer works fine but now it doesn't go on standby anymore. Is there a way to fix the cable on motherboard (for example with Kapton tape) or is there a software to manage computer standby?
Thanks in advance for your help.
Mary
Hi, thanks for this tutorial, it is really helpful. Unfortunately I cannot push the ribbon cable into the socket. The space is really limited, the cable is hard, and the socket seems to be too narrow. Is there any tool to push this kind of cable in a short space? Very fine plastic tweezers could work? Even without this cable the Mac can work, so I leave it before I break it.
Hideyuki
-
-
-
スパッジャーの先端を使って、キーボードのリボンケーブルの固定フラップを裏返します。
-
キーボードのリボンケーブルをソケットからまっすぐ引き抜きます。
I ran into trouble when re-installing the keyboard cable. I got everything put back together, plugged it in, and pressed Power... and nothing happened. I took everything apart again, reseated the heat sink and everything, put it back together... and the Power button didn't respond.
The MagSafe light came on, and the battery charge lights came on. But it wouldn't power up.
Finally I figured out that the keyboard cable is really tricky to get in correctly. If you can slide it out with the retaining clip locked (applying very little pressure), then the cable isn't actually in correctly. I had to really fiddle with it, and maybe slide it in one side first, to see that it actually needed to slide in another 1/8th inch or so beyond what felt like "in" the first few times I did it.
Once I'd secured that cable, my MacBook turned on again without a problem. So far, after just replacing the Thermal Paste (I didn't actually install a new heat sink), the computer is running 20°F cooler than it has in years. Thanks!
I think I broke the keyboard ribbon cable, now I have to replace the keyboard.....
I agree. The instructions should place emphasis on seeing how deep this ribbon is. Most ribbons are pretty easy to slot back in. This one is not (maybe because of the colour). The IR/sleep is a b... too!
Hi Jerome. Thank you for your feedback. I agree with you and simolinic. There should be a reminder bullet that warns people about the depth of the ribbon cable. Thanks for adding that. Much appreciated.
Thank you simonlinic, for pointing this out. I was so disapppointed when the MacBook Pro wouldn't start up. I reopened the MacBook and was able to insert the keyboard ribbon cable quite a bit more by pushing agains the top of the cable while inserting it. I tired starting up after that and it still wouldn't start. I took a 15 minute break and then it started up perfectly! I'm grateful to you all!
Here is the best way to reinsert this cable: MacBook unibody keyboard ribbon cable won't go in Putting a piece of tape on the connector (creating a pull-tab) and pulling it in works great.
-
-
-
スパッジャーの平面側先端を使って、マイクケーブルコネクタを基板上のソケットからまっすぐ引き抜きます。
I don't believe this step is actually necessary, the cable is attached on the other side of the logic board and comes along with it, so it just isn't really necessary to disconnect (although it's not hard either).
-
-
-
上部ケースに基板を固定している3.2 mmプラスネジを7本外します。
On reassembly, check carefully that none of the fiddly little cables are trapped under the logic board. I had to back up and liberate the subwoofer connector. It takes some careful jiggling to get the sockets seated in the port holes.
The two screws closest to the optical drive have smaller heads. (May not be critical.)
-
-
-
上部ケースに下部ケースのクリップを固定している3.5 mプラスネジを2本外します。
-
上部ケースから下部ケースのクリップを持ち上げて取り出します。
My clip is oriented 180 degrees (flipped) from this picture.
The bottom case clip is screwed to a black plastic bracket that's glued onto the upper case. My replacement upper case did not come with this bracket. I had to carefully pry it off the old upper case, taking care not to break it, and glue it to the new upper case before replacing the logic board.
I have a 2.66ghz 15inch Unibody Macbook Pro (A1286) and this step was not necessary.
Andrew Mostajoからの引用:
I have a 2.66ghz 15inch Unibody Macbook Pro (A1286) and this step (24) was not necessary.
Apropos to the last tip in this step, the replacement unibody I purchased omitted the receiving end of this clip, but it was in my original. As it only captures (but does not secure) a small metal tab on the bottom cover, I skipped transferring it.
Agree with @colleenthompson - mine was also rotated 180 degrees from what is shown, which also matches the other side of the computer.
-
-
-
バッテリーコネクタを十分つかめるほどの高さまで基板を持ち上げ、基板上のソケットからまっすぐ引き抜きます。
-
基板アセンブリを上部ケースから持ち上げます。
Its better to carefuly “flip” the board towards battery compartment and then take the connector out. The way, how it is written here, its badly accessible with fingers and with tweezers and the connector has plastic point which clicks into hole in the middle of connector. So its better to carefully flip the board upside out and then take it carefully out.
-
-
-
スパッジャーの平面側先端を使って、ロジックボードから左側スピーカーのコネクタを持ち上げます。
this connector is very fragile, just like the the thermal sensor in step 29. The spudger needs to go under the thin plastic border and not just under the cables or you will break the copper connector you can see on the picture !
-


デバイスを再組み立てする際は、これらのインストラクションを逆の順番に従って作業を進めてください。
デバイスを再組み立てする際は、これらのインストラクションを逆の順番に従って作業を進めてください。
58 の人々がこのガイドを完成させました。
以下の翻訳者の皆さんにお礼を申し上げます:
100%

Midori Doiさんは世界中で修理する私たちを助けてくれています! あなたも貢献してみませんか?
翻訳を始める ›

11 件のコメント
I have a late 2008, 2.4Ghz, core 2 duo, 15" , unibody, MB470LL/A, MacBook Pro5,1. My current board has the following ports on the left:
Mag safe
Ethernet
FireWire 800
USB (x2)
Mini display port
Mic
Headphone
I just want to verify that any of the boards (2.4, 2.53, 2.66, 2.8, 2.93), will work. I figure as long as I'm replacing the board, why not upgrade CPU and RAM capacity. Any insight would be deeply appreciated!
What did you end up installing?
c cs -
Any advice for someone who stripped a screw each on the fans. I can't get them out.
Original Deutch:
Mein MacBook Pro (MacBook Pro 15" Unibody Late 2008) funktioniert schon länger nicht mehr. Es startete nicht mehr und zeigte, bis auf die Akkuanzeige, keine Lebenszeichen. Vor kurzem habe ich mit einen Reparaturversuch gestartet. Jetzt habe ich das Logic Board vor mir und finde nichts eindeutig beschädigtes. Das einzige was ich sehe ist das die Aufgelötete Batterie kein Saft mehr hat. Ich finde zu dieser jedoch keine Informationen. Mit was tausche ich diese aus?
Google English:
My MacBook Pro (MacBook Pro 15 "Unibody Late 2008) has been running for a while, it stopped booting and showed no sign of life, except for the battery indicator I recently started a repair attempt Now I have the logic board in front of me The only thing I can see is that the soldered battery has no juice left, but I can not find any information about it, so what do I swap it with?
hello there , sorry it is been quite long time your post ......
I would really appreciate if you can upgrade your experience of your matter .... did you actually find the fault ...?
did you try to check the c7771 mostly likely is that ....
also please do you get something about
"The only thing I can see is that the soldered battery has no juice left"
i would like to know what stand for .....
have a great time
regards
My friend accidentally ripped off the surface mount for the temp probe from the heat pipe to the motherboard. Does anyone know if this is the temp input that the CPU uses to control fan speed, or if there is another temp sensor say on the CPU socket that does this?
I’m very poor and a tech newbie. This guide was delightful in that it worked smoothly on the first try
mi mac book pro 15 finales 2008 no carga ni prende y la luz del led prende muy debil alguien que me ayude
Thank you much. I just wanted to replace the thermal paste that stuff was crusty. This machine is older than me and running Linux just fine.
The A1286 has no Access Door.!!
I actually can see no sign of the battery!...
aguib - 返信
I assume you have the newer model, with the built-in battery. It's still removable with tools, but these are the wrong instructions for that model.
lgc90 - 返信
when will there be a guide for the other unibody macbook pro. that does not have an access door?
irishking - 返信
Is there a manual to show, how disasembly the display, i mean, after step 5, to check the display between lcd and aluminiun back case?
Max
Max - 返信
On other guides you state the height of the HD that can be supported, e.g. MacBook Pro 15" Core 2 Duo Model A1211 Hard Drive Replacement , I have read ( but have not confirmed ) that the uni-body MacBook Pro can be fitted with the 750GB and 1TB 12mm drive from Western Digital.
Can you confirm this?
Many thanks in advance.
ahothabeth - 返信
My display and aluminum casing has separated.
I don't know if it just snaps back together or does it need to be glued.
I dropped mine on the carpeted stairs and the display still works.
I'm hoping I can just snap it back together and that no plastic pieces or teeth of the snapping
portion have been broken........
SHerwood Ball - 返信
When you say "left fan" is this "left when looking at the logic board after turning the computer over and looking it up opening it up" or "left when sitting at the computer keyboard and typing on it"?
thvv - 返信
We always use left and right in reference to the computer when you're using it.
Andrew Optimus Goldheart -
Directions were great and the worn dc in board was replaced. The hardest part of the procedure is disconnecting the data display cable. A better description of step 21 is to slide the connector parallel to the circuit board towards the outside corner. Reconnecting correctly took several tries.
I used the tip of the spudger to nudge the corners a little at a time to seat the connector.
The ribbon connector for the keyboard has to be inserted all the way before seating the retaining cap. It took me three tries . First try power button did not work second try numbers keys did not work.
Thanks for the directions ...could not have done it with out them!!!
landryd - 返信
Hola. Poseo un MacBook Pro Late 2008 y debo cambiarle las cornetas. Me sirve unas cornetas de un MBP Late 2011?
jegonzalez80 - 返信
Please read the instructions about removing the bluetooth cable - you CAN work around it, and NOT take off the plug.
kenneth krabat - 返信