メインコンテンツにスキップ

MacBook Pro 13" 2022 (M2) Speakers Replacement

必要な工具と部品

  1. MacBook Pro 13" 2022 (M2) Speakers Replacement, Unfasten the lower case: 手順 1、 1の画像 1
    この手順で使用する道具:
    FixMat
    $36.95
    購入する
    • Use a P5 Pentalobe driver to remove the six screws securing the lower case:

    • Two 6.8 mm screws

    • Two 5.3 mm screws

    • Two 3.4 mm screws

    • Throughout this repair, keep track of each screw and make sure it goes back exactly where it came from.

  2. MacBook Pro 13" 2022 (M2) Speakers Replacement, Separate the lower case: 手順 2、 2の画像 1 MacBook Pro 13" 2022 (M2) Speakers Replacement, Separate the lower case: 手順 2、 2の画像 2
    • Apply a suction handle near the front edge of the lower case, between the screw holes.

    • Pull up on the suction handle to create a gap between the lower case and the frame.

  3. MacBook Pro 13" 2022 (M2) Speakers Replacement, Release the left clips: 手順 3、 3の画像 1 MacBook Pro 13" 2022 (M2) Speakers Replacement, Release the left clips: 手順 3、 3の画像 2 MacBook Pro 13" 2022 (M2) Speakers Replacement, Release the left clips: 手順 3、 3の画像 3
    • Insert an opening pick between the lower case and the frame.

    • Slide the pick around the left corner to release the first set of clips.

    • You'll hear and feel a pop when each clip releases.

  4. MacBook Pro 13" 2022 (M2) Speakers Replacement, Release the right clips: 手順 4、 3の画像 1 MacBook Pro 13" 2022 (M2) Speakers Replacement, Release the right clips: 手順 4、 3の画像 2 MacBook Pro 13" 2022 (M2) Speakers Replacement, Release the right clips: 手順 4、 3の画像 3
    • Slide your opening pick around the right corner to release the second set of clips securing the lower case.

  5. MacBook Pro 13" 2022 (M2) Speakers Replacement, Pry the lower case up: 手順 5、 3の画像 1 MacBook Pro 13" 2022 (M2) Speakers Replacement, Pry the lower case up: 手順 5、 3の画像 2 MacBook Pro 13" 2022 (M2) Speakers Replacement, Pry the lower case up: 手順 5、 3の画像 3
    • Insert your opening pick between the lower case and the frame near the middle left screw hole.

    • Firmly twist the pick until the clip releases.

    • Repeat this procedure for the clip near the middle right screw hole.

  6. MacBook Pro 13" 2022 (M2) Speakers Replacement, Release the remaining clips: 手順 6、 3の画像 1 MacBook Pro 13" 2022 (M2) Speakers Replacement, Release the remaining clips: 手順 6、 3の画像 2 MacBook Pro 13" 2022 (M2) Speakers Replacement, Release the remaining clips: 手順 6、 3の画像 3
    • Firmly pull the lower case away from the screen hinges to release the last clips securing it to the frame.

    • This motion requires significant force. Don't pull the lower case up, as you may bend the clips.

    • If it feels stuck, pull one corner at a time.

  7. MacBook Pro 13" 2022 (M2) Speakers Replacement, Remove the lower case: 手順 7、 2の画像 1 MacBook Pro 13" 2022 (M2) Speakers Replacement, Remove the lower case: 手順 7、 2の画像 2
    • Remove the lower case.

    • To reinstall the lower case:

    • Set it in place and align the sliding clips near the display hinges. Press down and slide the lower case toward the hinges.

    • Once the lower case is secured near the hinges, press down firmly to engage the remaining four clips.

    • You'll hear and feel a pop when each clip engages.

  8. MacBook Pro 13" 2022 (M2) Speakers Replacement, Remove the battery board cover: 手順 8、 2の画像 1 MacBook Pro 13" 2022 (M2) Speakers Replacement, Remove the battery board cover: 手順 8、 2の画像 2
    この手順で使用する道具:
    Tweezers
    $4.99
    購入する
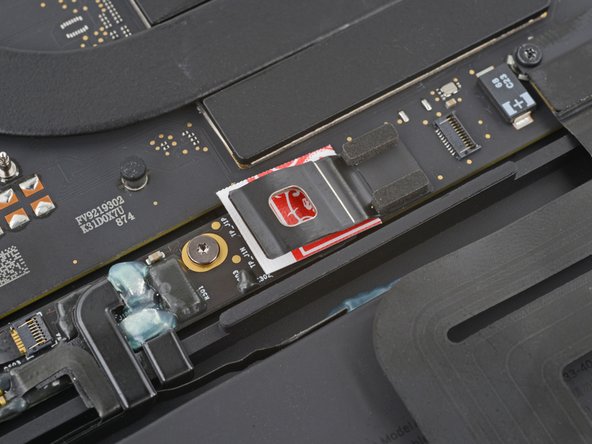
    • Use blunt nose tweezers or your fingers to peel and remove the cover from the battery board, just above the middle battery cell.

  9. MacBook Pro 13" 2022 (M2) Speakers Replacement, Disconnect the battery data cable: 手順 9、 2の画像 1 MacBook Pro 13" 2022 (M2) Speakers Replacement, Disconnect the battery data cable: 手順 9、 2の画像 2
    • Use blunt nose tweezers to gently peel back the pull tab covering the battery data connector.

    • Don't remove or tear the pull tab, as it's attached to the head of the connector.

  10. MacBook Pro 13" 2022 (M2) Speakers Replacement: 手順 10、 2の画像 1 MacBook Pro 13" 2022 (M2) Speakers Replacement: 手順 10、 2の画像 2
    • Use the point of a spudger to flip up the small locking tab securing the battery data connector.

    • Locking tabs on ZIF connectors are fragile—be gentle with your spudger.

  11. MacBook Pro 13" 2022 (M2) Speakers Replacement: 手順 11、 3の画像 1 MacBook Pro 13" 2022 (M2) Speakers Replacement: 手順 11、 3の画像 2 MacBook Pro 13" 2022 (M2) Speakers Replacement: 手順 11、 3の画像 3
    • Use blunt nose tweezers or your fingers to grab the battery data cable pull tab and slide it straight out of its socket.

    • Move the cable to the left, out of the way of the battery board.

    • Don't strain the cable, as it's still attached to the battery board.

  12. MacBook Pro 13" 2022 (M2) Speakers Replacement, Unfasten the battery connector: 手順 12、 1の画像 1
    • Use a T5 Torx driver to remove the 3.7 mm screw securing the battery connector.

  13. MacBook Pro 13" 2022 (M2) Speakers Replacement, Disconnect the battery: 手順 13、 3の画像 1 MacBook Pro 13" 2022 (M2) Speakers Replacement, Disconnect the battery: 手順 13、 3の画像 2 MacBook Pro 13" 2022 (M2) Speakers Replacement, Disconnect the battery: 手順 13、 3の画像 3
    • Use the flat end of your spudger to slightly lift the battery connector away from the battery board.

    • Lifting the connector too high will break it. Angle it enough so it won't accidentally contact the battery board during repair.

    • Optionally, you may insert a barrier, such as a piece of a playing card, between the connector and the board during the repair.

  14. MacBook Pro 13" 2022 (M2) Speakers Replacement, Disconnect the left speaker: 手順 14、 3の画像 1 MacBook Pro 13" 2022 (M2) Speakers Replacement, Disconnect the left speaker: 手順 14、 3の画像 2 MacBook Pro 13" 2022 (M2) Speakers Replacement, Disconnect the left speaker: 手順 14、 3の画像 3
    この手順で使用する道具:
    Tweezers
    $4.99
    購入する
    • Use the point of a spudger to flip up the small locking tab securing the left speaker connector.

    • Use blunt nose tweezers or your fingers to grab the pull tab on the head of the connector and slide it straight out of its socket.

  15. MacBook Pro 13" 2022 (M2) Speakers Replacement, Unfasten the left speaker: 手順 15、 1の画像 1
    • Use your T5 Torx driver to remove the three 2.8 mm screws securing the left speaker.

    • The screws are held in place by rubber spacers that may prevent them from coming out once they're unscrewed.

  16. MacBook Pro 13" 2022 (M2) Speakers Replacement, Remove the left speaker: 手順 16、 3の画像 1 MacBook Pro 13" 2022 (M2) Speakers Replacement, Remove the left speaker: 手順 16、 3の画像 2 MacBook Pro 13" 2022 (M2) Speakers Replacement, Remove the left speaker: 手順 16、 3の画像 3
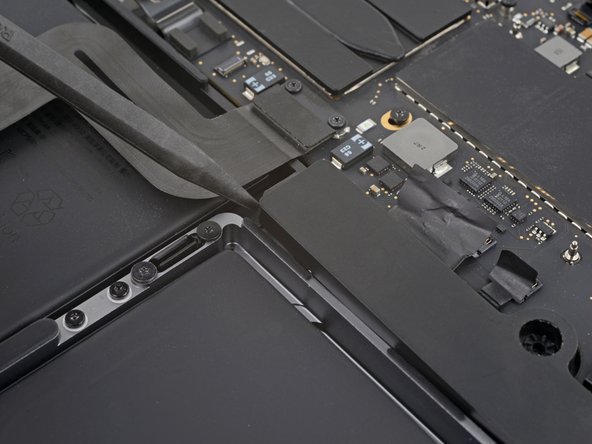
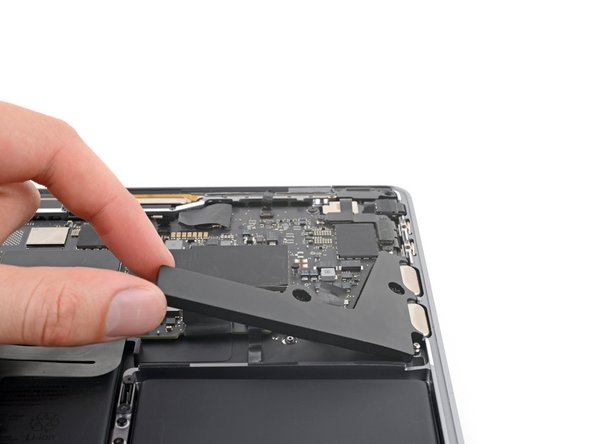
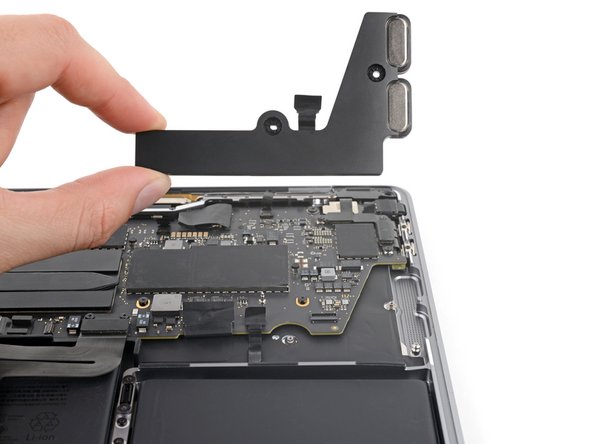
    • Insert the point of your spudger between the right edge of the left speaker and the frame.

    • Pry the speaker out of its recess in the frame.

    • Grab the right edge of the speaker and remove it.

  17. MacBook Pro 13" 2022 (M2) Speakers Replacement, Disconnect the right speaker: 手順 17、 3の画像 1 MacBook Pro 13" 2022 (M2) Speakers Replacement, Disconnect the right speaker: 手順 17、 3の画像 2 MacBook Pro 13" 2022 (M2) Speakers Replacement, Disconnect the right speaker: 手順 17、 3の画像 3
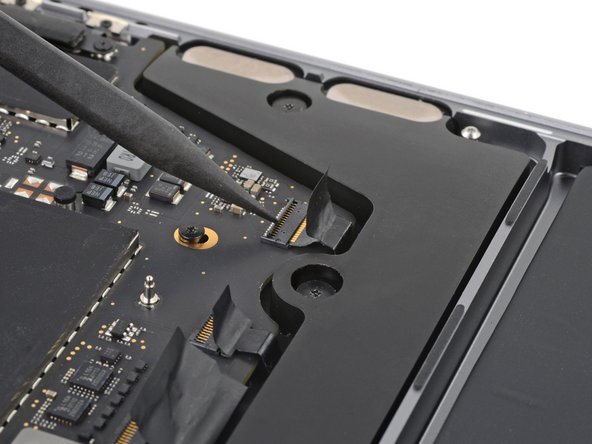
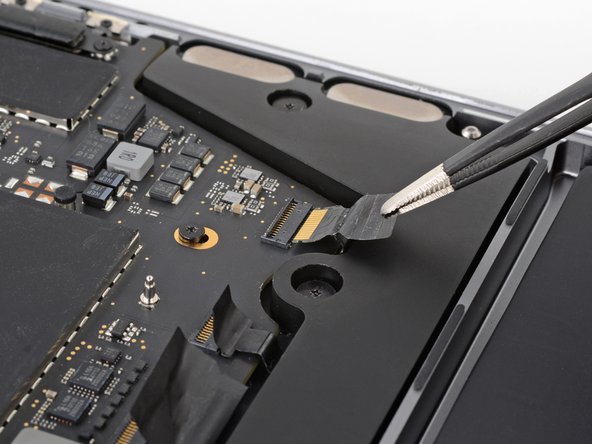
    • Use the point of a spudger to flip up the small locking tab securing the right speaker connector.

    • Use blunt nose tweezers or your fingers to grab the pull tab on the head of the connector and slide it straight out of its socket.

  18. MacBook Pro 13" 2022 (M2) Speakers Replacement, Unfasten the right speaker: 手順 18、 1の画像 1
    • Use your T5 Torx driver to remove the two 2.8 mm screws securing the right speaker.

    • The screws are held in place by rubber spacers that may prevent them from coming out once they're unscrewed.

  19. MacBook Pro 13" 2022 (M2) Speakers Replacement, Pry up the right speaker: 手順 19、 2の画像 1 MacBook Pro 13" 2022 (M2) Speakers Replacement, Pry up the right speaker: 手順 19、 2の画像 2
    • Insert the point of your spudger between the left edge of the right speaker and the frame.

    • Pry the speaker out of its recess in the frame.

  20. MacBook Pro 13" 2022 (M2) Speakers Replacement, Remove the right speaker: 手順 20、 3の画像 1 MacBook Pro 13" 2022 (M2) Speakers Replacement, Remove the right speaker: 手順 20、 3の画像 2 MacBook Pro 13" 2022 (M2) Speakers Replacement, Remove the right speaker: 手順 20、 3の画像 3
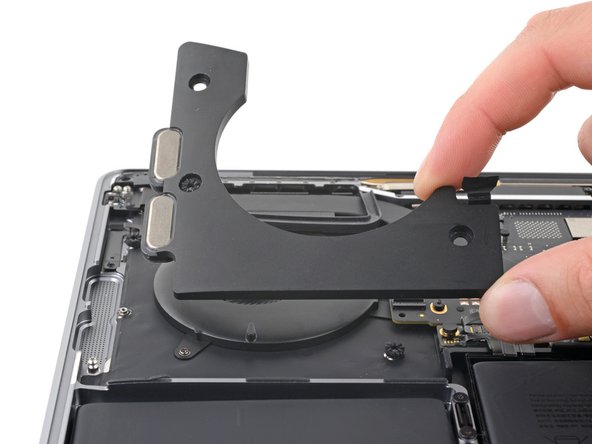
    • Grab and lift the left edge of the right speaker.

    • Remove the speaker.

    • During reassembly, angle the speaker downward before inserting it in the frame.

  21. MacBook Pro 13" 2022 (M2) Speakers Replacement, Reassembly information: 手順 21、 3の画像 1 MacBook Pro 13" 2022 (M2) Speakers Replacement, Reassembly information: 手順 21、 3の画像 2 MacBook Pro 13" 2022 (M2) Speakers Replacement, Reassembly information: 手順 21、 3の画像 3
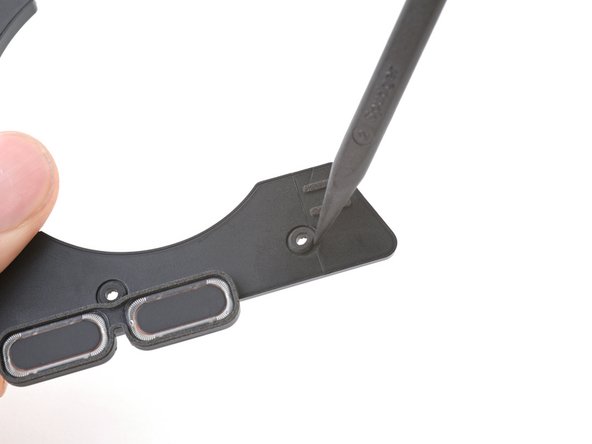
    • Before reinstalling the speakers, the rubber spacers must be in the speaker screw holes. If any spacers are on their screw posts in the frame, remove them and follow these instructions:

    • Flip the speaker over so the bottom side faces you.

    • Press each rubber spacer into its hole with the smooth side facing up.

    • Use the point of a spudger to fully seat the spacer into its slot.

終わりに

Compare your new replacement part to the original part—you may need to transfer remaining components or remove adhesive backings from the new part before installing.

To reassemble your device, follow these instructions in reverse order.

Take your e-waste to an R2 or e-Stewards certified recycler.

Repair didn’t go as planned? Try some basic troubleshooting or search our Answers community for help.

作成者

1人の作成者と共同作成されました。

Clay Eickemeyer

メンバー登録日: 09/19/22

69,639 ポイント

453のガイドは作成済み

チーム

iFixit iFixit人のメンバー

Staff

141 メンバー

17,911のガイドは作成済み

0 件のコメント

コメントを追加

統計データ:

過去 24時間: 3

過去 7 日: 15

過去 30 日: 76

今までの合計 1,076