はじめに
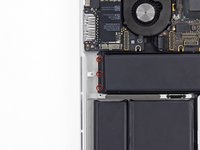
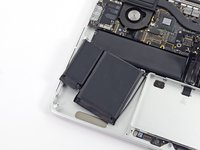
バッテリーは6つの個別セルで作られており、上部ケースに固定されています。キットにある接着剤リムーバーにより、バッテリーに付けられた接着剤を溶解し、簡単に取り出すことが可能となります。バッテリーは6つのセルからできており、そのうち4つのバッテリーは上部ケースに接着されています。
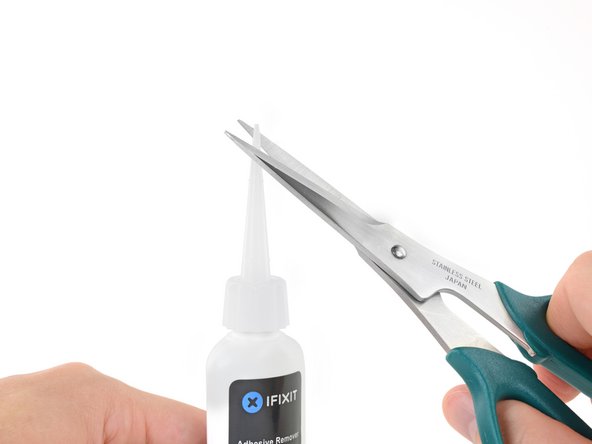
iFixitの接着剤リムーバーは可燃性が高いです。このリムーバーを使って作業をする際は、通気性のよい場所で行ってください。作業中、付近で喫煙したり、火器のある場所で行わないでください。
ダメージのリスクを軽減するため、この作業を始めるにバッテリーを完全に放電してください。充電したリチウムポリマーバッテリーに穴を開けてしまうと、危険かつ手に負えない火事を引き起こしかねます。バッテリーが膨張している場合は、特に注意を払って適切な方法で処理してください。
ご注意: リムーバーはMacBook Proのプラスチック製スピーカー用筐体などのような、プラスチックのある箇所にダメージを与えてしまうことがあります。リムーバーを塗布する際は、慎重に作業を行ってください。
ボトルとスポイトが付いている旧タイプのiFixit接着剤リムーバーを使用する場合は(販売終了)、こちらの修正版ガイドを参照してください。
必要な工具と部品
-
この手順で使用する道具:Magnetic Project Mat$19.95
-
底ケースと上部ケースを留めている次のネジを10本外します。
-
2.3 mm P5ペンタロープネジー2本
-
3.0 mm P5 ペンタロープネジー8本
-
この作業中、外した各ネジの管理を安全に行ってください。再組み立ての際は、デバイスのダメージを防ぐため、正しい位置に装着してください。
-
-
-
-
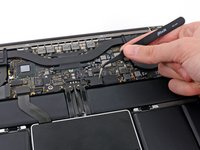
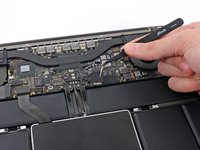
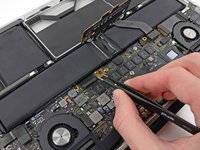
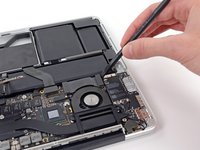
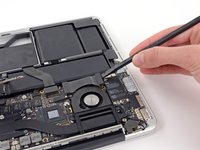
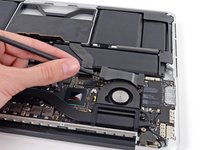
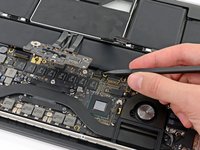
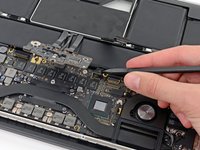
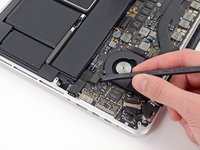
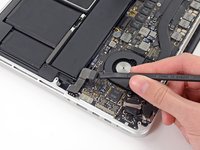
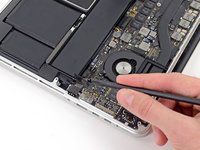
スパッジャーの平面側先端を使って、SSDケーブルコネクターをロジックボードのソケットから引き上げます。
-
SSDケーブルコネクターを作業の邪魔にならない位置に動かします。
-
-
-
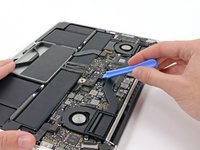
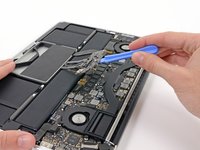
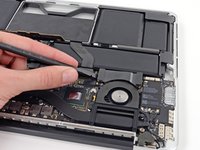
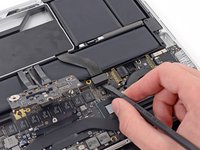
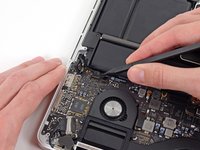
親指を使ってSSDトレイ上のプラスチック製バネ付きバーを曲げ、デバイスの正面側にある2つのクリップを外します。
-
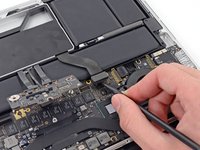
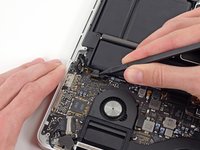
バネ付きバーを押さえながら、SSDアセンブリをスペースから外すように前向き押し上げます。
-
-
-
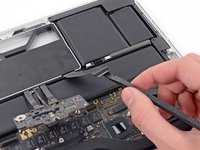
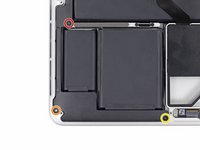
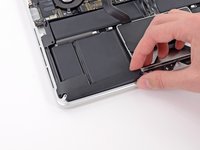
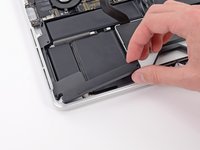
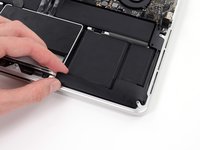
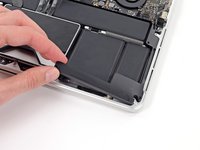
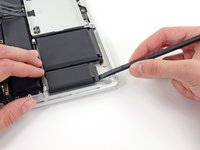
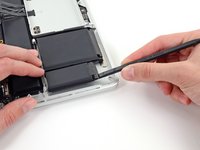
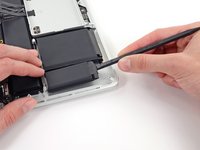
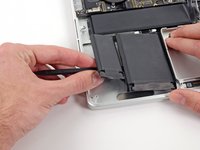
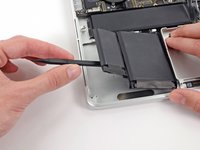
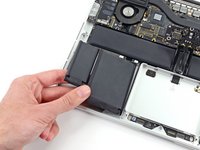
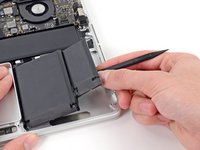
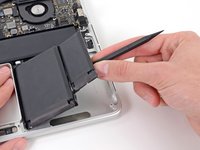
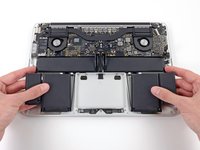
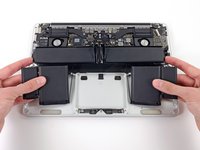
バッテリーを上部ケースから完全に取り出します。
-
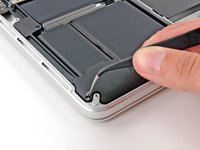
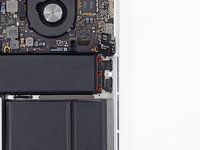
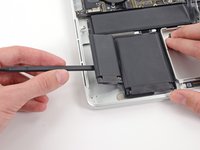
運が良ければ、ゆっくりと指で各接着ストリップを剥がせます。
-
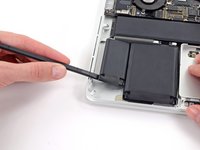
そうでない場合は、各バッテリーセルの下に接着剤リムーバーを少量ずつ付けます。2−3分間待った後、開口ピックやお持ちのツールで接着剤をこすり落とします。この作業には少し忍耐が必要です。
-
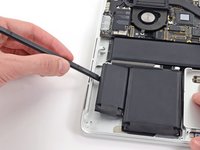
残りのバッテリーセルについても接着剤リムーバーを付けて同じ作業を繰り返します。それからMacBook Proを数分間、空気乾燥させます。
-
この修理ガイドを完成したら、新しく装着したバッテリーのキャリブレーションを行なってください。100%になるまで充電します。充電後も最低2時間はプラグを繋げたままにします。それからプラグを外して、通常通り使用しながら、自然に放電させます。バッテリー残量小のサインが表示されたら、これまでの作業を保存して、スリープ状態になるまで放置してください。スリープ状態に入ったら、少なくとも5時間置きます。それから一気に100%まで充電します。
-


デバイスを再組み立てする際は、これらのインストラクションを逆の順番に従って作業を進めてください。
バッテリーの最適化のために、この手順を完了後、新しく搭載したバッテリーの残量を調整してください。 100%まで充電したら、そのままプラグに繋いだまま、さらに2時間充電状態にします。それから自動的にシャットダウンするまで放電させて、中断なく一気に100%まで充電してください。
e-wasteを処理する場合は、認可済みリサイクルセンターR2を通じて廃棄してください。
修理が上手く進みませんか?基本的なトラブルシュートのページを参照するか、アンサーフォーラムを検索してください。
デバイスを再組み立てする際は、これらのインストラクションを逆の順番に従って作業を進めてください。
バッテリーの最適化のために、この手順を完了後、新しく搭載したバッテリーの残量を調整してください。 100%まで充電したら、そのままプラグに繋いだまま、さらに2時間充電状態にします。それから自動的にシャットダウンするまで放電させて、中断なく一気に100%まで充電してください。
e-wasteを処理する場合は、認可済みリサイクルセンターR2を通じて廃棄してください。
修理が上手く進みませんか?基本的なトラブルシュートのページを参照するか、アンサーフォーラムを検索してください。
248 の人々がこのガイドを完成させました。
以下の翻訳者の皆さんにお礼を申し上げます:
100%

これらの翻訳者の方々は世界を修理する私たちのサポートをしてくれています。 あなたも貢献してみませんか?
翻訳を始める ›

63 件のコメント
There is a much easier way to get the batteries out. If you look at the 2 cells on either side (left and right), you will notice that they put them in an area that is slightly lowered. This is by design. To remove the batteries, pour a small amount of 90% isopropyl alcohol on both sides and let it sit for about 30 to 45 mins. It will dissolve the glue and you can gently then lift out the batteries without any prying. After you remove the batteries, simply wipe up any remaining alcohol, let it dry, buff it clean, and insert the new battery. Considerably easier and safer than potentially damaging the battery packs. If you are putting the same battery pack back, just use double sided tape. IMPORTANT NOTE: ALWAYS BE SAFE USING ISOPROPYL ALCOHOL AROUND FLAMES OR ANYTHING THAT MIGHT MAKE IT BURN. ALSO, NEVER ATTEMPT TO PRY THE BATTERIES IN ANY WAY IF ANY ALCOHOL IS STILL POTENTIALLY PRESENT!! WAIT UNTIL IT IS EVAPORATED!!
jimhoffa69 - 返信
Thank You for the hint with the alcohol, but where can I buy a spare battery?
Uli -
I poured isopropanol into those lowered areas but unfortunately it soaked up along the battery leads and got all the way under the keyboard and elsewhere where it shouldn’t. It made some other plastic parts of the computer swell which isn’t good so I would not recommend pouring any solvent in there. Add a very small amount of solvent (0.25 ml) just enough to soften the adhesive, and let it sit for about 30 min and then pry carefully and add a little more, making sure it doesn’t get soaked up by the battery leads.
Another important thing: when you buy a battery, make sure it’s new, up to 1 year from date of manufacture because they have a limited shelf life and get permanently damaged when sitting uncharged.
Prying the battery out is HARD! and VERY dangerous. I tried using a flat head screwdriver, put it under the battery and twisting the thing out. DO NOT DO THAT!! as it can punch a hole in the battery if you twist it too hard. I had a small smoke coming off by doing that and was lucky enough it didn't burn. Using isopropyl would be an ideal solution. But to bad I can't find that around here :(.
[DO THIS ON YOUR OWN RISK] What I ended up doing is using the screwdriver to gouge the underlying glue out as much as I can on the side (about 10%) and use fingers to pry it up. Good luck!
Perfect! not as difficult as it looked first, especially with the proper tools. To take the batteries out the alcohol (I used ethanol used for cleaning purposes) works like charm. I put a few ml in nearby the batteries, waited maybe 20min and was able to pry them out easily. Tried before without the alocohol and nothing moved. I ordered the battery on ebay for 70€ and it has the same numbers and text as the original it says apple japan as well. My old battery had more than a thousand cycles after 3 years and did not last vey long. Now the software shows 0 cycles and it is charging starting at 15% and will be fully charged in 2:45h. I think apple charges 249€ for the job here in Gernany. It took me about 1 hour to replace it (with waiting).