はじめに
トラックパッドを交換するためのガイドです。
必要な工具と部品
-
この手順で使用する道具:P5 Pentalobe Screwdriver Retina MacBook Pro and Air$5.99
-
P5ペンタローブドライバーを使って、下部ケースをはずしてください。ネジは次の長さに分かれます。
-
9mm ネジー 2本
-
2.6mm ネジー 8本
 FixBotに聞いてみる
-
-
-
-
バッテリーをロジックボードに近い上端から持ち上げ、上部ケースから取り外します。
-
100%になるまで充電します。充電後も最低2時間はプラグを繋げたままにします。それからプラグを外して、通常通り使用しながら、自然に放電させます。バッテリー残量小のサインが表示されたら、これまでの作業を保存して、スリープ状態になるまで放置してください。スリープ状態に入ったら、少なくとも5時間置きます。それから一気に100%まで充電します。
-
新しいバッテリーを装着後、通常通り作動しない場合は、MacBook ProのSMCをリセットしなければならない可能性があります。
-
-
-
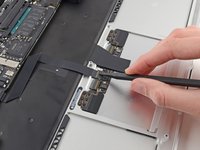
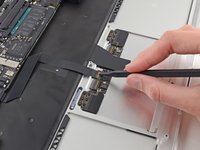
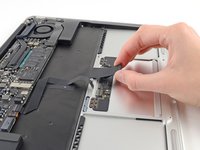
スパッジャーの先端もしくは指の爪先を使って、トラックパッドリボンケーブルのZIFソケット上の固定フラップを跳ね上げて裏返します。
-
トラックパッドのリボンケーブルを、Airのリアケース端に向けてまっすぐ引っ張ります。
-
-
-
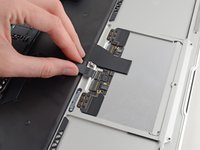
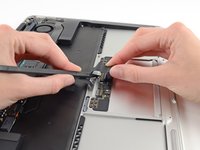
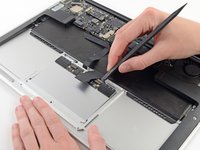
注意しながら片手でキーボードリボンケーブルを持ち上げながら、スパッジャーの先端または指の爪先を使用して、キーボードリボンケーブルZIFソケットの固定フラップを持ち上げます。
-
キーボードのリボンケーブルをソケットからAirのフロントエッジに向けて、まっすぐ引っ張り、外します。
-
-
-
次の12本のネジを外します。
-
トラックパッドを上部ケースに固定している1.6 mmプラスネジー6本
-
トラックパッドのブラケットをトラックパッドに固定している1.6 mmプラスネジー6本
-
-
-
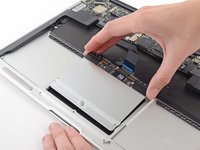
スパッジャーの平面側先端を使って、丁寧に上部ケースの奥からキーボード側に近いトラックパッドの端をゆっくりと持ち上げ、上部ケースに付けられたブラケットから外します。
-
上部ケースからトラックパッドを取り出します。
-


デバイスを再組み立てするには、これらのインストラクションを逆の順番に従って作業を進めてください。
32 の人々がこのガイドを完成させました。
以下の翻訳者の皆さんにお礼を申し上げます:
100%

これらの翻訳者の方々は世界を修理する私たちのサポートをしてくれています。 あなたも貢献してみませんか?
翻訳を始める ›

5件のガイドコメント
even a 65 year old can do it! (with magnifying glasses) Thank! Fixed the dirty, sticking trackpad!
Step 10 should not be done! This is a pure adjustment screw for the clickpoint. Only readjust there, in case clicking does not feel okay after a change of the trackpad. Usually no adjusment is necessary. The trackpad comes out easily after Step 8
Schritt 10 ist falsch! Diese Schraube dient lediglich der Justage des Druckpunkts des Klicks. Sie muss nur verstellt werden, falls der Klick nach dem Wechsel des Trackpads nicht mehr ok ist. Das Trackpad lässt sich aber bereits nach Schritt 8 problemlos entnehmen.
I have replaced the trackpad but it now gives erratic behavior. Usually after booting/opening the lid it works fine for a couple of minutes. Then it stops moving or jumps around the screen after a freeze. Reset SMC does not help unfortunately. Anybody any ideas?