はじめに
このガイドを使ってMacBook Air 13インチEarly 2015のバッテリー交換をしましょう。
注意もし、薄いプラスチックフィルム が新しいバッテリーに貼ってある場合は、剥がさないでください。それは糊付けされており、MacBook内部にバッテリーがある間、バッテリーを保護してくれます。
必要な工具と部品
ビデオの概要
-
この手順で使用する道具:P5 Pentalobe Screwdriver Retina MacBook Pro and Air$5.99
-
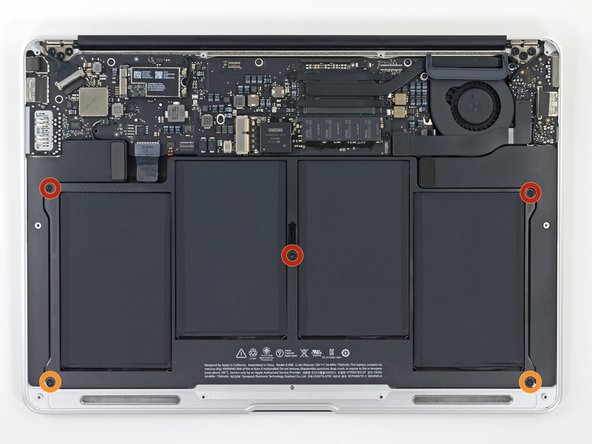
P5ペンタローブドライバーを使って、下部ケースをはずしてください。ネジは次の長さに分かれます。
-
9mm ネジー 2本
-
2.6mm ネジー 8本
-
-
-
-
ロジックボード側の端からバッテリーを持ち上げて、上部ケースから取り出します。
-
100%になるまで充電します。充電後も最低2時間はプラグを繋げたままにします。それからプラグを外して、通常通り使用しながら、自然に放電させます。バッテリー残量小のサインが表示されたら、これまでの作業を保存して、スリープ状態になるまで放置してください。スリープ状態に入ったら、少なくとも5時間置きます。それから一気に100%まで充電します。
-
新しいバッテリーを装着後、通常通り作動しない場合は、MacBook ProのSMCをリセットしなければならない可能性があります。
-


デバイスを組み立て直すには、これらの手順と逆の順序に従ってください。
デバイスを組み立て直すには、これらの手順と逆の順序に従ってください。
401 の人々がこのガイドを完成させました。
以下の翻訳者の皆さんにお礼を申し上げます:
100%


これらの翻訳者の方々は世界を修理する私たちのサポートをしてくれています。 あなたも貢献してみませんか?
翻訳を始める ›

61 件のコメント
Do I have to allow the battery to completely discharge and then recharge after replacement? One site said that was appropriate way to do it.
Yes, for best results you should calibrate your battery by draining it completely and then charging it uninterrupted to 100%. Once it hits 100%, leave it plugged in for a couple more hours. Then drain it again until it shuts off automatically (make sure it doesn't go to sleep). After that, charge it up and use it normally.
But thats a myth … if I’m not wrong, only nickel battery can be calibrated, the os-systems of theses days take care of it, like with all smartphones nowadays.
@mrgrdn You might be thinking of memory effect. Calibration is still very much a thing and quite important, particularly on a new battery. Here’s some reading if you are curious!
Génial pour la livraison et pour ce tuto… j’ai un mac tout neuf ! Et un grand merci pour les bonbons :-)