はじめに
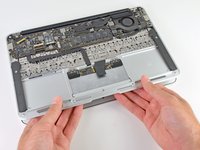
MacBook Air 11" Late 2010からトラックパッドを取り外します。
必要な工具と部品
-
-
-
バッテリを上部ケースに固定している以下の5本のネジを外します。
-
5.2 mm T5トルクスねじ(六角星ねじ) 2本
-
6 mm T5トルクスねじ(六角星ねじ) 1本
-
2.6 mm T5トルクスねじ(六角星ねじ) 2本
Don’t be like me! Make sure you use the *other* screw driver, not the one you took the case off with. I got five of them out with the wrong screwdriver, stripped the head on the sixth, got it out with a screw extractor, cut a new slot in it so I could use a normal flat head screw driver on it to put it back in, and then realized….
-
-
-
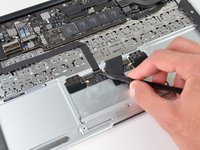
バッテリーをロジックボードに近い上端から持ち上げ、上部ケースから取り外します。
-
100%になるまで充電します。充電後も最低2時間はプラグを繋げたままにします。それからプラグを外して、通常通り使用しながら、自然に放電させます。バッテリー残量小のサインが表示されたら、これまでの作業を保存して、スリープ状態になるまで放置してください。スリープ状態に入ったら、少なくとも5時間置きます。それから一気に100%まで充電します。
-
新しいバッテリーを装着後、通常通り作動しない場合は、MacBook ProのSMCをリセットしなければならない可能性があります。
I need to point out here that the replacement battery that I bought here at iFixit for this MacBook Air says that the battery calibration consists on draining the battery below 10%, then charging it uninterruptedly to 100%, but this is not consistent with the battery calibration that appears on this guide. Which one should I follow? Any additional thoughts on this? Thanks.
Hi Rafael,
We updated our battery calibration technique recently. The most reliable way would be to follow the guide method (charge full + 2 hours, drain completely, charge full again).
This was wonderfully easy-peasy! I just have one small suggestion: you might add a word (and a photo would be great), reminding folks that they need to connect the new battery connector. I know, it should (ok, it is! :) obvious and all… but I have to admit, after having my hand held so well through the rest of the process, having to engage brain again and realize that needed to be done (“what’s missing here?”) - took a moment. It was a bit nervous-making, too, since the new battery cable was quite stiff, resistant to bending, and I had to apply a wee bit of brute force and ignorance to position and connect the connector. Adding a note about that might be useful. Just a thought! Otherwise, super easy and straight forward - I feel so empowered! :)
-
-
-
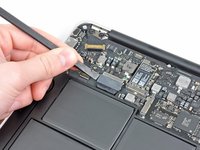
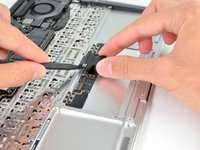
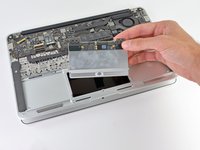
スパッジャーの先端を使いトラックパッドデータケーブルZIFコネクターの保持フラップを持ち上げます。
-
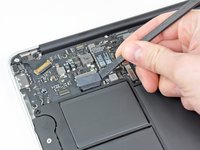
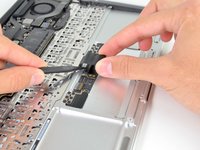
トラックパッドのリボンケーブルをZIFコネクターから徐々に引き出します。
-
-
-
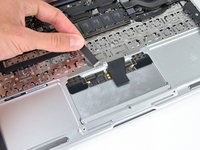
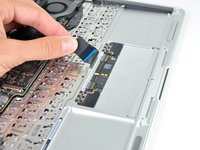
トラックパッドアッセンブリを固定している6つの1.5 mm #00プラスネジを取り外します。
Excellent instructions, just replaced my trackpad and everything worked out well. I can confirm that the 000 Philips is the better choice. One more thing: my new tackpad did not click very smoothly so I had to adjust the sensitivity by turning the tiny screw that sits in the upper case opposite the click mechanism of the trackpad (see step 9 photographs) a bit, 1/2 a rotation was enough, thanks a lot, Oliver, Switzerland
-


デバイスを再組み立てする際は、これらの手順を逆の順番に従って作業を進めてください。
デバイスを再組み立てする際は、これらの手順を逆の順番に従って作業を進めてください。
28 の人々がこのガイドを完成させました。

4 件のコメント
I did it! Replaced the trackpad after the MacBook Air took a dive from a stand, which fortunately just shattered the trackpad's glass. Thanks for the easy to use instructions!
Just one note on step 8: I had to use a PH000 (triple 0) instead of the double 0 - almost destroyed one of the screws before realising.
Best regards,
StH
The trackpad from my macbook air would not click anymore. The pointer still worked, i could still tap and hoover around.
My guess was that something fell between the trackpad and the housing.
And I was right, it was a bread crumb or else of a little seed.
While following this guide, I saw that a little magnet underneath the unibody is lifting the trackpad up again, after being pushed down. Right in that tiny space was the little bugger :)
I'm with Stefan, about his comment by step 8. I actually did destroy one screw (there sat really, really tight) and had to use brute force with a pincer and a tip of WD-40 to loosen it. It seems like Apple took that into account, since there are enough to leave one out :)
I had the same issue, non-clicking mouse, and a dis-assembly & light clean also sorted me out. Thanks everyone!
pabz -
Replacement went well - iFixit guide marvellous as usual and replacement trackpad performs perfectly. So good to resurrect
the trusty MB Air!
I recommend that one of the tools you obtain is a jeweler's loupe that mounts on your glasses. It makes things easier.
blairweaver - 返信
This is not correct. You need the pentalobe tool at this point.
Duane Hellums - 返信