はじめに
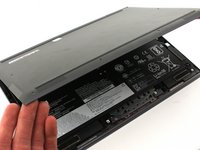
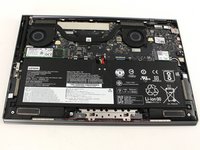
このガイドを参照すれば、Lenovo Yoga C930-13IKBバッテリーを簡単に交換できます。 バッテリーは通常、時間の経過とともに劣化したり、寿命内で問題が生じることがあります。 これによってバッテリーの寿命が短くなり、充電を維持できなくなる可能性があります。 バッテリーの問題の詳細については、トラブルシューティングガイドをご覧ください。
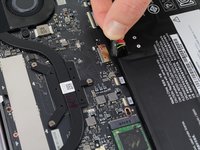
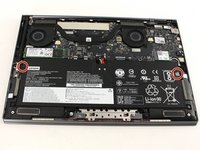
このガイドは、バッテリーがすぐに消耗する、充電できない、またはバッテリーが反応しないために、バッテリーを交換する場合に必要です。この作業に必要なツールは、T5 Torxドライバー、#00プラスドライバー、およびプラスチック製の開口ツールです。
安全のため、デバイスを分解する前にバッテリーを25%以下に放電してください。 これにより、修理中にアクシデントでバッテリーを損傷した場合に、危険な熱現象が発生するリスクを低減することができます。バッテリーが膨張している場合は、適切な方法で処分してください。
必要な工具と部品


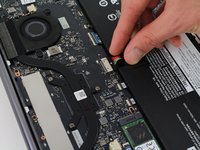
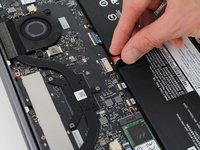


デバイスを再組立する際は、これらのインストラクションを逆の順番に従って作業を進めてください。
e-wasteを処理する場合は、認可済みリサイクルセンターR2を通じて廃棄してください。
修理がうまく進みませんか?ベーシックなトラブルシューティングを行うか、アンサーコミュニティ]に尋ねてみましょう。
デバイスを再組立する際は、これらのインストラクションを逆の順番に従って作業を進めてください。
e-wasteを処理する場合は、認可済みリサイクルセンターR2を通じて廃棄してください。
修理がうまく進みませんか?ベーシックなトラブルシューティングを行うか、アンサーコミュニティ]に尋ねてみましょう。
21 の人々がこのガイドを完成させました。
以下の翻訳者の皆さんにお礼を申し上げます:
100%

Midori Doiさんは世界中で修理する私たちを助けてくれています! あなたも貢献してみませんか?
翻訳を始める ›

チーム

Cal Poly, Team S19-G5, White Winter 2020 Cal Poly, Team S19-G5, White Winter 2020人のメンバー
CPSU-WHITE-W20S19G5
4 メンバー
16のガイドは作成済み
13 件のコメント
One little addition: After removing the bottom cover of the computer, there are two little clear plastic tapes, one on each side of the battery, that you should peel free before starting to lift the battery out. One of those tapes is shown in this photo, just to the right of the icon that resembles a figure eight: https://d3nevzfk7ii3be.cloudfront.net/ig... Those clear tapes are attached to the black plastic strips beneath the battery, that you want to try to leave in place. If you don’t peel back the clear tape tabs, they will increase the likelihood of pulling up those black plastic strips when you start to lift the battery up. My original battery was adhered quite strongly to those plastic strips, and it took a fair bit of work to “dissect” them from the battery using a straight plastic tool that had an end like a regular screwdriver. I did peel those strips up off the computer a bit, but they stuck back down after I separated them from the battery. Thanks for the instructions!
After I had finished putting my C930 back together, I noticed that the underside of the original battery had four soft black strips adhered to it, perhaps as a cushion between the battery and the components beneath. It is possible to remove those, and they could be re-applied to the new battery before installing it, but I’m not going to bother going back now to do that.
I was able to remove the 4 black, “spongy” strips from the original battery and place them on the new battery. This created a “landing” area for the adhesive strips that remained working the computer housing. All instructions were good and quite thorough. Thank you!