はじめに
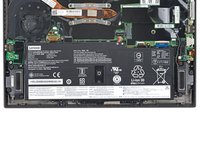
このガイドを使用して、Lenovo ThinkPad X1 Carbon 第7世代ノートパソコンのバッテリーを交換します。
安全のため、分解する前にバッテリーを25%以下に放電してください。これにより、修理中に誤ってバッテリーを破損した場合の発火の危険性を軽減できます。電池が膨張している場合は、適切な処理をしてください。
必要な工具と部品
-
-
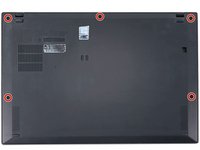
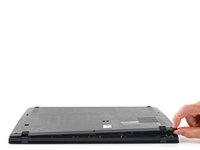
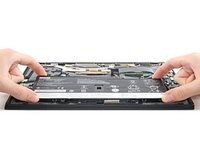
バックカバーとフレームの間にオープニングピックを45°の角度で挿入し、背面中央のネジの近くに挿入します。
-
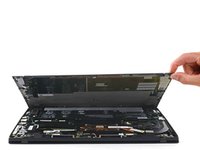
ピックを持ち上げて、バックカバーをフレームに固定しているク リップを外します。
-
-


このデバイスを再組み立てするには、インストラクションを逆の順番に従って作業を進めてください。
この修理ガイドを完成したら、新しく装着したバッテリーのキャリブレーションを行なってください。
e-wasteを処理する場合は、認可済みリサイクルセンターR2を通じて廃棄してください。
修理がうまく進みませんか?ベーシックなトラブルシューティングを試して見るか、このモデルのアンサーコミュニティを参照してください。
このデバイスを再組み立てするには、インストラクションを逆の順番に従って作業を進めてください。
この修理ガイドを完成したら、新しく装着したバッテリーのキャリブレーションを行なってください。
e-wasteを処理する場合は、認可済みリサイクルセンターR2を通じて廃棄してください。
修理がうまく進みませんか?ベーシックなトラブルシューティングを試して見るか、このモデルのアンサーコミュニティを参照してください。
20 の人々がこのガイドを完成させました。
以下の翻訳者の皆さんにお礼を申し上げます:
100%

Midori Doiさんは世界中で修理する私たちを助けてくれています! あなたも貢献してみませんか?
翻訳を始める ›


10 件のコメント
Thank you for the post! My laptop battery is totally dead, not charging at all at 0%, so I cannot disable the built-in battery. Since it immediately dies if unplugged, the built-in battery is automatically enabled while it’s turned on and plugged. Can I just let it unplugged and proceed?
You should still be able to access BIOS with the laptop plugged into its charger to disable the battery before unplugging it and removing it. However, if that does not work, just be careful not to bridge any of the pins the battery connects to on the motherboard and everything should still be fine.
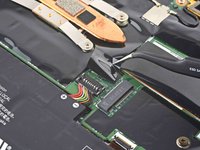
The X1 g.7 has a known bug where internal battery stops working (won’t charge, or says battery not detected in windows). I have personally solved this problem on 4-5 laptops by disconnecting the battery (follow this guide until step 4) and then plugging it back in after ten seconds. In 90% of the cases this has solved the problem without battery replacement.
Yeah it's a hardware connection issue at least in my case. A light kick to the back of the laptop also works usually.
Thanks! This has been very helpful. Just followed the steps until removing the battery connector and putting it back. Issue sorted!
kj_only1 -