メインコンテンツにスキップ

Lenovo ThinkPad T480 Motherboard Replacement

必要な工具と部品

  1. Lenovo ThinkPad T480 Motherboard Replacement, External Battery: 手順 1、 2の画像 1 Lenovo ThinkPad T480 Motherboard Replacement, External Battery: 手順 1、 2の画像 2
    • Disable the battery, power down, and unplug your device before you begin.

    • Flip the laptop over so the bottom of the device is showing.

  2. Lenovo ThinkPad T480 Motherboard Replacement: 手順 2、 3の画像 1 Lenovo ThinkPad T480 Motherboard Replacement: 手順 2、 3の画像 2 Lenovo ThinkPad T480 Motherboard Replacement: 手順 2、 3の画像 3
    • Using your fingers, slide the lock on each side of the battery to the unlocked position.

    • Remove the battery from the slot.

  3. Lenovo ThinkPad T480 Motherboard Replacement, Keyboard: 手順 3、 1の画像 1
    • Use the Phillips #1 screwdriver to loosen the two screws parallel to the battery compartment.

  4. Lenovo ThinkPad T480 Motherboard Replacement: 手順 4、 1の画像 1
    • Open the laptop so the keyboard is facing you.

  5. Lenovo ThinkPad T480 Motherboard Replacement: 手順 5、 3の画像 1 Lenovo ThinkPad T480 Motherboard Replacement: 手順 5、 3の画像 2 Lenovo ThinkPad T480 Motherboard Replacement: 手順 5、 3の画像 3
    • Push the keyboard towards the screen and away from the trackpad and then slide it out towards you gently.

    • The keyboard is connected to the board by two ribbon connectors.

    • Be careful not to rip the connectors when you flip the keyboard over.

  6. Lenovo ThinkPad T480 Motherboard Replacement: 手順 6、 3の画像 1 Lenovo ThinkPad T480 Motherboard Replacement: 手順 6、 3の画像 2 Lenovo ThinkPad T480 Motherboard Replacement: 手順 6、 3の画像 3
    • Flip the keyboard over towards you to expose the backside of the keyboard and the two ribbon connectors.

    • Using the black nylon spudger, flip the first ribbon connector lock open. Slide the first connector out.

  7. Lenovo ThinkPad T480 Motherboard Replacement: 手順 7、 3の画像 1 Lenovo ThinkPad T480 Motherboard Replacement: 手順 7、 3の画像 2 Lenovo ThinkPad T480 Motherboard Replacement: 手順 7、 3の画像 3
    • Using the black nylon spudger, unlock the second ribbon connector and slide it out from the port.

  8. Lenovo ThinkPad T480 Motherboard Replacement: 手順 8、 2の画像 1 Lenovo ThinkPad T480 Motherboard Replacement: 手順 8、 2の画像 2
    • Remove the keyboard from the laptop.

  9. Lenovo ThinkPad T480 Motherboard Replacement, Back Cover: 手順 9、 2の画像 1 Lenovo ThinkPad T480 Motherboard Replacement, Back Cover: 手順 9、 2の画像 2
    • Using the Phillips #1 screwdriver, loosen the six captive screws.

  10. Lenovo ThinkPad T480 Motherboard Replacement: 手順 10、 3の画像 1 Lenovo ThinkPad T480 Motherboard Replacement: 手順 10、 3の画像 2 Lenovo ThinkPad T480 Motherboard Replacement: 手順 10、 3の画像 3
    • Insert the blue plastic opening tool into the space between the lower case and the chassis.

    • Slide the opening tool around the perimeter of the case to release the clips holding the case and the chassis together.

    • If it feels like the battery well portion of the back cover isn't loose, these clips may be holding the cover to the laptop. Use your opening tool to pry the clips loose and try removing the cover again.

    • Remove the back case.

  11. Lenovo ThinkPad T480 Motherboard Replacement, Internal Battery: 手順 11、 2の画像 1 Lenovo ThinkPad T480 Motherboard Replacement, Internal Battery: 手順 11、 2の画像 2
    • Using the Phillips #1 screwdriver, remove the two 4.6 mm screws securing the internal battery to the frame.

  12. Lenovo ThinkPad T480 Motherboard Replacement: 手順 12、 3の画像 1 Lenovo ThinkPad T480 Motherboard Replacement: 手順 12、 3の画像 2 Lenovo ThinkPad T480 Motherboard Replacement: 手順 12、 3の画像 3
    • Use the spudger to slide the battery socket connector parallel to the motherboard and out of its socket on the motherboard.

  13. Lenovo ThinkPad T480 Motherboard Replacement: 手順 13、 3の画像 1 Lenovo ThinkPad T480 Motherboard Replacement: 手順 13、 3の画像 2 Lenovo ThinkPad T480 Motherboard Replacement: 手順 13、 3の画像 3
    • Using the black nylon spudger, wedge the battery up from the case and lift it out.

  14. Lenovo ThinkPad T480 Motherboard Replacement, RAM: 手順 14、 3の画像 1 Lenovo ThinkPad T480 Motherboard Replacement, RAM: 手順 14、 3の画像 2 Lenovo ThinkPad T480 Motherboard Replacement, RAM: 手順 14、 3の画像 3
    • Pull the black plastic sheet back to reveal the RAM stick.

    • Using your fingers, pull the metal arms (located on both sides of the RAM stick) slightly away from it .

    • The RAM will pop up by a few millimeters.

    • Remove it at an angle and not straight up so you don't damage the socket.

  15. Lenovo ThinkPad T480 Motherboard Replacement: 手順 15、 2の画像 1 Lenovo ThinkPad T480 Motherboard Replacement: 手順 15、 2の画像 2
    • Slide the RAM stick out from the memory module slot.

    • Repeat for the RAM stick located below. This computer did not have RAM in the slot below however.

  16. Lenovo ThinkPad T480 Motherboard Replacement, Wi-Fi Card: 手順 16、 1の画像 1
    • Using the Phillips #1 screwdriver, remove the single 3.6 mm screw at the top of the Wi-Fi card attaching it to the motherboard.

  17. Lenovo ThinkPad T480 Motherboard Replacement: 手順 17、 2の画像 1 Lenovo ThinkPad T480 Motherboard Replacement: 手順 17、 2の画像 2
    • Insert the point of a spudger under one of the antenna cables close to the connector. Pry straight up to disconnect the cable off of the Wi-Fi card.

    • Be careful as you pry the cables off of the Wi-Fi card as they are fragile and easily damaged.

  18. Lenovo ThinkPad T480 Motherboard Replacement: 手順 18、 2の画像 1 Lenovo ThinkPad T480 Motherboard Replacement: 手順 18、 2の画像 2
    • Slide the Wi-Fi card out from the slot to remove it from the board.

  19. Lenovo ThinkPad T480 Motherboard Replacement, CMOS Battery: 手順 19、 2の画像 1 Lenovo ThinkPad T480 Motherboard Replacement, CMOS Battery: 手順 19、 2の画像 2
    • Using an IC extractor or black nylon spudger, unplug the connector from the socket on the motherboard.

    • This connector may be very difficult to remove and is easily damaged. Be careful that you don't damage the port when removing the coin cell battery connector.

  20. Lenovo ThinkPad T480 Motherboard Replacement: 手順 20、 2の画像 1 Lenovo ThinkPad T480 Motherboard Replacement: 手順 20、 2の画像 2
    • Using the black nylon spudger, pry the coin cell battery off of the motherboard.

    • The coin cell battery is stuck to the board with a light adhesive.

  21. Lenovo ThinkPad T480 Motherboard Replacement, Speakers: 手順 21、 2の画像 1 Lenovo ThinkPad T480 Motherboard Replacement, Speakers: 手順 21、 2の画像 2
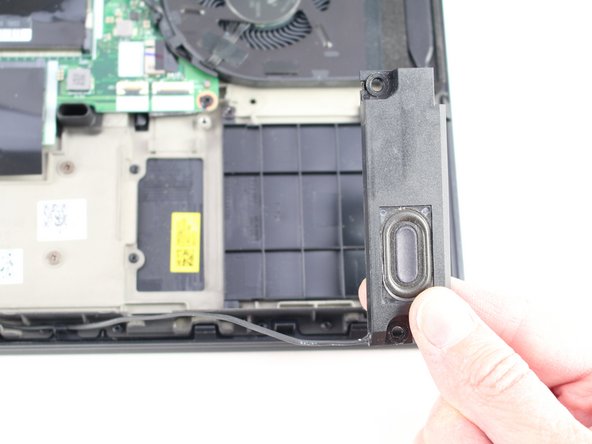
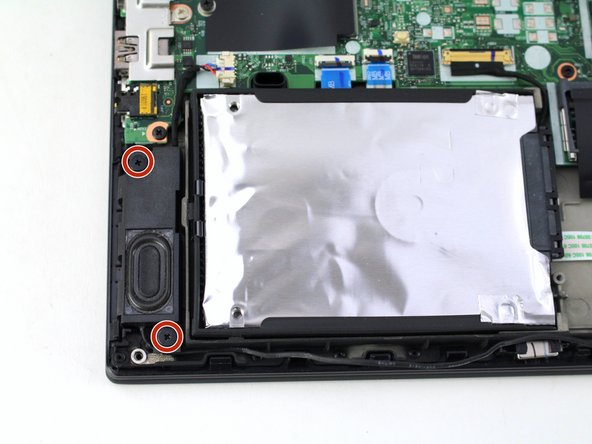
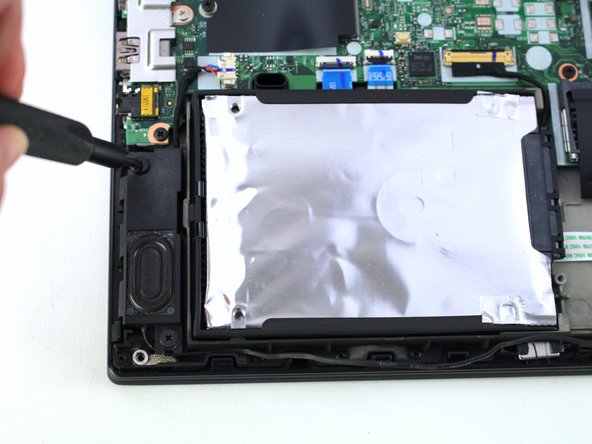
    • Using the Phillips #1 screwdriver, remove two 4.8 mm screws from the right speaker.

  22. Lenovo ThinkPad T480 Motherboard Replacement: 手順 22、 2の画像 1 Lenovo ThinkPad T480 Motherboard Replacement: 手順 22、 2の画像 2
    • Lift the right speaker out of the case.

    • Gently remove the speaker cable from the perimeter of the chassis, connecting the right speaker to the left speaker.

  23. Lenovo ThinkPad T480 Motherboard Replacement: 手順 23、 2の画像 1 Lenovo ThinkPad T480 Motherboard Replacement: 手順 23、 2の画像 2
    • Remove two 4.8 mm screws from the left speaker using the Phillips #1 screwdriver.

  24. Lenovo ThinkPad T480 Motherboard Replacement: 手順 24、 3の画像 1 Lenovo ThinkPad T480 Motherboard Replacement: 手順 24、 3の画像 2 Lenovo ThinkPad T480 Motherboard Replacement: 手順 24、 3の画像 3
    • Using the black nylon spudger, remove the slide connector which attaches the left speaker to the motherboard.

    • Remove the left speaker from the case.

  25. Lenovo ThinkPad T480 Motherboard Replacement, Fan Assembly/Heatsink: 手順 25、 2の画像 1 Lenovo ThinkPad T480 Motherboard Replacement, Fan Assembly/Heatsink: 手順 25、 2の画像 2
    • Using the Phillips #1 screwdriver, loosen the four captive screws in the arm of the heatsink.

  26. Lenovo ThinkPad T480 Motherboard Replacement: 手順 26、 2の画像 1 Lenovo ThinkPad T480 Motherboard Replacement: 手順 26、 2の画像 2
    • Use the black nylon spudger to slide the fan connector parallel to the motherboard and out of its socket on the motherboard.

  27. Lenovo ThinkPad T480 Motherboard Replacement: 手順 27、 3の画像 1 Lenovo ThinkPad T480 Motherboard Replacement: 手順 27、 3の画像 2 Lenovo ThinkPad T480 Motherboard Replacement: 手順 27、 3の画像 3
    • Lift the fan assembly off of the board.

    • Prior to replacing your fan assembly, remember to apply thermal paste.

  28. Lenovo ThinkPad T480 Motherboard Replacement, Hard Drive: 手順 28、 3の画像 1 Lenovo ThinkPad T480 Motherboard Replacement, Hard Drive: 手順 28、 3の画像 2 Lenovo ThinkPad T480 Motherboard Replacement, Hard Drive: 手順 28、 3の画像 3
    • Using the black nylon spudger, lift the connector lock up.

    • Disconnect the storage cable from the system board.

  29. Lenovo ThinkPad T480 Motherboard Replacement: 手順 29、 3の画像 1 Lenovo ThinkPad T480 Motherboard Replacement: 手順 29、 3の画像 2 Lenovo ThinkPad T480 Motherboard Replacement: 手順 29、 3の画像 3
    • Lift the hard drive up with a tab if it has one or with your spudger.

    • Lift the drive assembly from the system.

  30. Lenovo ThinkPad T480 Motherboard Replacement, Motherboard: 手順 30、 2の画像 1 Lenovo ThinkPad T480 Motherboard Replacement, Motherboard: 手順 30、 2の画像 2
    • Using the Phillips #1 screwdriver, remove three 4.6 mm screws from the I/O bracket.

  31. Lenovo ThinkPad T480 Motherboard Replacement: 手順 31、 2の画像 1 Lenovo ThinkPad T480 Motherboard Replacement: 手順 31、 2の画像 2
    • Lift the I/O bracket off the motherboard.

  32. Lenovo ThinkPad T480 Motherboard Replacement: 手順 32、 3の画像 1 Lenovo ThinkPad T480 Motherboard Replacement: 手順 32、 3の画像 2 Lenovo ThinkPad T480 Motherboard Replacement: 手順 32、 3の画像 3
    • Using the Phillips #1 screwdriver, remove the three 4.1 mm screws from the RJ45 bracket.

    • Lift the bracket off of the motherboard.

  33. Lenovo ThinkPad T480 Motherboard Replacement: 手順 33、 3の画像 1 Lenovo ThinkPad T480 Motherboard Replacement: 手順 33、 3の画像 2 Lenovo ThinkPad T480 Motherboard Replacement: 手順 33、 3の画像 3
    • Use the black nylon spudger to lift up the small locking flap on the power button cable's ZIF connector.

    • Slide the power button cable out of the ZIF connector.

  34. Lenovo ThinkPad T480 Motherboard Replacement: 手順 34、 3の画像 1 Lenovo ThinkPad T480 Motherboard Replacement: 手順 34、 3の画像 2 Lenovo ThinkPad T480 Motherboard Replacement: 手順 34、 3の画像 3
    • Using the black nylon spudger, disconnect the LCD cable from the motherboard.

  35. Lenovo ThinkPad T480 Motherboard Replacement: 手順 35、 3の画像 1 Lenovo ThinkPad T480 Motherboard Replacement: 手順 35、 3の画像 2 Lenovo ThinkPad T480 Motherboard Replacement: 手順 35、 3の画像 3
    • Use the tip of a spudger or an opening tool, to flip up the small, hinged locking flap on the camera cable connector to remove the cable from the motherboard.

  36. Lenovo ThinkPad T480 Motherboard Replacement: 手順 36、 3の画像 1 Lenovo ThinkPad T480 Motherboard Replacement: 手順 36、 3の画像 2 Lenovo ThinkPad T480 Motherboard Replacement: 手順 36、 3の画像 3
    • Using the black nylon spudger, remove the NFC cable connector and trackpad connector from the motherboard.

  37. Lenovo ThinkPad T480 Motherboard Replacement: 手順 37、 3の画像 1 Lenovo ThinkPad T480 Motherboard Replacement: 手順 37、 3の画像 2 Lenovo ThinkPad T480 Motherboard Replacement: 手順 37、 3の画像 3
    • Using the Phillips #1 screwdriver, remove seven 3.6 mm screws from the motherboard.

    • Lift the motherboard off of the case to remove it.

終わりに

To reassemble your device, follow the above steps in reverse order.

Take your e-waste to an R2 or e-Stewards certified recycler.

Repair didn’t go as planned? Try some basic troubleshooting, or ask our Answers community for help.

Sarah Westberg

メンバー登録日: 03/11/19

22,723 ポイント

70のガイドは作成済み

チーム

iFixit iFixit人のメンバー

Staff

136 メンバー

16,577のガイドは作成済み

0 件のコメント

コメントを追加

統計データ:

過去 24時間: 7

過去 7 日: 50

過去 30 日: 293

今までの合計 7,005