この修理ガイドは変更されています。最新の未承認バージョンに切り替えます。
はじめに
This guide will teach users how to pry open the back cover, and remove screws in order to access the battery.
必要な工具と部品
-
-
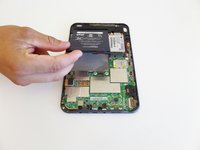
Turn the device upside-down and insert a pry tool between the two case pieces.
-
Work the pry tool around the edge of the case, releasing the 18 clips. Don't insert your tool too far, or you may damage components near the edges of the device. The clips are all in the outer edge of the backplate anyway. Note that the clip above the power switch is bigger and stronger than the rest.
-
Pull the rear cover off. The remaining two clips near the center of the back are surprisingly strong.
-
-
-
-
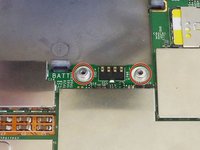
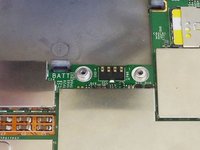
Unscrew the two silver 4 mm Phillips screws securing the battery connector.
-
Set the screws aside in a safe place -- there are exposed components and it's easy for them to short-circuit something.
-
-
-
Lift battery out of housing starting at the end that was secured by the screws.
-
Watch out for the odd-shaped silver washers beneath the battery connector (see second photo); they are necessary for proper mating of the electrical contacts when the screws are re-tightened.
The washer came loose. Will it be ok?
I lost one of the washers. What do they do and where can I buy one? What’s the specific name for it?
They hold the battery flat. Without it pulls the battery into a curve. I have plenty of spare parts, including motherboards, both Wi-Fi and 3G. I’m in the UK
This helped me change my Kindle Keyboards battery easily. Thank you!
In my case, battery died. I replaced it with a spare pouch li-ion I had - the thing is, this battery communicates it's status through I2C, so I had to crank it open to separate the PCB from the actual battery. After doing so, I only had to solder the new battery between + and -, close up and it worked like a charm 😀
-


To reassemble your device, follow these instructions in reverse order, paying attention to the reassembly notes in the individual steps.
To reassemble your device, follow these instructions in reverse order, paying attention to the reassembly notes in the individual steps.
97 の人々がこのガイドを完成させました。
チーム

CSU Fullerton, Team 1-5, Bruce Fall 2014 CSU Fullerton, Team 1-5, Bruce Fall 2014人のメンバー
CSUF-BRUCE-F14S1G5
4 メンバー
15のガイドは作成済み
23 件のコメント
Hi Allison Monahan,
thank you very much for yor help! By using your guide I made my nearly 6 years old Kindle Keyboard fixed - great!
I went to mpfproducts.com and ordered my new battery which came in today. I’ve changed out the battery and my Kindle 3 is now charging. YAHOO!!!
Where did you get the battery? I couldn’t find it on Amazon. Do you have a model number for the battery? Thanks.
sand1k -
The old Amazon link has been removed. There’s now a link at the top of this guide to an eBay vendor that stocks the battery. Good luck!
Thanks, Allison and IFIXIT!!! God, I love this site. Cheers, Tom
My Kindle won’t turn on, but the on/off switch glows. It has been working, somewhat. If I tried to turn it off, it would reboot, so I just let it go to sleep on its own. Does the battery need replacing?
My 10-year old kindle is now like-new. Bought my replacement battery (with tools included) at:
The toughest part was prying off the back. Be careful but forceful, those who are attempting this! Thank you for the guide and the part, iFixit!
Hi
I lost the 2 silver washers, what do i do now?
Thanks, my 2010 Kindle 3 is as good as new :D
My Kindle 3 was 12 years old and the battery died. Given my very limited skills in working on devices (that is, taking them apart etc), I was happy to have found this guide. With some difficulty opening it, I managed to replace the battery. And, thanks to the tip about the silver washers I knew what to do with them when I saw them on my desk after I had closed the kindle and it was dead. So, I opened it again, put the silver washers in place, and, voila, hopefully I have another 12 years with this. I prefer the older Kindles, with no backlight. So this guide was immensely helpful. tnx
Great tutorial! Went smoothly and now our Kindle is ready for more years of trouble free service and we don’t have to buy a new one! Thanks, Allison and I Fix It for helping us with all by hosting this site for information as well as selling quality parts and tools that make these repairs possible.
Hi. I was wondering if I could replace the kindle 3 (keyboard) battery by rigging a 18650? Would that be possible?
Thanks in advance!
OK, so I'm replying to myself and anyone who's interested. I was too impatient to wait for a reply so I tried it out myself. I opened my Kindle, removed the battery and peeled the paper wrapping off. Then I freed the BMS circuit and kept the plastic frame while snipping off the terminals of my old battery. I soldered 2 wires to the B+ and B- pads on the BMS circuit and soldered their other ends to a 18650 battery holder. I then screwed the frame back in and inserted a generic 18650 battery into the holder, at which point my kindle told me to charge it up. After a few minutes, the device awoke and I was able to read. There. It's a bit ghetto, but with a little work you can attach the battery holder to the back of the kindle and drill a small hole in the back of the case for the cable. Makes battery replacement a breeze and gives your old Kindle a new lease of life as well as a cyberpunk look :)
I purchased the battery for my Kindle (Gen3) from IFIXIT, and the customer service, shipping and instructions were excellent. I'd recommend that you give them a try - you'll be back. I also like what they offer, which is a way to keep durable products alive, and not having to "rebuy" a perfectly repairable item that you already like. Thanks guys!
I have an old Kindle 3, it was "working" with the original battery but would need to be recharged within a day. I attempted replacement with this kit but it stays on the "Empty Battery" screen. I had charged it overnight and measured 4v on the battery. I swapped the original back in and the kindle booted normally. It seems like it is not seeing the new battery. What can I do to get it going besides the 15/30/40 "hold the power button" reset?
My Kindle 3 is up and running again! Thank you!
I definitely second the comment that it seems to make more sense to start prying the back off in the bottom right corner, instead of right around that delicate ribbon cable. I used an opening pick to get it started, and then used the pry tool right next to each latch point. Once I got it to the area near the delicate cable, I was able too remove it the rest of the way by hand.
I am about to take my 1st Kindle—to have battery changed. I’m a little old lady yet capable, but easiest to have ‘pro’ do it(so if messed up, I can fuss at him instead of myself! Haha)
Funny that K3 would still be my favorite even owning current Kindles. However, point of this note is Thank You for such excellent instructions!!
KCampbell, Texas
Fixed my old Kindle Keyboard with this guide and a replacement battery I bought off of this site. Did exactly what was outlined, no unexpected things, easy five minute replacement, device loaded like a charm. Perfect beginner guide, thanks!
As a note, my old battery is swollen and is already in a battery center's disposal bin.
Ah, I put it on in the wrong order, then figured out that starting at the bottom works best. I did the bottom, top and corners and then the sides, because I already had the top done.
kwood - 返信
BE VERY CAREFUL HERE!! 15mm below the "next page" button was directly where the flex cable was. And it is an extremely fragile cable, even for flex cables. Which means I, of course, tore right through it without knowing until I got the cover off. So don't do that. Start 15mm above the lower corner, if anything, or start on the opposite side. Starting on the side with a single-point-of-failure is a really risky choice. The opposite side has basically nothing up against the edge, so you're free to poke it.
The other thing that isn't stated here is that the flex cable is inherently tied into the screen. Which means that if you, like me, damage that cable, the entire screen now broken and needs replacing. And if you, like me, was just trying to replace the battery or the motherboard, now it just makes sense to replace the entire device, both environmentally and financially. Whomp whomp.
bhurwitz - 返信
As is, the guide sets you up SPECIFICALLY to DAMAGE THE SCREEN by prying into its very delicate ribbon cable.
A Kenny - 返信
Apart from the buttons, are there any other specific places where we shouldn't pry, because it would damage something?
okojoijohoij - 返信
There are clips a several centimeters from the edge of the Kindle across from the page-turning buttons. Undoing these clips was the most difficult part of opening the back of the Kindle. Be careful and take your time here.
It's a good idea to start on at the left page-turning button to help minimize risk of damage to the flex cable.
John Thoreson - 返信
I've submitted an edit clearing up where to start the pry tool. Please folks, if you encounter something like this don't hesitate to remove bad information! With the contradictory instructions here I ended up starting on the left and piercing the cable like so many before me, which is very frustrating.
Jakob C - 返信
Die Anleitung sollte in diesem Punkt wirklich überarbeitet werden. Das ist die absolut gefährlichste Stelle, das Gerät zu öffnen. So habe ich das Flex-Kabel eines funktionierenden Displays zerstört. Ich schreibe dies auf Deutsch und bitte darum, die englischen Erläuterungen zu lesen, wo man besser öffnet.
Kajetan Hinner - 返信
I submitted an edit adding that the corners are another good place to start (it's how I just opened mine with no trouble) and moved the ribbon cable warning up to make sure people see it.
Neal Sofge - 返信
Regarding two last (central) clips, it helps to know they both are facing the same way and after releasing the outer clips you can slide the back cover slightly towards the top of device to release them.
Konrad Grzegorzewicz - 返信