メインコンテンツにスキップ

この翻訳は、ソースガイドの最新の更新を反映していない可能性があります。 翻訳の更新に協力してください。 または ソースガイドを参照してください

Huawei P9 ディスプレイの交換

必要な工具と部品

  1. Huawei P9 ディスプレイの交換, バックカバー: 手順 1、 3の画像 1 Huawei P9 ディスプレイの交換, バックカバー: 手順 1、 3の画像 2 Huawei P9 ディスプレイの交換, バックカバー: 手順 1、 3の画像 3
    • まず、スマートフォンの電源を切り、SIMカードトレイを取り出します。

    • デバイスのUSB Cポートの横、底部に留められたペンタローブP2ネジを2本外します。

    • スクリーンが割れている場合、ガラスの破片から目を保護するため保護メガネを着用します。スマートフォンを開口するときに握りやすくするため、スクリーン上にテープを貼ることもできます。

  2. Huawei P9 ディスプレイの交換: 手順 2、 2の画像 1 Huawei P9 ディスプレイの交換: 手順 2、 2の画像 2
    • デバイス本体ではなく、ディスプレイだけを持ち上げると、スクリーンに傷がつくことがあります。

    • iSclackや吸盤ハンドルを使って、リアパネルからディスプレイユニットを引き離します。

    • リアパネルからデバイスのアセンブリを持ち上げて取り外せない場合は、ヘッドフォンジャックの開口部にスパッジャーの先端を差し込み、アセンブリとリアパネルの間に隙間ができるまでデバイスのアセンブリを上向きに押してください。その後、スパッジャーを使ってパネルからデバイスアセンブリを引き抜きます。

    • ケーブルが接続された状態のため、まだリアパネルを完全に取り外さないでください。指紋センサーからディスプレイユニットまで繋がったままの状態です。

  3. Huawei P9 ディスプレイの交換, 指紋センサーの接続を外します: 手順 3、 2の画像 1 Huawei P9 ディスプレイの交換, 指紋センサーの接続を外します: 手順 3、 2の画像 2
    • スパッジャーで指紋センサーの接続を外します。

  4. Huawei P9 ディスプレイの交換, バッテリー: 手順 4、 3の画像 1 Huawei P9 ディスプレイの交換, バッテリー: 手順 4、 3の画像 2 Huawei P9 ディスプレイの交換, バッテリー: 手順 4、 3の画像 3
    • アンテナケーブルを抜いて下さい。

    • ネジの上にある液体侵入インジケーターを取り除いて下さい。

  5. Huawei P9 ディスプレイの交換: 手順 5、 3の画像 1 Huawei P9 ディスプレイの交換: 手順 5、 3の画像 2 Huawei P9 ディスプレイの交換: 手順 5、 3の画像 3
    • 金属プレートを固定している二つの#00プラスネジを外して下さい。

    • バッテリーコネクタをカバーしているプレートには二つの小さいフックが両側についています。ピンセットを使ってヒンジを外し、慎重にプレートを上むきに動かして下さい。

  6. Huawei P9 ディスプレイの交換: 手順 6、 2の画像 1 Huawei P9 ディスプレイの交換: 手順 6、 2の画像 2
    • バッテリーコネクタの接続を外して、(作業の邪魔にならないように)折り曲げたままにします。

    • EVA -L09モデルにはNFCアンテナがバッテリーに装着されています。

    • ディスプレイにアクセスするために、バッテリーを取り外すだけの場合、NFCをバッテリー上に残しておくことができます。

    • 再組み立て用に増えるとペンでバッテリー上に位置をマークしてきましょう。 慎重に剥がし、アンテナを破ったり折り目を付けたりしないようご注意ください。

    • 再組み立ての際には、NFCアンテナを接続部分が合致していたバッテリー上の元あった場所に搭載します。

  7. Huawei P9 ディスプレイの交換: 手順 7、 2の画像 1 Huawei P9 ディスプレイの交換: 手順 7、 2の画像 2
    • 接着プルタブの先端を引いて、しっかりと摘まんでください。

  8. Huawei P9 ディスプレイの交換: 手順 8、 3の画像 1 Huawei P9 ディスプレイの交換: 手順 8、 3の画像 2 Huawei P9 ディスプレイの交換: 手順 8、 3の画像 3
    この手順で使用する道具:
    Tesa 61395 Tape
    $5.99
    購入する
    • バッテリーは中央部分とSIMトレイ側に、合わせて3本の接着プルタブ付きで固定されています。ボタン側につけられた三つ目の粘着剤にはプルタブがついていません。

    • 粘着性のある取手はゆっくりと一定の動作で引っ張って下さい。

    • 接着タブがついている場合は、 iOpener を使って接着剤を温めて少し柔らかくなったら、スパッジャーでバッテリーを持ち上げてください。

    • この二つのケーブルはバッテリーのすぐ下を通っています。スパッジャーでこじ開けていく作業では、バッテリーにダメージを与えないようご注意ください。プルタブが付けられている位置を最後の写真で確認することができます。

    • ゆっくりとバッテリーをボタン側にあげて、残りの接着剤を綺麗に取り除きます。

    • デバイス本体を再組み立てするときは、古い接着剤を ストレッチリリースタイプの接着ストリップもしくは両面テーププレカットされた接着ストリップに交換します。

  9. Huawei P9 ディスプレイの交換, ディスプレイ: 手順 9、 3の画像 1 Huawei P9 ディスプレイの交換, ディスプレイ: 手順 9、 3の画像 2 Huawei P9 ディスプレイの交換, ディスプレイ: 手順 9、 3の画像 3
    • マザーボードから#00プラスネジを5本外します。

    • マザーボードのフレックスケーブルに加えてパワー/音量ボタンケーブルの接続を外します。

  10. Huawei P9 ディスプレイの交換: 手順 10、 3の画像 1 Huawei P9 ディスプレイの交換: 手順 10、 3の画像 2 Huawei P9 ディスプレイの交換: 手順 10、 3の画像 3
    • LCDスクリーン用フレックスケーブルの接続を外します。

    • これでマザーボードを完全に取り外しできます。

    • 便利なことに、フロントとリアカメラの

    • ここに翻訳を挿入する

  11. この手順は未翻訳です。 翻訳を手伝う。

    Huawei P9 ディスプレイの交換: 手順 11、 1の画像 1
    • Heat the top part of the glass with a heat gun or iOpener.

    • The glue used for the display is tough and needs patience and gentle steady force.

  12. この手順は未翻訳です。 翻訳を手伝う。

    Huawei P9 ディスプレイの交換: 手順 12、 3の画像 1 Huawei P9 ディスプレイの交換: 手順 12、 3の画像 2 Huawei P9 ディスプレイの交換: 手順 12、 3の画像 3
    この手順で使用する道具:
    Plastic Cards
    $2.99
    購入する
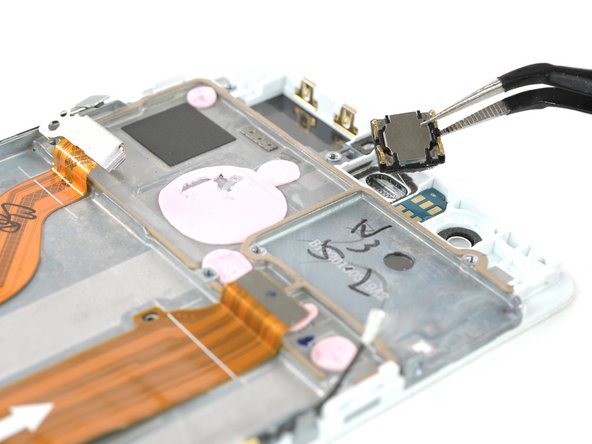
    • When the glue is softened, insert a spudger through the camera bay in the midframe and push the display away from the frame.

    • Place a plastic card or two opening picks under the display bezel at the top, between the screen and the frame. This will prevent the glue from readhering.

  13. この手順は未翻訳です。 翻訳を手伝う。

    Huawei P9 ディスプレイの交換: 手順 13、 3の画像 1 Huawei P9 ディスプレイの交換: 手順 13、 3の画像 2 Huawei P9 ディスプレイの交換: 手順 13、 3の画像 3
    • Insert an opening pick approximately 1/16 of an inch and slide it along the side to sparate the display from the frame.

    • You might feel more resistance where the LCD ends on the lower end.

    • Stop here and take your time to reheat that part and soften the glue.

  14. この手順は未翻訳です。 翻訳を手伝う。

    Huawei P9 ディスプレイの交換: 手順 14、 3の画像 1 Huawei P9 ディスプレイの交換: 手順 14、 3の画像 2 Huawei P9 ディスプレイの交換: 手順 14、 3の画像 3
    • When the glue is soft enough carefully move the pick around the bottom corner.

    • You can now work your way along the bottom edge.

    • Leave the opening pick on one side and flip the display over.

  15. この手順は未翻訳です。 翻訳を手伝う。

    Huawei P9 ディスプレイの交換: 手順 15、 2の画像 1 Huawei P9 ディスプレイの交換: 手順 15、 2の画像 2
    • On the back side detach the display flex cable from the frame.

    • Now you can lift the display away from the frame.

    • Check for any small parts like the rubber gasket at the top behind the speaker grill.

終わりに

デバイスを再組み立てする際は、これらの手順を逆の順番に従って作業を進めてください。

46 の人々がこのガイドを完成させました。

以下の翻訳者の皆さんにお礼を申し上げます:

en jp

58%

Midori Doiさんは世界中で修理する私たちを助けてくれています! あなたも貢献してみませんか?
翻訳を始める ›

作成者

6人の作成者と共同で作成されました。

Dominik Schnabelrauch

メンバー登録日: 11/23/16

204,050 ポイント

682のガイドは作成済み

チーム

iFixit iFixit人のメンバー

Staff

135 メンバー

17,198のガイドは作成済み

14 件のコメント

While the guide shows pictures along the process it doesn't really give the whole picture.

Just one example: as a repair guide, you could easily expect the display to be cracked and you can no longer use a suction cup to open it up.

A bigger issue is that the guide doesn't show steps up to the replacement part listed.

An incomplete guide while still providing enough information to help someone with experience in repairs.

Seth - 返信

ifixit sent me screen and digitizer without the metal frame. is there a way to remove the metal frame and add it to the replacement screen? does ifixit sell screen and digitizer with the metal frame?

david cech - 返信

you guys are killing me... first you sell the display without the frame even though your instructions clearly show the frame and now it is exactly the same story with a middle frame screen... why it is not part of your display package since it is necessary for the replacement and once again showed in instructional video?

david cech - 返信

Hello David, I am very sorry for the confusion. The guide was not congruent with the spare part in the shop. Having a display assembly with the frame already attached would be more convenient and an easier repair. Though the display without the frame is a bit cheaper but makes the guide more complex (hence the rating "difficult").

What instructional video do you mean? Is it for another device?

Tobias Isakeit -

Please sir let me know if I replace the only screen is it not effect to battery. Because someone told me if I have replace screen it should need whole cover with battery . Please tell me is it true or not

Anurudda Weerasekara - 返信

コメントを追加

統計データ:

過去 24時間: 4

過去 7 日: 26

過去 30 日: 65

今までの合計 59,803