メインコンテンツにスキップ

この翻訳は、ソースガイドの最新の更新を反映していない可能性があります。 翻訳の更新に協力してください。 または ソースガイドを参照してください

Google Pixel 6 Proの接着剤の交換方法

必要な工具と部品

  1. Google Pixel 6 Proの接着剤の交換方法, フレームのクリーニング: 手順 1、 3の画像 1 Google Pixel 6 Proの接着剤の交換方法, フレームのクリーニング: 手順 1、 3の画像 2 Google Pixel 6 Proの接着剤の交換方法, フレームのクリーニング: 手順 1、 3の画像 3
    • 接着剤もしくは汚れが残っていると、スクリーンの密閉性が損なわれます。

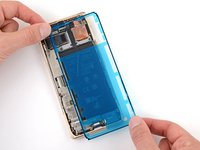
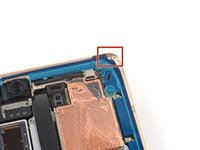
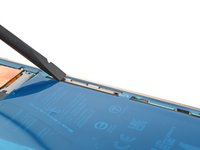
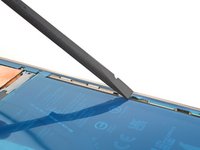
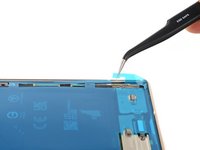
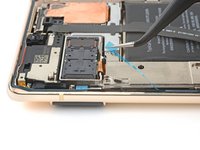
    • スパッジャーの平面側先端を使って、できる限り接着剤を削り取ります。

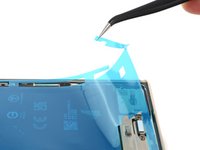
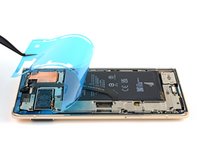
    • ピンセットもしくは指で、残りの接着剤を綺麗に除去します。

    • ピンセットでバッテリーに穴を開けてしまうと、危険な化学物質が漏れたり、火災の原因になったりすることがあります。

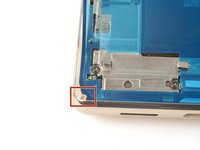
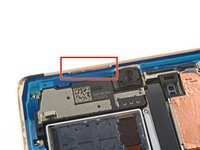
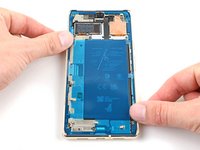
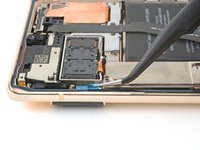
    • 少量の高濃度イソプロピルアルコール(90%以上)と糸くずの出ない布またはマイクロファイバー布で、フレームの周囲をクリーニングします。

  2. Google Pixel 6 Proの接着剤の交換方法, スクリーンをクリーニング: 手順 2、 3の画像 1 Google Pixel 6 Proの接着剤の交換方法, スクリーンをクリーニング: 手順 2、 3の画像 2 Google Pixel 6 Proの接着剤の交換方法, スクリーンをクリーニング: 手順 2、 3の画像 3
    • スクリーンを再利用する場合は、フレームも同じようにクリーニングします。

  3. Google Pixel 6 Proの接着剤の交換方法, 接着剤の装着方向を確認: 手順 3、 2の画像 1 Google Pixel 6 Proの接着剤の交換方法, 接着剤の装着方向を確認: 手順 3、 2の画像 2
    • 新しい接着剤を再装着する前に、フレーム上に接着シートを重ねて、装着方向を確認します。」

    • 前面カメラ、上部スピーカー、角の切り欠きなどの特徴を利用して、装着する方向を確認してください。

  4. Google Pixel 6 Proの接着剤の交換方法, 接着剤の裏面を剥がす: 手順 4、 1の画像 1
    • 接着シートの上部にあるプルタブを使って、透明シールを剥がします。

  5. Google Pixel 6 Proの接着剤の交換方法, 接着剤を装着する: 手順 5、 3の画像 1 Google Pixel 6 Proの接着剤の交換方法, 接着剤を装着する: 手順 5、 3の画像 2 Google Pixel 6 Proの接着剤の交換方法, 接着剤を装着する: 手順 5、 3の画像 3
    • この作業には十分な注意が必要です。接着剤は非常に粘着力が強く、一度貼り付けると元に戻せません。接着剤の位置がずれると、シールがうまくいかないことがあります。

    • 接着剤をフレームの上に重ねて、下端または上端から順に揃えていきます。位置を少しずつ修正しながら進めてください。

    • 左下の切り欠き、右上の切り欠き、上部ラウドスピーカーの切り欠きは、接着剤の位置を合わせるのに役立ちます。

  6. Google Pixel 6 Proの接着剤の交換方法: 手順 6、 3の画像 1 Google Pixel 6 Proの接着剤の交換方法: 手順 6、 3の画像 2 Google Pixel 6 Proの接着剤の交換方法: 手順 6、 3の画像 3
    • スパッジャーもしくは指で接着剤の周囲全体に沿って押し込み、フレームに装着します。

  7. Google Pixel 6 Proの接着剤の交換方法, ライナーを剥がす: 手順 7、 3の画像 1 Google Pixel 6 Proの接着剤の交換方法, ライナーを剥がす: 手順 7、 3の画像 2 Google Pixel 6 Proの接着剤の交換方法, ライナーを剥がす: 手順 7、 3の画像 3
    • フレームの右下にあるプルタブをつまんで、ライナーを剥がします。

    • この下に小さいライナーがります。この時点で、まだ外さないでください。

  8. Google Pixel 6 Proの接着剤の交換方法, ライナーを確認: 手順 8、 1の画像 1
    • 交換用スクリーンのフロントカメラの穴とセンサーの切り欠きの位置があっているか確認し、残りの保護ライナーを剥がします。

  9. Google Pixel 6 Proの接着剤の交換方法, 再組み立てを再開: 手順 9、 1の画像 1
    • デバイスの修理ガイドに戻って、再組み立てを再開します。

    • ディスプレイケーブルのブラケットを必ず再装着してください。

    • スクリーンをインストールした時に、この修理ガイドは終了です。デバイスを密封する準備ができました。

  10. Google Pixel 6 Proの接着剤の交換方法: 手順 10、 3の画像 1 Google Pixel 6 Proの接着剤の交換方法: 手順 10、 3の画像 2 Google Pixel 6 Proの接着剤の交換方法: 手順 10、 3の画像 3
    • フレームの左上にあるプルタブをつまんで、接着剤の周辺を覆っているライナーを剥がします。

    • ライナーで接着剤が剥がれないように注意します。

  11. Google Pixel 6 Proの接着剤の交換方法, スクリーンをインストール: 手順 11、 2の画像 1 Google Pixel 6 Proの接着剤の交換方法, スクリーンをインストール: 手順 11、 2の画像 2
    • スクリーンを裏返して、フレームの上に重ねます。

    • スクリーンの周辺に沿って押し込み、固定します。

  12. Google Pixel 6 Proの接着剤の交換方法, 接着力を強める: 手順 12、 3の画像 1 Google Pixel 6 Proの接着剤の交換方法, 接着力を強める: 手順 12、 3の画像 2 Google Pixel 6 Proの接着剤の交換方法, 接着力を強める: 手順 12、 3の画像 3
    この手順で使用する道具:
    Screen Vise Clamps 6-Pack
    $15.99
    購入する
    • Pixelを均等に圧縮し、スクリーンとフレームの接着力を強化するには、カメラバーに注意する必要があります。

    • スクリーン用のリバースクランプがあれば、カメラバー周辺でも作業ができます。クランプをにデバイスの周囲.に固定します。

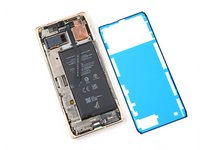
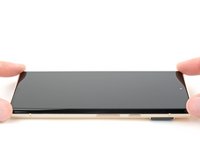
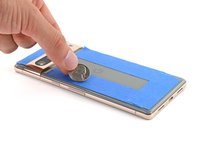
    • リアガラスの周囲にテープを貼り、仕上げを保護する。

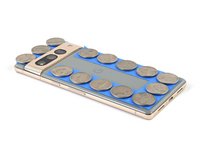
    • リアガラス縁に沿ってコインまたは同様の厚さのものを置きます。カメラバーと同じかそれ以上の厚さにします。

    • スマホの上に本など重いものを複数重ねます。30分以上そのままにしておいてください。ベストな結果には、一晩重ねたままにしておいてください。

ゴール

29 の人々がこのガイドを完成させました。

以下の翻訳者の皆さんにお礼を申し上げます:

en jp

95%

Midori Doiさんは世界中で修理する私たちを助けてくれています! あなたも貢献してみませんか?
翻訳を始める ›

作成者

6人の作成者と共同で作成されました。

Clay Eickemeyer

メンバー登録日: 09/19/22

66,438 ポイント

453のガイドは作成済み

チーム

iFixit iFixit人のメンバー

Staff

135 メンバー

16,818のガイドは作成済み

8 件のコメント

will the phone have the same water resistance rating after this? Assume proper adhesive placement? ALso, what about b7000 glue? Any comment on using that?

Michael Carton - 返信

Your phone will lose its official IP rating after reapplying any adhesive. The official double sided adhesive technically requires a large amount of force (somewhere in the ballpark of 80 psi) to bond as well as the phone was originally sold with. Without the equipment to do this, its difficult to predict how well your individual repair will hold up against water. A mobile-device-specific glue will work in the same fashion. I encourage you to seal the phone however you feel most comfortable. If you try glue instead of the official adhesive, make sure to be extremely precise about how much and where you apply the glue, since it's messy and your only barrier against the elements. Good luck!

Clay Eickemeyer -

Thanks!!! I can use a book with a weight on it, of an amount calculated to exert 80psi on the screen. By eyeballing it at a coffee shop, looks like 20lbs. Do you think that I should calculate this ONLY around the perimeter, or do you apply pressure evenly on the whole screen?

Michael Carton - 返信

As a disclaimer: be extra sure the raised rear camera mesa doesn't create uneven force. If it does, the pressure may crack the rear case or lead to an improper seal of the screen. But, yes, calculate the area around the perimeter, since the screen isn't designed to support that weight in only the center.

Clay Eickemeyer -

Hello! I am going to be following this guide soon and I noticed that the alcohol recommended is Isopropyl at 90%. I only have Ethyl at 80%. Is this bad? Is the difference so big that I shouldn't use it? I really need to fix this phone soon and I'm scared of damaging it.

Fox Man - 返信

コメントを追加

統計データ:

過去 24時間: 9

過去 7 日: 77

過去 30 日: 395

今までの合計 8,932