この翻訳は機械によって生成されたものであり、まだ人間による校正は行われていません。 この言語を話せますか? レビューはこちら.
はじめに
この修理ガイドでは、EasySMX ESM-9100 ゲームコントローラーのボタン(A/B/X/Y)の交換方法を説明します。コントローラーのボタンが応答しない主な原因は、コントローラー内部で位置がずれ、押しても基板に接触しなくなったことです。ボタンの反応が不安定な場合は、コントローラーのシェル内での配置が不適切であるか、パネルがボタンをしっかりと固定できていないことが考えられます。特にBボタンは他のボタンと比べて形状が独特で小さいため、この問題が発生しやすくなっています。これらの問題が発生した場合は、このガイドで詳しく説明しているように、位置の調整または交換を行うことで改善できます。EasySMX ESM-9100 ゲームコントローラーのボタンが機能しなくなった場合は、この修理ガイドに従って交換してください。
内部の電子部品を扱う作業となるため、コントローラーが完全に反応しなくなることを防ぐため、破損させないよう注意してください。修理を開始する前に、コントローラーがゲームコンソールまたはPCから取り外されていることを確認してください。
必要な工具と部品
-
-
-
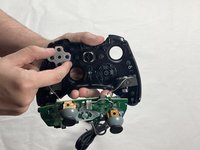
iFixit オープニングツールを使用してリアカバーをこじ開けて外すと、内部コンポーネントが現れます。
-
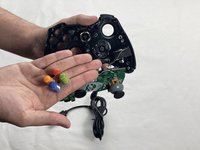
外したカバーは脇に置き、回路基板をつかんでフロントカバーから慎重に取り外します。
-
-
-


デバイスを再組み立てするには、これらのインストラクションを逆の順番に従って作業を進めてください。e-wasteを処分する場合は、認可済みリサイクルセンターR2を通じて廃棄してください。
2 の人々がこのガイドを完成させました。
以下の翻訳者の皆さんにお礼を申し上げます:
100%

Translation Botさんは世界中で修理する私たちを助けてくれています! あなたも貢献してみませんか?
翻訳を始める ›

チーム

UMass Dartmouth, Team 4-4, Shaddix Spring 2024 UMass Dartmouth, Team 4-4, Shaddix Spring 2024人のメンバー
UMASSD-SHADDIX-S24S4G4
4 メンバー
66のガイドは作成済み