メインコンテンツにスキップ

Dell Inspiron 11-3162 Battery Replacement

必要な工具と部品

  1. Dell Inspiron 11-3162 Battery Replacement, Back Cover Removal: 手順 1、 2の画像 1 Dell Inspiron 11-3162 Battery Replacement, Back Cover Removal: 手順 1、 2の画像 2
    この手順で使用する道具:
    Tweezers
    $4.99
    購入する
    • Before you begin, be sure to turn off your laptop and unplug it from the outlet.

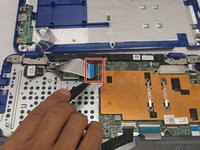
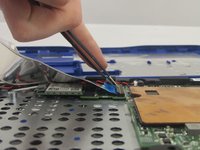
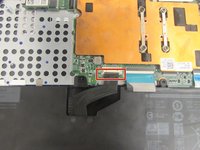
    • Use tweezers to pry and remove the center screw cover on the back cover.

  2. Dell Inspiron 11-3162 Battery Replacement: 手順 2、 2の画像 1 Dell Inspiron 11-3162 Battery Replacement: 手順 2、 2の画像 2
    • Use a Phillips screwdriver to unscrew the nine 6.8 mm screws securing the back cover.

  3. Dell Inspiron 11-3162 Battery Replacement: 手順 3、 1の画像 1
    • Use a spudger to pry around the base edges of the back cover to loosen it from the laptop.

    • Do not fully remove the cover, as it is still attached to the laptop with cables.

  4. Dell Inspiron 11-3162 Battery Replacement: 手順 4、 3の画像 1 Dell Inspiron 11-3162 Battery Replacement: 手順 4、 3の画像 2 Dell Inspiron 11-3162 Battery Replacement: 手順 4、 3の画像 3
    • If you are only replacing the battery, you can skip this step. Be careful not to strain the still-connected cable as you work.

    • Unlock the wide ZIF connector securing the flex cable.

    • To unlock a ZIF connector, use the tip of a spudger or your fingernail to flip up the small, hinged locking flap.

    • Pull the ribbon cable outwards to disconnect the back cover from the motherboard.

  5. Dell Inspiron 11-3162 Battery Replacement, Battery: 手順 5、 2の画像 1 Dell Inspiron 11-3162 Battery Replacement, Battery: 手順 5、 2の画像 2
    • Use a Phillips screwdriver to unscrew the three 4 mm screws securing the battery.

  6. Dell Inspiron 11-3162 Battery Replacement: 手順 6、 3の画像 1 Dell Inspiron 11-3162 Battery Replacement: 手順 6、 3の画像 2 Dell Inspiron 11-3162 Battery Replacement: 手順 6、 3の画像 3
    この手順で使用する道具:
    Tweezers
    $4.99
    購入する
    • Use your fingers (or a set of tweezers) to disconnect the battery cable from the motherboard by gently pulling it towards the battery.

    • Pull parallel to the battery, not straight up.

    • Lift and remove the battery from its recess.

終わりに

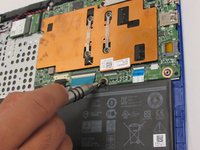
To reassemble your device, follow these instructions in reverse order.

For optimal performance, after completing this guide, calibrate your newly installed battery.

Take your e-waste to an R2 or e-Stewards certified recycler.

Repair didn’t go as planned? Try some basic troubleshooting, or ask our Answers community for help.

6 の人々がこのガイドを完成させました。

作成者

5人の作成者と共同で作成されました。

Dominic DeLong

メンバー登録日: 09/29/16

775 ポイント

4のガイドは作成済み

チーム

Eastern Washington University, Team 1-2, Crane Fall 2016 Eastern Washington University, Team 1-2, Crane Fall 2016人のメンバー

EWU-CRANE-F16S1G2

3 メンバー

6のガイドは作成済み

0 件のコメント

コメントを追加

統計データ:

過去 24時間: 1

過去 7 日: 4

過去 30 日: 16

今までの合計 3,099