メインコンテンツにスキップ
リペアコミュニティに参加 - アカウントの作成

Corsair K65 Plus Wireless Key Stabilizer Replacement

必要な工具と部品

    1. Corsair K65 Plus Wireless Key Stabilizer Replacement, Key Stabilizer: 手順 1、 2の画像 1 Corsair K65 Plus Wireless Key Stabilizer Replacement, Key Stabilizer: 手順 1、 2の画像 2
      • Use a keycap puller or a pair of tweezers to remove the keycaps.

      • Work carefully around larger keys, since they are connected to stablizers.

      • Set the keycaps aside in the same order they were removed, if possible.

      FixBotに聞いてみる

      コメントを追加

    2. Corsair K65 Plus Wireless Key Stabilizer Replacement: 手順 2、 2の画像 1 Corsair K65 Plus Wireless Key Stabilizer Replacement: 手順 2、 2の画像 2
      • Grip the multi-function knob and pull it straight up to remove it from the stem.

      • If the knob is difficult to remove by hand, use a plastic spudger to gently lift it upward.

      FixBotに聞いてみる

      コメントを追加

    3. Corsair K65 Plus Wireless Key Stabilizer Replacement: 手順 3、 2の画像 1 Corsair K65 Plus Wireless Key Stabilizer Replacement: 手順 3、 2の画像 2
      • Use a switch puller or a pair of tweezers to grip the switch, then pull straight up to remove it.

      • Do not twist the switches while removing them, as this may bend the switch pins or damage the PCB sockets.

      • Set the switches aside in a safe location.

      FixBotに聞いてみる

      コメントを追加

    4. Corsair K65 Plus Wireless Key Stabilizer Replacement: 手順 4、 3の画像 1 Corsair K65 Plus Wireless Key Stabilizer Replacement: 手順 4、 3の画像 2 Corsair K65 Plus Wireless Key Stabilizer Replacement: 手順 4、 3の画像 3
      • Flip the keyboard so that back cover is facing up.

      • Use a JIS #1 screwdriver to remove the eight 6.0 mm screws from the bottom of the device.

      • Remove the 2.4 Gz Wireless USB adapter from the keyboard.

      FixBotに聞いてみる

      コメントを追加

    5. Corsair K65 Plus Wireless Key Stabilizer Replacement: 手順 5、 1の画像 1
      • Carefully lift the back cover away from the keyboard.

      • If the cover does not come off easily, use a plastic opening tool to gently separate the case clips.

      • Do not pull the cover off quickly, cables for the battery and indicator light are still attached.

      FixBotに聞いてみる

      コメントを追加

    6. Corsair K65 Plus Wireless Key Stabilizer Replacement: 手順 6、 1の画像 1
      • To disconnect the battery cable, use the point of a spudger to push on alternating sides of the connector to "walk" it out of its socket.

      • If that doesn't work, use a pair of tweezers to firmly grip the sides of the connector and pull straight away from the socket. Hold the tweezers closer to the connector to get a better grip.

      • If you're having trouble, try rocking the connector side-to-side to loosen it.

      • Do not pull on the wires directly.

      FixBotに聞いてみる

      コメントを追加

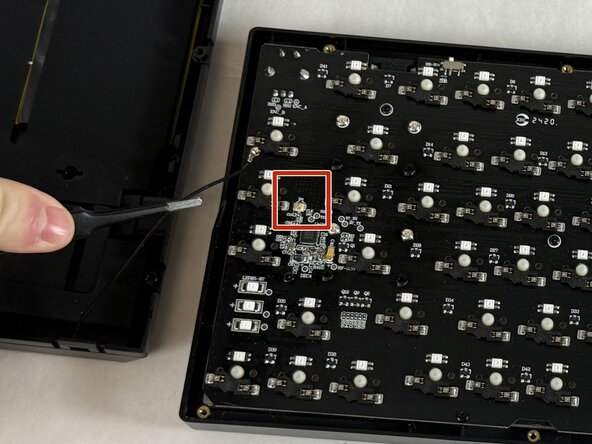
    7. Corsair K65 Plus Wireless Key Stabilizer Replacement: 手順 7、 2の画像 1 Corsair K65 Plus Wireless Key Stabilizer Replacement: 手順 7、 2の画像 2
      • Slide a thin, ESD-safe pry tool or angled tweezers under the metal neck of the connector (as close to the head as possible) and lift straight up from the board.

      • Carefully disconnect the multi-purpose indicator light cable from the PCB.

      • Set the back cover aside once all cables are disconnected.

      FixBotに聞いてみる

      コメントを追加

    8. Corsair K65 Plus Wireless Key Stabilizer Replacement: 手順 8、 1の画像 1
      • Remove the keyboard membrane.

      • Lift the key membrane slowly so the membrane does not tear or stretch.

      • Set the membrane aside on a clean surface.

      FixBotに聞いてみる

      コメントを追加

    9. Corsair K65 Plus Wireless Key Stabilizer Replacement: 手順 9、 1の画像 1
      • Use a JIS #1 screwdriver to remove the nine black 6.0 mm screws securing the PCB to the keyboard housing.

      • Keep these screws separate from the case screws.

      FixBotに聞いてみる

      コメントを追加

    10. Corsair K65 Plus Wireless Key Stabilizer Replacement: 手順 10、 3の画像 1 Corsair K65 Plus Wireless Key Stabilizer Replacement: 手順 10、 3の画像 2 Corsair K65 Plus Wireless Key Stabilizer Replacement: 手順 10、 3の画像 3
      • Flip the keyboard right side up.

      • Remove the gray metal plate.

      • Remove the foam board from the keyboard.

      FixBotに聞いてみる

      コメントを追加

    11. Corsair K65 Plus Wireless Key Stabilizer Replacement: 手順 11、 1の画像 1
      • Remove the silver 5.5 mm screws securing each stabilizer to the PCB.

      • Each stabilizer should have two screws

      FixBotに聞いてみる

      コメントを追加

    12. Corsair K65 Plus Wireless Key Stabilizer Replacement: 手順 12、 1の画像 1
      • Lift the stabilizers from the PCB.

      • If a stabilizer does not come out easily, check that all screws have been removed.

      • Do not force the stabilizers out, as this may damage the PCB.

      FixBotに聞いてみる

      コメントを追加

終わりに

To reassemble your device, follow these instructions in reverse order. Take your e-waste to an R2 or e-Stewards certified recycler.

キャンセル: このガイドを終了できませんでした。

作成者

3人の作成者と共同で作成されました。

Justin Morrison

メンバー登録日: 03/06/26

205 ポイント

1ガイドが承認済み

チーム

UMass Dartmouth, Team 3-3, Shaddix Spring 2026 UMass Dartmouth, Team 3-3, Shaddix Spring 2026人のメンバー

UMASSD-SHADDIX-S26S3G3

4 メンバー

5のガイドは作成済み

0件のガイドコメント

コメントを追加

統計データ:

過去 24時間: 3

過去 7 日: 8

過去 30 日: 34

今までの合計 96