メインコンテンツにスキップ
リペアコミュニティに参加 - アカウントの作成

Anker 2.4G Wireless Mouse Sensor Replacement

必要な工具と部品

  1. Anker 2.4G Wireless Mouse Sensor Replacement, Sensor: 手順 1、 1の画像 1
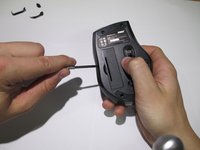
    • Using a spudger, carefully pry off the stickers to reveal the location of four screws.

    FixBotに聞いてみる

    コメントを追加

  2. Anker 2.4G Wireless Mouse Sensor Replacement: 手順 2、 1の画像 1
    • Using your Phillips screwdriver, remove the four screws.

    FixBotに聞いてみる

    コメントを追加

  3. Anker 2.4G Wireless Mouse Sensor Replacement: 手順 3、 2の画像 1 Anker 2.4G Wireless Mouse Sensor Replacement: 手順 3、 2の画像 2
    • Using a spudger, carefully pry apart the upper and lower housing of the mouse.

    • Make sure you are not using too much pressure, as you could warp the plastic.

    FixBotに聞いてみる

    コメントを追加

  4. Anker 2.4G Wireless Mouse Sensor Replacement: 手順 4、 1の画像 1
    • Disconnect the wires from the white crimping headers.

    • Pull as far up on the wire as possible, but be careful to avoid ripping the wires.

    FixBotに聞いてみる

    コメントを追加

  5. Anker 2.4G Wireless Mouse Sensor Replacement: 手順 5、 1の画像 1
    • Remove the scroll wheel from the motherboard by pulling it to the left.

    • This may take some force to remove. Make sure to pull it parallel to the board, instead of perpendicularly.

    FixBotに聞いてみる

    コメントを追加

  6. Anker 2.4G Wireless Mouse Sensor Replacement: 手順 6、 1の画像 1
    この手順で使用する道具:
    Anti-Static Wrist Strap
    $7.95
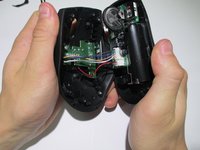
    • Gently lift the motherboard away from the plastic housing.

    • Use an iFixit grounding strap or another antistatic measure to prevent sensitive components from electrostatic discharge during this step.

    FixBotに聞いてみる

    コメントを追加

  7. Anker 2.4G Wireless Mouse Sensor Replacement: 手順 7、 1の画像 1
    • Desolder the six wires holding the I.C. in place to complete the sensor change.

    • Replace the broken sensor with the new sensor and solder back in place.

    • Make sure none of your solder connections are bridged as this can cause serious damage to your mouse.

    FixBotに聞いてみる

    コメントを追加

終わりに

To reassemble your device, follow these instructions in reverse order.

キャンセル: このガイドを終了できませんでした。

2 の人々がこのガイドを完成させました。

作成者

12人の作成者と共同で作成されました。

Ryan

メンバー登録日: 01/23/14

152 ポイント

1ガイドが承認済み

チーム

Cal Poly, Team 1-39, Maness Winter 2014 Cal Poly, Team 1-39, Maness Winter 2014人のメンバー

CPSU-MANESS-W14S1G39

4 メンバー

16のガイドは作成済み

0件のガイドコメント

コメントを追加

統計データ:

過去 24時間: 3

過去 7 日: 17

過去 30 日: 71

今までの合計 8,400