メインコンテンツにスキップ

Sostituzione batteria Google Pixel

英語
イタリア語

手順 4を翻訳中

手順4
Google Pixel Battery Replacement: 手順 0、 2の画像 1 Google Pixel Battery Replacement: 手順 0、 2の画像 2
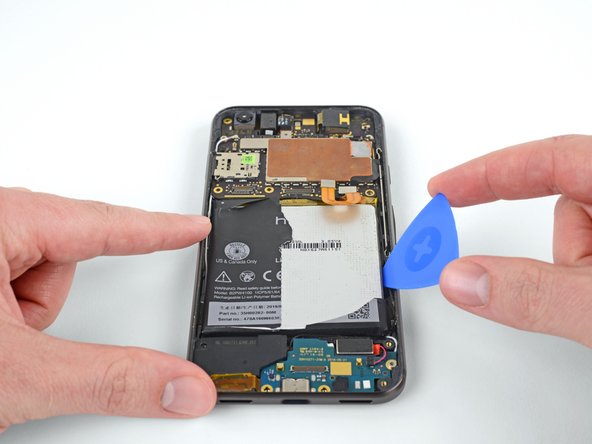
  • The battery has a jacket that can double as a battery removal tab, pull it to remove the battery. If that doesn't work, follow the instructions below.

  • Carefully wedge an opening pick underneath the battery to break the adhesive.

  • If the battery does not come out easily, don't pry aggressively. Apply heat to the back of the phone with an iOpener or a heat gun to loosen the adhesive.

  • Try your best not to deform the battery during this process. Soft-shell lithium-ion batteries can leak dangerous chemicals, catch fire, or even explode if damaged. Do not use excessive force or pry at the battery with metal tools.

  • Do not reuse the battery after it has been removed, as doing so is a potential safety hazard. Replace it with a new battery.

La batteria ha un rivestimento che può fungere anche da linguetta per la rimozione: tirala per estrarre la batteria. Se ciò non funziona, segui le istruzioni di seguito.

Facendo molta attenzione, infila uno strumento di apertura sotto la batteria per staccare l'adesivo.

Se la batteria non esce facilmente, non fare leva in modo aggressivo. Applica calore sul retro del telefono con un iOpener o una pistola termica per allentare l'adesivo.

Fai del tuo meglio per non deformare la batteria durante questo processo. Le batterie agli ioni di litio a guscio morbido possono perdere sostanze chimiche pericolose, prendere fuoco o persino esplodere se danneggiate. Non usare forza eccessiva o fare leva sulla batteria con strumenti di metallo.

Non riutilizzare la batteria dopo che è stata rimossa, poiché ciò potrebbe costituire un potenziale pericolo per la sicurezza. Sostituiscila con una nuova batteria.

クリエイティブコモンズのオープンソース著作権のもと、あなたの投稿は著作権の対象となります