メインコンテンツにスキップ

Desmontaje de Rayos X de Apple Watch

英語
スペイン語

手順 16を翻訳中

手順16
Apple Watch X-ray Teardown: 手順 0、 3の画像 1 Apple Watch X-ray Teardown: 手順 0、 3の画像 2 Apple Watch X-ray Teardown: 手順 0、 3の画像 3
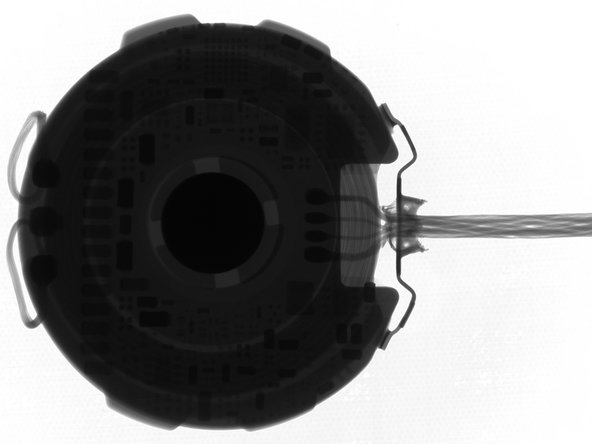
  • Fade to black... cue lights! Time to shine some illuminating rays on our next target, the inductive charger.

  • By adjusting the power level and exposure, we can see different strata of the charger.

  • For example, in the first image we see a high-contrast silhouette of the charger's internals, nested in the haziness of the plastic outer case. And in the last image, the board-level components are visible.

  • X-ray fun fact: Power and current are adjustable. Lower power equals better resolution—and fewer frames per second. Creative Electron's X-ray machines do up to 60 FPS, but this was slower than that.

  • X-ray fun fact 2: The zoom level of the image is directly proportional to the distance between the tungsten sensor and the object. It's also inversely proportional to the distance between the object and the X-ray source.

Fundido a negro... ¡luces de señal! Es hora de hacer brillar algunos rayos iluminadores en nuestro próximo objetivo, el cargador inductivo.

Al ajustar el nivel de potencia y la exposición, podemos ver diferentes estratos del cargador.

Por ejemplo, en la primera imagen vemos una silueta de alto contraste de las partes internas del cargador, anidadas en la bruma de la carcasa exterior de plástico. Y en la última imagen, los componentes a nivel de placa son visibles.

Dato curioso de rayos X: la potencia y la corriente son ajustables. Menor potencia equivale a mejor resolución y menos fotogramas por segundo. Las máquinas de rayos X de Creative Electron alcanzan los 60 FPS, pero esto fue más lento que eso.

Dato curioso 2 sobre rayos X: el nivel de zoom de la imagen es directamente proporcional a la distancia entre el sensor de tungsteno y el objeto. También es inversamente proporcional a la distancia entre el objeto y la fuente de rayos X.

クリエイティブコモンズのオープンソース著作権のもと、あなたの投稿は著作権の対象となります