メインコンテンツにスキップ

Procedimento di Apertura (1° e 2° generazione)

注意:あなたは必要条件ガイドを編集しています。あなたが行なう変更は、この手順を含む全ての7個のガイドに反映されます。

英語
イタリア語

手順 6を翻訳中

手順6
Opening Procedure (1st and 2nd Gen), Insert an opening pick: 手順 0、 3の画像 1 Opening Procedure (1st and 2nd Gen), Insert an opening pick: 手順 0、 3の画像 2 Opening Procedure (1st and 2nd Gen), Insert an opening pick: 手順 0、 3の画像 3
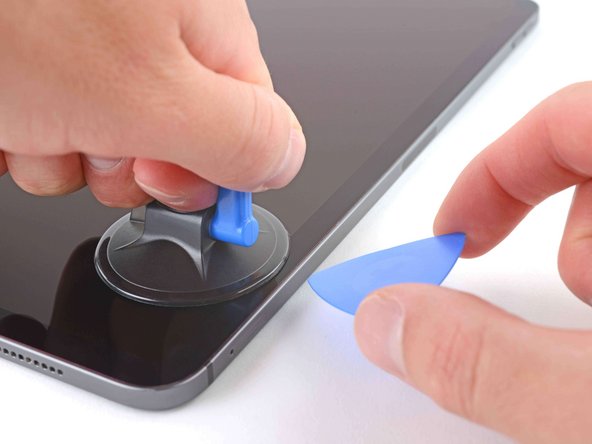
Insert an opening pick
  • If your screen is badly cracked, covering it with a layer of clear packing tape may allow the suction cup to adhere. Alternatively, very strong tape may be used instead of the suction cup. If all else fails, you can superglue the suction cup to the broken screen.

  • Apply a suction handle to the right edge of the screen, about 5 cm from the bottom edge.

  • Pull up on the suction handle with firm, constant pressure to create a gap large enough to insert an opening pick.

  • Only create a gap small enough to insert an opening pick. Overbending the screen will damage it.

  • Insert the tip of an opening pick into the gap.

  • Don't insert the opening pick more than 5 mm or you'll damage the LCD.

Se il tuo schermo è gravemente rotto, coprirlo con uno strato di nastro adesivo trasparente da pacchi potrebbe aiutare la ventosa ad aderire. In alternativa, puoi usare del nastro adesivo molto resistente invece della ventosa. Se nient'altro funziona, puoi incollare la ventosa allo schermo rotto con della supercolla (cianoacrilica).

Applica un manico ventosa sul bordo destro dello schermo, a circa 5 cm di distanza dal bordo inferiore.

Solleva il manico ventosa con ferma e costante pressione per creare un'apertura grande abbastanza da inserire un plettro di apertura.

Crea solo un'apertura piccola abbastanza da inserire un plettro di apertura. Piegare eccessivamente lo schermo lo danneggerà.

Inserisci la punta di un plettro di apertura dentro l'apertura.

Non inserire il plettro di apertura per più di 5 mm o danneggerai l'LCD.

クリエイティブコモンズのオープンソース著作権のもと、あなたの投稿は著作権の対象となります