メインコンテンツにスキップ

Steam Deck 右側トリガーの交換

注意:あなたはさきほど閲覧しているガイドの前提となるページを編集しています。あなたが行った変更は、この手順を含むガイド全体に影響を与えます。

英語
日本語

手順 1を翻訳中

手順1
Steam Deck Right Trigger Replacement, Unclip the right trigger: 手順 0、 2の画像 1 Steam Deck Right Trigger Replacement, Unclip the right trigger: 手順 0、 2の画像 2
Unclip the right trigger
  • The right trigger will be on your left-hand side when working on the Steam Deck, as it's laying upside down.

  • The Steam Deck's triggers clip into place on two pegs on the trigger bracket, which doubles as the hinge.

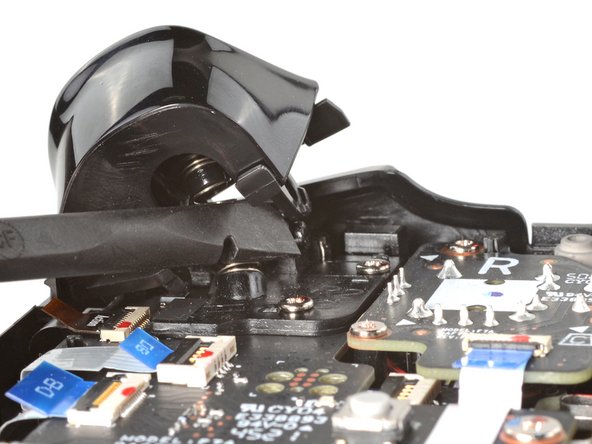
  • Place the flat end of a spudger onto the inside edge of the trigger's right clip.

  • Pivot the trigger clip out, away, and up from the peg to unlatch it.

  • During reassembly, latch the outermost peg first. Once in place, push down on the trigger to latch the innermost peg, producing an audible "click" sound.

  • Check to make sure that the trigger spring is properly aligned. Test the trigger action before continuing reassembly.

スチームデッキの作業をする場合、右手のトリガーは、上下逆さまに置かれているため、左側にあります。

Steam Deckのトリガーは、ヒンジを兼ねたトリガーブラケットにある2つのペグにクリップで固定されています。

トリガーの右クリップの内側の端に、スパッジャーの平らな先端を当てます。

トリガークリップをペグから離し、上に回して、ラッチを解除します。

再組み立ての際は、一番外側のペグを先にラッチしてください。トリガーを押し下げると、「カチッ」という音がして、一番奥のペグがはまります。

トリガー・スプリングが適切に配置されていることを確認します。再組み立てを続ける前に、トリガーの動作をテストしてください。

クリエイティブコモンズのオープンソース著作権のもと、あなたの投稿は著作権の対象となります