メインコンテンツにスキップ
リペアコミュニティに参加 - アカウントの作成

iRobot Braava 375t Battery Replacement

必要な工具と部品

  1. iRobot Braava 375t Battery Replacement, Battery: 手順 1、 1の画像 1
    • Turn the device over upside down and locate the battery panel.

    • The panel has a symbol of a trash can crossed out.

    FixBotに聞いてみる
  2. iRobot Braava 375t Battery Replacement: 手順 2、 1の画像 1
    • After locating the panel, locate the screw (should be around the top center).

    • You will need a medium sized flathead screwdriver to loosen the screw.

    FixBotに聞いてみる
  3. iRobot Braava 375t Battery Replacement: 手順 3、 1の画像 1
    • Insert the screwdriver and turn counter clockwise (left) to loosen the screw.

    • You may need to apply pressure when turning if the screw is tight.

    FixBotに聞いてみる
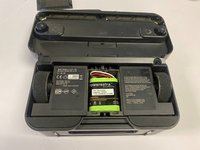
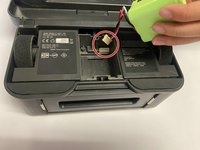
  4. iRobot Braava 375t Battery Replacement: 手順 4、 2の画像 1 iRobot Braava 375t Battery Replacement: 手順 4、 2の画像 2
    • Once the screw is completely taken off, remove the panel to reveal the battery.

    • The battery will have a wire, follow the wire which will lead to a plastic white clip (pin). Pull the wire clip upwards carefully until the all pins are separated.

    • Use a small screwdriver and wedge the head between the clips if the pins are tight.

    FixBotに聞いてみる
終わりに

To reassemble your device, follow these instructions in reverse order.

ある他の人がこのガイドを完成しました。

作成者

5人の作成者と共同で作成されました。

Jadealyn Paulino

メンバー登録日: 09/26/22

275 ポイント

1ガイドが承認済み

チーム

CSU Los Angeles, Team 5-5, Adachi Fall 2022 CSU Los Angeles, Team 5-5, Adachi Fall 2022人のメンバー

CSULA-ADACHI-F22S5G5

6 メンバー

4のガイドは作成済み

0件のガイドコメント

コメントを追加

統計データ:

過去 24時間: 1

過去 7 日: 5

過去 30 日: 41

今までの合計 380