メインコンテンツにスキップ
リペアコミュニティに参加 - アカウントの作成

iRobot Braava 320 Battery Replacement

必要な工具と部品

  1. iRobot Braava 320 Battery  Replacement, Battery: 手順 1、 1の画像 1
    • Flip your device over and locate the battery cover.

    • The battery cover is located in the center of the device in between both wheels.

    FixBotに聞いてみる

    コメントを追加

  2. iRobot Braava 320 Battery  Replacement: 手順 2、 1の画像 1
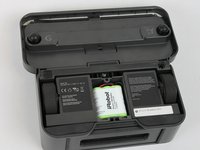
    • Using a Flathead #4 screwdriver, gently turn the 12mm screw that holds the battery cover in.

    • The screw does not remove, it stays attached to the cover.

    FixBotに聞いてみる

    コメントを追加

  3. iRobot Braava 320 Battery  Replacement: 手順 3、 2の画像 1 iRobot Braava 320 Battery  Replacement: 手順 3、 2の画像 2
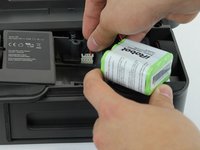
    • Gently remove the battery from the tray and disconnect the battery cable.

    • To remove the battery, pull it straight up. To disconnect the cable, gently pull it straight out of the connector.

    • To reinstall the cable, hold it near the end and gently push it in the connector.

    FixBotに聞いてみる

    コメントを追加

終わりに

To reassemble your device, follow these instructions in reverse order.

キャンセル: このガイドを終了できませんでした。

ある他の人がこのガイドを完成しました。

作成者

2人の作成者と共同で作成されました。

bradley boardwine

メンバー登録日: 02/28/17

222 ポイント

2のガイドは作成済み

チーム

USF Tampa, Team S1-G3, Nance Spring 2017 USF Tampa, Team S1-G3, Nance Spring 2017人のメンバー

USFT-NANCE-S17S1G3

4 メンバー

10のガイドは作成済み

1件のガイドコメント

where do I get a new battery from?

j.svetlova - 返信 共有

コメントを追加

統計データ:

過去 24時間: 1

過去 7 日: 6

過去 30 日: 20

今までの合計 5,107