はじめに
もっと多くのストレージスペースを作るためにハードドライブをアップグレードしましょう!
このガイドはSSD搭載のiMacのハードドライブのアップグレードについても説明しています。SSDの温度センサーの取り付けについて説明していますので、Macのファンは正確なスピードで動作するでしょう。
iMacを起動させる前にコンピューターのプラグを抜き、電力供給装置のコンデンサを放電するために10秒間電源ボタンを長押ししてください。
細心の注意を払ってくださいコンデンサのリード線や電力供給装置の後ろにあるむき出しのはんだ接合には、絶対に触れないでください。
必要な工具と部品
-
この手順で使用する道具:Heavy-Duty Suction Cups (Pair)$16.95
-
ガラスパネルの上部コーナー付近の2箇所に、重量用の吸盤カップを取り付けます。
-
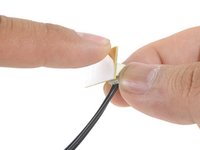
吸盤カップをガラスに軽く当てながら、可動ハンドルをもう一方のハンドルと平行になるまで持ち上げます。(3番目の画像を参照してください。)
-
-


デバイスを組み立て直すには、これらの手順と逆の順序に従ってください。
250 の人々がこのガイドを完成させました。
以下の翻訳者の皆さんにお礼を申し上げます:
100%


これらの翻訳者の方々は世界を修理する私たちのサポートをしてくれています。 あなたも貢献してみませんか?
翻訳を始める ›

68件のガイドコメント
Hey I just replaced my i Mac HDD to a WD Green the previous one was really noisy. Thanks this walkthrough really helped me out. My I Macs now super quiet. This worked well for me. Thanks i fix it.
Levi Oscar - 返信 共有
Your WD green is an SSD or another HDD?
Thanks for the guide guys, managed to replace a broken HDD in no time. However, I'd like to mention that standard torx bits could not be used to remove the display, a normal screwdriver with replacable bits is too thick to fit in, and bits are too short, so you will need something thinner (or longer bits).
Is it ok to replace the HDD with a SDD? (I know there is a tutorial for adding an SSD as a second drive, but I (and I'm sure others) don't have a big enough need or feel comfortable with the process involved.
What did you find out regarding this?