メインコンテンツにスキップ

Xbox 360 Wireless Controller Vibration Motors Replacement

必要な工具と部品

  1. Xbox 360 Wireless Controller Vibration Motors Replacement, Battery: 手順 1、 2の画像 1 Xbox 360 Wireless Controller Vibration Motors Replacement, Battery: 手順 1、 2の画像 2
    • Depress the battery release button on the top of the controller.

    • Remove the battery holder from the controller.

    • The standard option for Xbox 360 Wireless Controllers Battery Packs is AA batteries. A rechargeable battery is also available, but both battery options are removed from the controller in the same way.

  2. Xbox 360 Wireless Controller Vibration Motors Replacement, Rear Case: 手順 2、 1の画像 1
    • Use a pair of tweezers to peel the barcode sticker from the battery compartment.

  3. Xbox 360 Wireless Controller Vibration Motors Replacement: 手順 3、 1の画像 1
    • Remove the seven 9.3 mm T8 Security Torx screws securing the rear case to the front case.

  4. Xbox 360 Wireless Controller Vibration Motors Replacement: 手順 4、 2の画像 1 Xbox 360 Wireless Controller Vibration Motors Replacement: 手順 4、 2の画像 2
    この手順で使用する道具:
    Spudger
    $2.99
    購入する
    • Insert a Spudger between the front and rear cases along the left edge of the controller.

    • Rotate the spudger toward the front of the controller, prying the two cases apart.

  5. Xbox 360 Wireless Controller Vibration Motors Replacement: 手順 5、 2の画像 1 Xbox 360 Wireless Controller Vibration Motors Replacement: 手順 5、 2の画像 2
    • Insert a spudger between the front and rear cases, near the headphone jack.

    • Rotate the spudger toward the front of the controller to pry the two cases apart.

  6. Xbox 360 Wireless Controller Vibration Motors Replacement: 手順 6、 2の画像 1 Xbox 360 Wireless Controller Vibration Motors Replacement: 手順 6、 2の画像 2
    • Grasp the controller by the battery compartment and the headphone jack.

    • Lift the battery compartment away from the headphone jack, separating the rear case from the front case and logic board.

    • The battery contact springs are held in place by slots in the battery housing in the rear case. Be sure to realign them properly during reassembly.

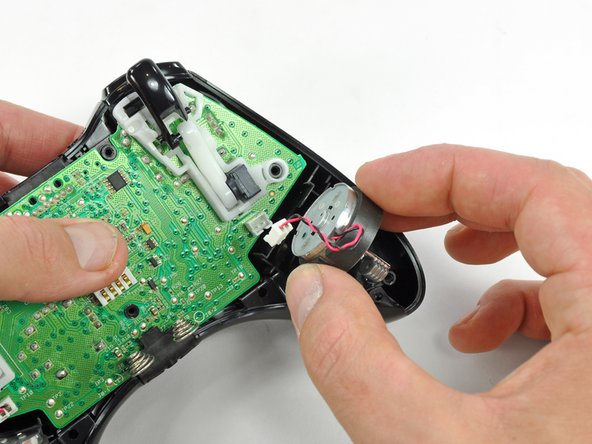
  7. Xbox 360 Wireless Controller Vibration Motors Replacement, Vibration Motors: 手順 7、 2の画像 1 Xbox 360 Wireless Controller Vibration Motors Replacement, Vibration Motors: 手順 7、 2の画像 2
    • Use the flat end of a spudger to remove the vibration motor cable, moving it upward from its socket on the logic board.

    • Lift the vibration motor out of the front case.

  8. Xbox 360 Wireless Controller Vibration Motors Replacement: 手順 8、 2の画像 1 Xbox 360 Wireless Controller Vibration Motors Replacement: 手順 8、 2の画像 2
    • Remove the vibration motor from the other side of the controller using the same method previously described.

    • The left motor has significantly more counterweight than the right motor.

終わりに

To reassemble your device, follow these instructions in reverse order.

19 の人々がこのガイドを完成させました。

作成者

8人の作成者と共同で作成されました。

Brett Hartt

メンバー登録日: 04/12/10

127,897 ポイント

143のガイドは作成済み

チーム

iFixit iFixit人のメンバー

Staff

135 メンバー

16,817のガイドは作成済み

3 件のコメント

Hello, I am very concerned about which side of the controller the motor with heavier counterweight should be. Shouldn’t it be on the left side of the controller, since the right side should be used for higher frequency vibrations?

Yado Nada - 返信

Hi Yado,

Thanks for pointing this out! You are right—the left side have the heavier counterweight. I’ve corrected the relevant step.

Arthur Shi -

Hi there, I believe that the screenshots provided have the vibration motors on the wrong sides. Watching several videos of the disassembly on youtube as well as taking apart my own controller that previously was never opened, the larger heavier motor should be on the right side and the smaller lighter motor should be on the left side.

Salman Kazi - 返信

コメントを追加

統計データ:

過去 24時間: 12

過去 7 日: 39

過去 30 日: 121

今までの合計 36,551