この翻訳は、ソースガイドの最新の更新を反映していない可能性があります。 翻訳の更新に協力してください。 または ソースガイドを参照してください。
はじめに
Xbox 360 Sモデルのヒートシンク破損は大きな問題となります。このガイドを参照して、ヒートシンクを交換しましょう。
必要な工具と部品
-
-
本体側面の「XBOX 360」の文字が右側、フェイスプレートが左側になるように配置します。
-
メタル製スパッジャーをXbox背面側付近の上部ベントと上部ベゼルの間に差し込みます。
-
コンソールから離れるようにスパッジャーを回転させ、2つのプラスチッククリップが外れるまでファンベントの端をこじ開けます。
This step is and the others following are to rough and not needed, simply put smth in between the lamellar and push it up with littlebit pressure thats better for the plastic parts.
TheSupport - 返信
-
-
-
上部ベゼルの左端にある一番手前のスリットから、上記のようにクリップ下端と左ケースの間にメタル製スパッジャーを差し込みます。
-
同時にスパッジャーをコンソールから離して回転させ、上部ベゼルを引き上げると、クリップがフリーになります。
So I got the fan filter thing off, but the black edge plate thing isn't coming off. All I did was warp my flathead screwdriver and scratch the console.
HumidTater - 返信
-
-
-
ハードディスクドライブに取り付けられている、ハードディスクドライブのサイズ(例:「250 GB」)と書かれたファブリック製のタブをしっかりとつかみます。
-
ハードドライブをコンソールからまっすぐ引き抜きます。
If i buy a new xbox 360 and replace the hardrive inside with my own, will i have my account and saves? or will i have to recover my account and start over?
You will still have your saves and account if you replace your hard drive in the new xbox
hola tengo un disco de laptop y quiero ponerle 100 juegos como puedo hacer la xbox me reconose el disco y todo lo configuro pero cuando conecto a mi pc para pasar los juejosel emulador no me deja
-
-
-
底部ベゼル左側後方のコーナー付近のスリットからメタルスパッジャーを差し込みます。
-
片方の手でリアベゼルを持ち上げながら、スパッジャーをデバイスから遠ざけるように回転させます。
These are pretty awkward to remove, but once you understand how they work its easy enough. The goal here is to slot the spudger THROUGH the gap of the silver tabs (visible in previous steps image, circled) and then pry. Put pressure against the wall of the Xbox case and push downwards, once you feel the spudger slot in, then apply force away from the Xbox and pull up a little with your free hand.
-
-
-
-
-
Wi-Fiカードの裏側、コンソールの上端に沿って、左右のケースをつなぐ2つのクリップを確認します。
-
片手で左右のケースを押しながら、メタル製のスパッジャーを使ってクリップをこじ開けて外します。
-
-
-
保証書が貼られていた左右のケースの間に、メタル製スパッジャーの平面側を差し込みます。
-
左のケースを上にひねって隙間を作り、スパッジャーを左のケースに向かってスライドさせます。
-
スパッジャーを上方向に回転させると、最後のクリップが外れます。
if you make a hole right here like the link`s picture you can boot the lock
As the user above me said, please avoid doing it like shown in the guide. It just didn’t work on my Xbox (unless your goal is to destroy the plastic case). Instead, pick some small needle like object (the spudger was too short for this, I used the SIM bit of my iFixit driver kit) and find the right spot on the big sticker which is on the left in the pictures shown in the guide. That spot is just between the text and the column of logos (Dolby Digital, etc.) (https://team-xecuter.com/slim/slim_secre..., picture not mine). Poke it (don’t be too gentle, you have to apply some force) and you will hear the clip release.
Both the above links are dead, i used this YouTube video which shows you the process of getting the hidden clip
I was able to open it by pushing on the sticker to unclamp the clip while another person helped me pull open the case.
Here is a Video that shows the small hole behind the sticker, ist in german but ist good to see how to open that hidden clip easiely.
-
-
-
右ケースをフェースプレートに固定している上端右端付近のクリップを外します。
There are 4 black screw that has to be removed before you can detach the other cover. Please note
Sorry, there 5screws, one in the middle and 4 at the edges
-
-
-
RFモジュールをメタルケースに固定している5.6mm T8トルクスネジを2本外します。
On my disassembly during this part, I found the T9 Torx to be too big and had to use the T8 Torx instead.
weitmeyerj - 返信
The correct size is T8!
-
-
-
Xboxから直接ボードを引き抜いて外します。
It may not be required but recommended. As you move the xbox around you could break this part. Removing it and placing it in a safe place keeps that from happening.
-
-
-
Xboxから光学ドライブを持ち上げて外します。
Is there a specific Optical Drive that Microsoft uses in these or can I upgrade my drive?
whitemare0 - 返信
i took my drive out but when installed my replacement it would not work
WAS thinking of possibly trying to repair my son's Xbox 360S, by replacing the optical drive, but after looking at all the spudger steps to get to the drive and then your comment that the replacement might not actually work... forget about it! I ain't going to all that work for possibly nothing... t'ain't worth it!
Anyone want a perfectly working Xbox 360S with a drive the spins game discs upon ejection? We've already bought a replacement, so this unit is for sale... name your price.
Luposian -
In regards to davidgardner301 comment there is a extra step they. Didn't show on this replacement guide in order for your new disk drive to work you will need to remove the origional board connected to thje origional drive that came with the system and soler that onto the new one its a tricky process however its a step most people over look
Without the origional board the xbox will not accept the replacement drive only because each disk drive is coded to work with tat soecific xbox only so your out of luck if you already. Tossed out your old disk drive
The DVD drives are coded to the Motherboard. If you buy the same exact drive to replace the broken one. You will still need to either 1) transfer the DVD circuit board OR 2) get the Firmware from the old DVD drive using a PC and then transfer it to the New DVD. There are website regarding this procedure if you want to look it up.
-
-
-
Gとマークされている穴から11.3 mmゴールドのT10トルクスネジを1本外します。
-
-
-
メタルフレームからハードドライブブラケットを持ち上げて外します。
I have a 4GB Xbox 360 slim and I bought a 500GB hard drive for it. I pushed the hard drive in its place and after I heard that click, I pushed it a little bit more to be shure that it's in place. I noticed that the hard drive bracket (the slide that holds the hard drive) it's elastic: after the hard drive is inserted, it wobbles (maybe to prevent hdd damage when the xbox is moved).
My question is: how does the hard drive bracket work? is there a metal spring in its mechanism that allows it to wobble? Did I make any damage to it because I pushed the hard drive to be sure that it is in place? I don't want to teardwon my console to find that out.
Thank you!
-
-
-
ロジックボードからファンケーブルのコネクタを引き抜いて外します。
-
-
-
メタルケースにロジックボードアセンブリを固定しているネジを10本外します。
-
"M", "N", "P", "R"と"T"マークされている11.3 mmシルバーのT10トルクスネジを5本外します。
-
"D", "E", "J", "K"とマークされている5.6 mmブラック T9トルクスネジを4本外します。
-
"A"とマークされている11.3 mmゴールドT10トルクスネジを1本外します。
Correct size for the orange screws is T8!
I confirm what the user above me said, they were T8, at least on my Xbox.
I don't have the gold one. Is it normal?
My gold and silver screws were reversed. 5 gold, 1 silver.
-
-
-
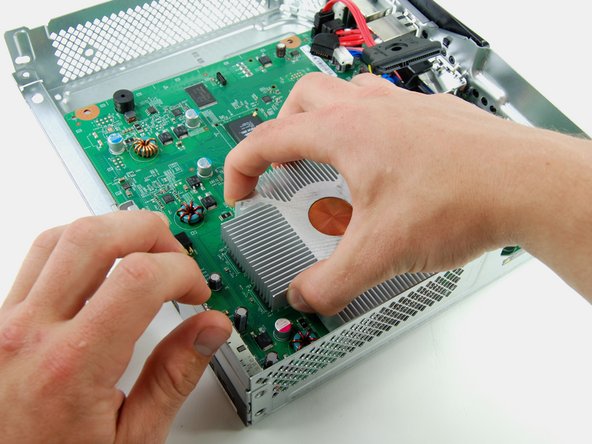
Xクランプの左手前から始めて、ヒートシンクのペグとXクランプのフックの間に1.5mmのマイナスドライバーを挿入します。
Uggghhhh, Microsoft is still using X-Clamps. Didn't they learn anything from the original 360?
Hopefully having the smaller CPU and GPU on the same die, as well as an "improved fan cooling system" will keep those old issues from rearing their ugly heads. The Red Ring of Death technically doesn't exist anymore, either.
I've been reading that people are ruining their boards on this step when they slip and the tool slices the main board while trying to remove the x-clamp. Use a metal spudger and slip it between the post and the x-clamp from ABOVE... not along the bottom where the board is. The whole clamp came off in 30 seconds and the spudger was nowhere near the pcb.
-


デバイスを再組み立てする際は、これらの手順を逆の順番に従って作業を進めてください。
デバイスを再組み立てする際は、これらの手順を逆の順番に従って作業を進めてください。
68 の人々がこのガイドを完成させました。
以下の翻訳者の皆さんにお礼を申し上げます:
88%

Midori Doiさんは世界中で修理する私たちを助けてくれています! あなたも貢献してみませんか?
翻訳を始める ›

16 件のコメント
This is a great guide. Thank you for taking the time to make it.
Intercooler guys, purchase an intercooler and save yourself from this hassle
I had problems getting the x-bracket off the back (step 54-57).
I found this video using a pair of needle nose pliers that helped me immensely with this step:
I think we all ended up finding that video...
Thank you for taking the time to make this very instructional guide
I bought the single kit with tools and the multi fix kit. The kits come with mini heat sinks, pads, washers and screws. Nothing in this set of directions tells me where to use them.? Are there other directions somewhere that I have as yet not found?
This is an awesome guide that I only found after getting stuck trying to remove the heat sink - wish I had found it before I started. Once removed I found an odd pattern of thermal paste, the circle of copper on the heat sink and beneath it on the chip only had a few spattering’s of thermal paste - is it possible that heat pushed the thermal paste out to the boundaries of the chip?
I’m going to go look for a recommendation of what type of thermal paste I should put back down.
Why didn’t u show us how to reinstall the X clamp bracket. Its not as easy as just sticking it on so maybe don’t forget that.
Hey guys I figured out how to put the bracket back on with out killing the mobo. Here follow this:
So first off u need to look back at the part where u take off the bracket. That way u know what way the bracket came off as. This might not matter but I couldn’t get mine with out lining it up correctly from when I removed it so do that first.
Then put new thermal paste on the CPU>put heatsink threw mobo and flip the mobo over.
Now align the bracket as u did before u took it off, then hook the bracket on one end of the heatsink screw holes. Now push firmly down on the opposite screw hole from the one u are notched on right now. If u do it right u should have those 2 brackets parts notched on the screw holes. If not take off the brackets and try again. Once done with the first set simply do the same thing to the last set.
Hope this helps for those like me who got confused when there wasn’t a section showing how to put the bracket back on.
Is the Heatsink on this model your showing have the old, original, upgraded or newest one? My daughter's Slim was very dirty dusty & clogged cooling intake and I cleaned it. She has an external fan also that plug into USB port and it is obvious why overheating but I want to know if heatsink should be replaced it has that same circle copper center core heatsink. I have looked at a couple of heatsink sites online showing progression of changing of sinks xbox went through but not this one. I'm hoping it is the newer or better yet the newest style. I have artic silver 5 thermal paste I use on video cards & processors on my computer builds & repairs. I don't know what paste the xbox360 slim uses and I have seen the crappy thermal pads used in some Compaq Laptops for the video processor which I switch out for a copper plate thermal pasted and the heat immediately goes away. If you know which sink this is should I switch it or just take it off and replace the paste? Thanks
James Hamicksburg
יעקב המיקסברג
I starred this guide because I like long guides, as well as well-organized ones. Yours is both! You’re welcome!
It is great! Do you any of you guys have any information what is the space (its like a cpu socket on pc’s) between the cpu holding holes. I’m asking because i’d like to put on a aio watercooilng kit into it. :) Thanks.
What is that metal embedded in the heatsink? Is it copper?
two scratches because of how hard the heatsink is hard to take off and one stab to the mobo because of how hard it was to screw the fan back, and the thing still works. 10/10 would accidentally damage my xbox again
haywirestudent7 - that is like putting a band-aid on something. It might work but it isn’t proper or recommended whatsoever. TIM doesn’t last forever. Replacing something defective is highly more advisable then doing something unnecessary.
It is easier to remove the X bracket by using a small flathead screwdriver or spudger to pry between a post and the inside edge of the opening (the side nearest the center). This will disengage the hook on the opposite side of the X. Releasing two ends that are side-by-side allows for removal by only working on two legs.
When separating the second part of the main case, there is no need to damage the edges of the plastic. There really is a small (about 1mm) hole near the "checkmark" under the tough plastic sticker. You still need to remove the little Warranty Sticker, because that binds the two pieces of the case. Pushing very firmly on the black sticker with the pad of your thumb will make a faint dimple where the hole is; puncture it with something sharp, then press a straightened paper clip through the hole to release the clip.
LordRegent - 返信