はじめに
このガイドを参照して、Xboxを蘇らせましょう。
必要な工具と部品
-
-
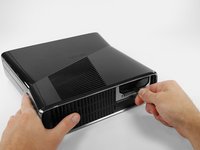
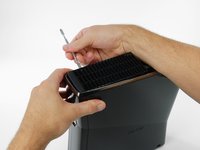
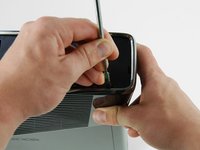
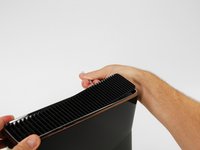
ハードディスクドライブに取り付けられている、ハードディスクドライブのサイズ(例:「250 GB」)と書かれたファブリック製のタブをしっかりとつかみます。
-
ハードドライブをコンソールからまっすぐ引き抜きます。
If i buy a new xbox 360 and replace the hardrive inside with my own, will i have my account and saves? or will i have to recover my account and start over?
You will still have your saves and account if you replace your hard drive in the new xbox
hola tengo un disco de laptop y quiero ponerle 100 juegos como puedo hacer la xbox me reconose el disco y todo lo configuro pero cuando conecto a mi pc para pasar los juejosel emulador no me deja
-
-
-
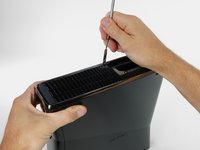
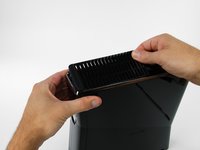
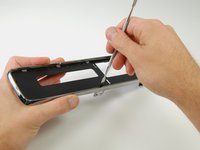
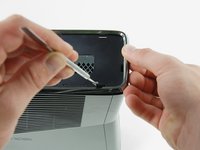
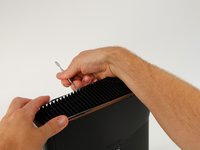
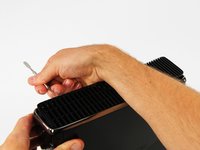
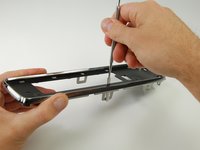
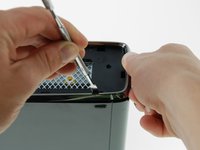
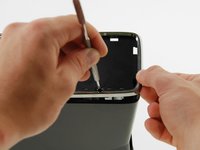
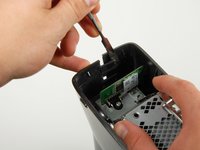
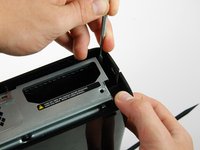
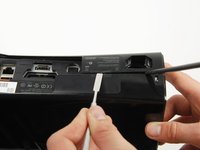
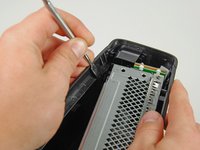
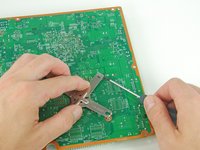
底部ベゼル左側後方のコーナー付近のスリットからメタルスパッジャーを差し込みます。
-
片方の手でリアベゼルを持ち上げながら、スパッジャーをデバイスから遠ざけるように回転させます。
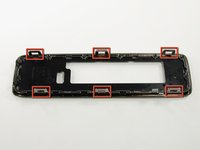
These are pretty awkward to remove, but once you understand how they work its easy enough. The goal here is to slot the spudger THROUGH the gap of the silver tabs (visible in previous steps image, circled) and then pry. Put pressure against the wall of the Xbox case and push downwards, once you feel the spudger slot in, then apply force away from the Xbox and pull up a little with your free hand.
-
-
-
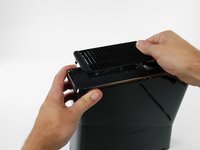
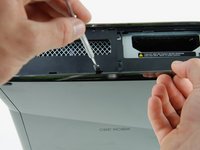
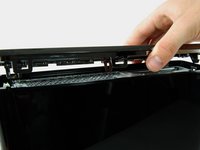
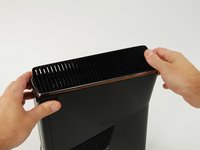
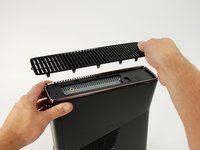
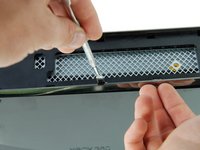
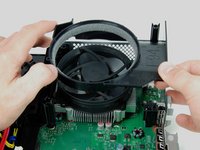
以下の手順で、13個のクリップで上部パネルに固定されている上側のベントを取り外します。
The motherboard and the disc drive's PCB (circuit board) are paired. If the drive's PCB is fine, which it most likely is, then all you need to do is swap out the PCB on the new drive with your old one before installing it. No motherboard replacement required.
Only in the unlikely case that the drive's PCB is fried will you require a full drive and motherboard replacement.
-
-
-
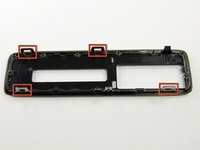
本体側面の「XBOX 360」の文字が右側、フェイスプレートが左側になるように配置します。
-
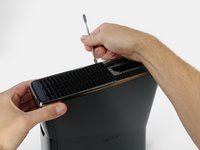
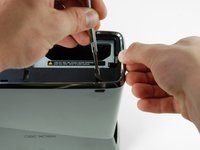
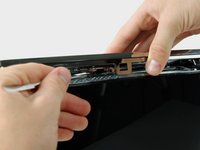
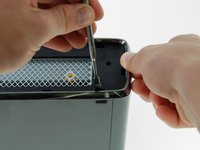
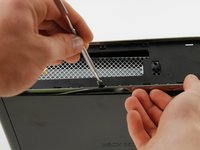
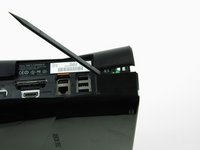
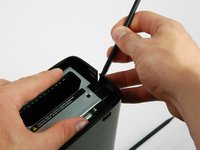
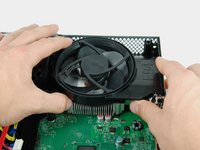
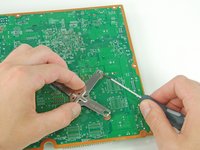
メタル製スパッジャーをXbox背面側付近の上部ベントと上部ベゼルの間に差し込みます。
-
コンソールから離れるようにスパッジャーを回転させ、2つのプラスチッククリップが外れるまでファンベントの端をこじ開けます。
This step is and the others following are to rough and not needed, simply put smth in between the lamellar and push it up with littlebit pressure thats better for the plastic parts.
TheSupport - 返信
-
-
-
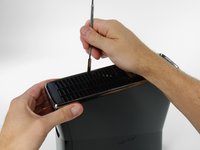
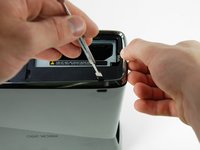
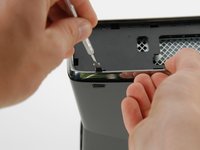
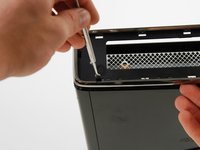
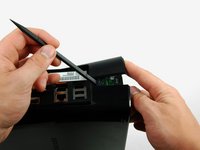
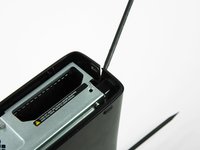
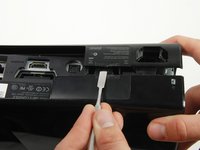
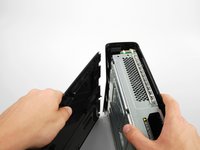
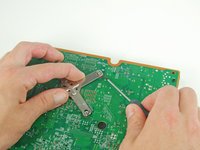
上部ベゼルの左端にある一番手前のスリットから、上記のようにクリップ下端と左ケースの間にメタル製スパッジャーを差し込みます。
-
同時にスパッジャーをコンソールから離して回転させ、上部ベゼルを引き上げると、クリップがフリーになります。
So I got the fan filter thing off, but the black edge plate thing isn't coming off. All I did was warp my flathead screwdriver and scratch the console.
HumidTater - 返信
-
-
-
-
-
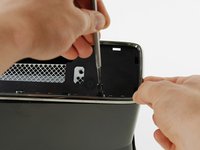
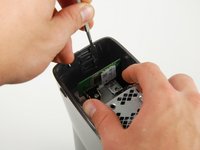
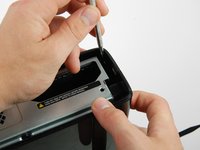
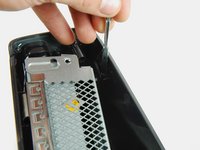
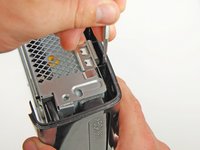
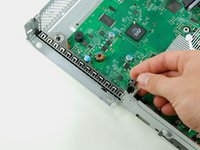
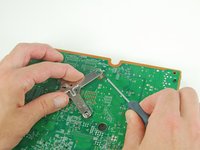
Wi-Fiカードの裏側、コンソールの上端に沿って、左右のケースをつなぐ2つのクリップを確認します。
-
片手で左右のケースを押しながら、メタル製のスパッジャーを使ってクリップをこじ開けて外します。
-
-
-
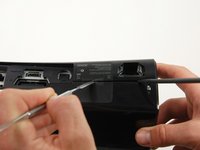
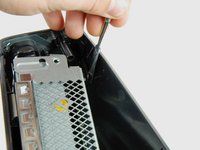
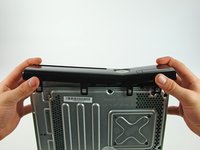
保証書が貼られていた左右のケースの間に、メタル製スパッジャーの平面側を差し込みます。
-
左のケースを上にひねって隙間を作り、スパッジャーを左のケースに向かってスライドさせます。
-
スパッジャーを上方向に回転させると、最後のクリップが外れます。
if you make a hole right here like the link`s picture you can boot the lock
As the user above me said, please avoid doing it like shown in the guide. It just didn’t work on my Xbox (unless your goal is to destroy the plastic case). Instead, pick some small needle like object (the spudger was too short for this, I used the SIM bit of my iFixit driver kit) and find the right spot on the big sticker which is on the left in the pictures shown in the guide. That spot is just between the text and the column of logos (Dolby Digital, etc.) (https://team-xecuter.com/slim/slim_secre..., picture not mine). Poke it (don’t be too gentle, you have to apply some force) and you will hear the clip release.
Both the above links are dead, i used this YouTube video which shows you the process of getting the hidden clip
I was able to open it by pushing on the sticker to unclamp the clip while another person helped me pull open the case.
Here is a Video that shows the small hole behind the sticker, ist in german but ist good to see how to open that hidden clip easiely.
None of the above options by the other commenters worked for me, but I found a video that points out there's a little hole right in the middle of the "SEE PRINTED MANUAL" and "UL" on the sticker under the Xbox 360 warranty sticker that I stuck a sewing needle into and it unlatches the latch: https://youtu.be/7mC8ckDvKqc?si=CVyCszpF...
-
-
-
右ケースをフェースプレートに固定している上端右端付近のクリップを外します。
There are 4 black screw that has to be removed before you can detach the other cover. Please note
Sorry, there 5screws, one in the middle and 4 at the edges
-
-
-
フェイスプレートの左端を持ち上げて、フェイスプレートを右側ケースに固定している最後の2つのクリップを外します。
-
フェイスプレートをデバイスの他の部分から切り離します。
There isn’t 2 clips there is 4 clips
I tore this on reassembly and it was barely held together. Be careful!
-
-
-
RFモジュールをメタルケースに固定している5.6mm T8トルクスネジを2本外します。
On my disassembly during this part, I found the T9 Torx to be too big and had to use the T8 Torx instead.
weitmeyerj - 返信
The correct size is T8!
-
-
-
Xboxから直接ボードを引き抜いて外します。
It may not be required but recommended. As you move the xbox around you could break this part. Removing it and placing it in a safe place keeps that from happening.
-
-
-
メタルフレームに右側ケースを固定している55.5 mm T10トルクスネジを5本外します。
I opened an Xbox 360 S manufactured in 2010. These 5 screws are needed to be undone in order to complete step 30. I didn't know about the one under the sticker so I ended up breaking the housing as a result. I'd appreciate it if you could make a note to step 30 pointing you to this step if you are having trouble taking the side off, as it is highly likely that these screws are the reason.
-
-
-
Xboxから光学ドライブを持ち上げて外します。
Is there a specific Optical Drive that Microsoft uses in these or can I upgrade my drive?
whitemare0 - 返信
i took my drive out but when installed my replacement it would not work
WAS thinking of possibly trying to repair my son's Xbox 360S, by replacing the optical drive, but after looking at all the spudger steps to get to the drive and then your comment that the replacement might not actually work... forget about it! I ain't going to all that work for possibly nothing... t'ain't worth it!
Anyone want a perfectly working Xbox 360S with a drive the spins game discs upon ejection? We've already bought a replacement, so this unit is for sale... name your price.
Luposian -
In regards to davidgardner301 comment there is a extra step they. Didn't show on this replacement guide in order for your new disk drive to work you will need to remove the origional board connected to thje origional drive that came with the system and soler that onto the new one its a tricky process however its a step most people over look
Without the origional board the xbox will not accept the replacement drive only because each disk drive is coded to work with tat soecific xbox only so your out of luck if you already. Tossed out your old disk drive
The DVD drives are coded to the Motherboard. If you buy the same exact drive to replace the broken one. You will still need to either 1) transfer the DVD circuit board OR 2) get the Firmware from the old DVD drive using a PC and then transfer it to the New DVD. There are website regarding this procedure if you want to look it up.
-
-
-
Gとマークされている穴から11.3 mmゴールドのT10トルクスネジを1本外します。
-
-
-
メタルフレームからハードドライブブラケットを持ち上げて外します。
I have a 4GB Xbox 360 slim and I bought a 500GB hard drive for it. I pushed the hard drive in its place and after I heard that click, I pushed it a little bit more to be shure that it's in place. I noticed that the hard drive bracket (the slide that holds the hard drive) it's elastic: after the hard drive is inserted, it wobbles (maybe to prevent hdd damage when the xbox is moved).
My question is: how does the hard drive bracket work? is there a metal spring in its mechanism that allows it to wobble? Did I make any damage to it because I pushed the hard drive to be sure that it is in place? I don't want to teardwon my console to find that out.
Thank you!
-
-
-
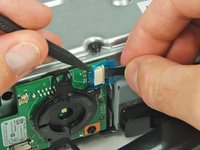
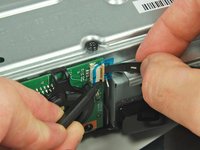
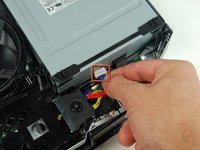
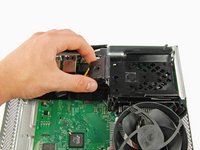
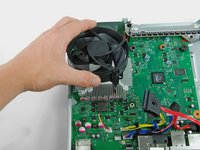
ロジックボードからファンケーブルのコネクタを引き抜いて外します。
-
-
-
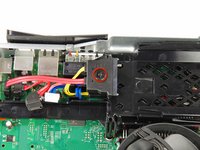
メタルケースにロジックボードアセンブリを固定しているネジを10本外します。
-
"M", "N", "P", "R"と"T"マークされている11.3 mmシルバーのT10トルクスネジを5本外します。
-
"D", "E", "J", "K"とマークされている5.6 mmブラック T9トルクスネジを4本外します。
-
"A"とマークされている11.3 mmゴールドT10トルクスネジを1本外します。
Correct size for the orange screws is T8!
I confirm what the user above me said, they were T8, at least on my Xbox.
I don't have the gold one. Is it normal?
My gold and silver screws were reversed. 5 gold, 1 silver.
-
-
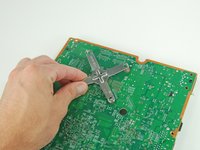
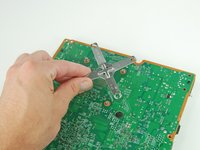
この手順で使用する道具:Flathead 1.5 mm Screwdriver$5.49
-
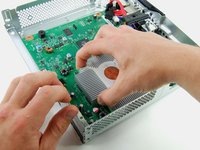
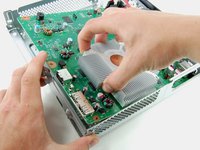
Xクランプの左手前から始めて、ヒートシンクのペグとXクランプのフックの間に1.5 mmマイナスドライバーを挿入します。
Uggghhhh, Microsoft is still using X-Clamps. Didn't they learn anything from the original 360?
Hopefully having the smaller CPU and GPU on the same die, as well as an "improved fan cooling system" will keep those old issues from rearing their ugly heads. The Red Ring of Death technically doesn't exist anymore, either.
I've been reading that people are ruining their boards on this step when they slip and the tool slices the main board while trying to remove the x-clamp. Use a metal spudger and slip it between the post and the x-clamp from ABOVE... not along the bottom where the board is. The whole clamp came off in 30 seconds and the spudger was nowhere near the pcb.
-
-
-
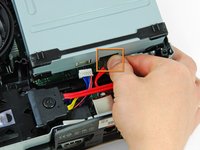
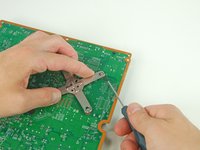
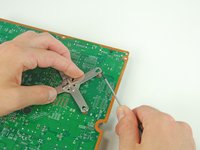
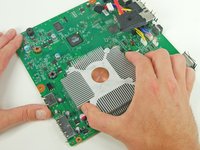
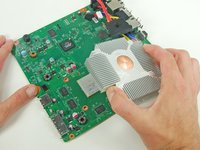
ロジックボードとコネクタが残ります。
When transferring cables from the old motherboard to the new one, please note that the two motherboard versions have different connectors for the hard drive power.
The Revision B board has a 4pin connector located between the two SATA data ports whilst the revision A board has a 5pin connector located near the CPU fan power connector.
Mason Dawe - 返信
-


デバイスを再組み立てする際は、これらの手順を逆の順番に従って作業を進めてください。
デバイスを再組み立てする際は、これらの手順を逆の順番に従って作業を進めてください。
122 の人々がこのガイドを完成させました。
以下の翻訳者の皆さんにお礼を申し上げます:
100%

Midori Doiさんは世界中で修理する私たちを助けてくれています! あなたも貢献してみませんか?
翻訳を始める ›

9 件のコメント
This guide wouldn't even work. DVD drives are linked to the motherboard. If someone were to follow this the end result would be an Xbox console that could only play DVDS games would show up as DVDs because of key mismatch.
What you mean “could only play DVDS games would show up as DVDs because of key mismatch “?
Whats the difference you mean about DVDS and DVDs?
Yes, but this is a good guide for those that are installing new thermal paste on their boards and/or wanna gut their system for a thorough cleaning.
just wanted to say thank you although i only needed up to step 43 as i'm have issues with the dvd drive it seems it only wants to read if the drive case is open my my thought is the slider servo is about done for. the dvd was a bit of a bear to figure out for a few minutes but remove the foam then use a p42 driver on the screws underside then the top slides off the back and honestly i left the bottom on.i found step 29 to be a bit of a pain and almost decided to break that bugger of a clip off for future work but didn't, and to me it seemed that removing the screws in step 40 made steps 32 through 34 easier, i don't know take it for what it's worth also i found i could also skip step 35 and leave the front plate and the rf module connected which made working the unit while open/disassembled easier if you need to remove the rf module then you can move the front plate off to the side enough and remove the screws holding it, and beside i hate working with ribbon cable. all in all nice guide though THUMBS UP!
Thanks mate, got me to where I needed to get to… that other tosser can !#^& off tho, id like to see him take the time and effort to produce a detailed instructional like this.
Paul Hayes - 返信
How do I swap a motherboard from a standard edition Xbox 360 Slim with a special edition like the R2-D2 Star wars edition? And keep the startup noise and lights.
You can't keep the startup noise and lights, that's programmed onto the console. Your best bet is buying a new R2-D2 board.
Who can to sell to me working motherboard??
In step 51, the four black screws are T8 like in step 36, not T9.