メインコンテンツにスキップ
リペアコミュニティに参加 - アカウントの作成

Treblab HD77 Battery Replacement

必要な工具と部品

  1. Treblab HD77 Battery Replacement, Surround: 手順 1、 3の画像 1 Treblab HD77 Battery Replacement, Surround: 手順 1、 3の画像 2 Treblab HD77 Battery Replacement, Surround: 手順 1、 3の画像 3
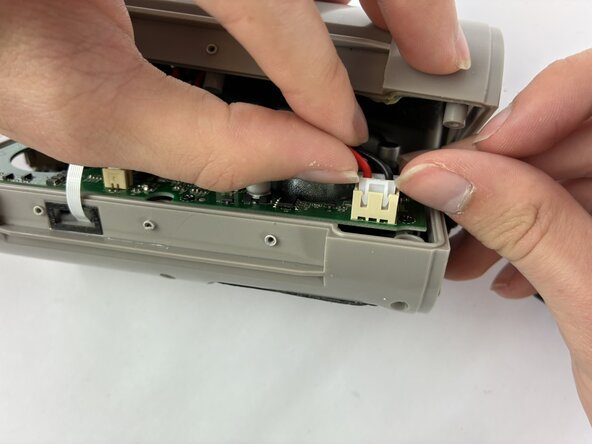
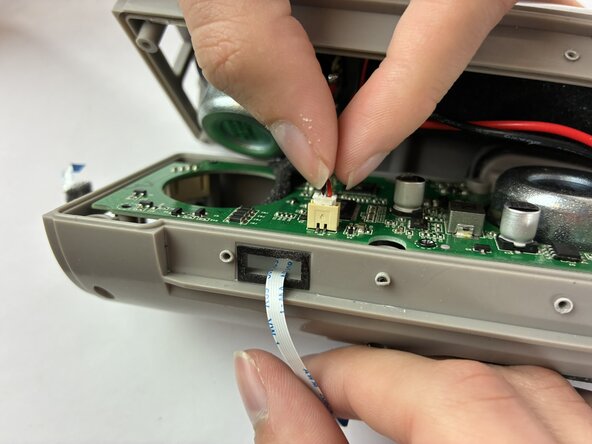
    • Remove the outer casing of the speaker by prying at the edges to unlock each prong holding the casing to the speaker.

  2. Treblab HD77 Battery Replacement: 手順 2、 3の画像 1 Treblab HD77 Battery Replacement: 手順 2、 3の画像 2 Treblab HD77 Battery Replacement: 手順 2、 3の画像 3
    • Remove the plastic ring on top of the rubber surround on the side of the speaker by lifting it gently.

    • There is a layer of adhesive between the plastic ring and the rubber surround beneath it.

  3. Treblab HD77 Battery Replacement: 手順 3、 3の画像 1 Treblab HD77 Battery Replacement: 手順 3、 3の画像 2 Treblab HD77 Battery Replacement: 手順 3、 3の画像 3
    • Insert the blade of a small precision knife between the edge of the rubber surround and the plastic edge.

    • Gently apply pressure and slide the blade in a circle along the entire circumference until the surround loosens and can be removed.

    • There is a layer of adhesive between the surround and the plastic housing it is resting on.

  4. Treblab HD77 Battery Replacement, LED Light: 手順 4、 3の画像 1 Treblab HD77 Battery Replacement, LED Light: 手順 4、 3の画像 2 Treblab HD77 Battery Replacement, LED Light: 手順 4、 3の画像 3
    • Slide a small precision knife underneath the LED light strip and remove the adhesive holding it in place.

    • There are four points where adhesive is used to hold the LED light strip down.

    • Lift up the LED light strip from the plastic casing.

  5. Treblab HD77 Battery Replacement: 手順 5、 3の画像 1 Treblab HD77 Battery Replacement: 手順 5、 3の画像 2 Treblab HD77 Battery Replacement: 手順 5、 3の画像 3
    • Flip the LED light strip upside down to see where the cord is plugged in.

    • Gently pinch the wire with your pointer finger and thumb, and remove the cord from the LED slowly.

    • The cord is very thin and lightweight so use caution when handling.

  6. Treblab HD77 Battery Replacement, Battery: 手順 6、 3の画像 1 Treblab HD77 Battery Replacement, Battery: 手順 6、 3の画像 2 Treblab HD77 Battery Replacement, Battery: 手順 6、 3の画像 3
    • Using a Phillips #0 screwdriver, remove all four 10mm screws that were exposed by removing the LED light strip.

    • Lift the plastic ring once all the screws have been removed.

    • The screws are very tiny and can fall inside the device if they are not handled carefully.

    • Repeat steps 1-6 for the opposite side.

  7. Treblab HD77 Battery Replacement: 手順 7、 2の画像 1 Treblab HD77 Battery Replacement: 手順 7、 2の画像 2
    • Slide the inner electronics casing out from the outer tubing encasing it.

  8. Treblab HD77 Battery Replacement: 手順 8、 2の画像 1 Treblab HD77 Battery Replacement: 手順 8、 2の画像 2
    • Unscrew the six 10mm screws holding the two halves of the electronics casing together using a Phillips #0 screwdriver.

  9. Treblab HD77 Battery Replacement: 手順 9、 3の画像 1 Treblab HD77 Battery Replacement: 手順 9、 3の画像 2 Treblab HD77 Battery Replacement: 手順 9、 3の画像 3
    • Insert the blade of a precision knife in between the edge of the rubber button cover and the extruded edges holding it in place.

    • Gently trace around the edge until you feel the cover beginning to loosen, and then slowly peel the cover up.

    • Be careful to not apply too much pressure with the blade, as there is a circuit board directly underneath the cover. There is also a layer of strong adhesive between the circuit board and the cover.

  10. Treblab HD77 Battery Replacement: 手順 10、 2の画像 1 Treblab HD77 Battery Replacement: 手順 10、 2の画像 2
    • Using a Phillips #0 screwdriver, unscrew the six 5mm screws holding the circuit board in place.

  11. Treblab HD77 Battery Replacement: 手順 11、 2の画像 1 Treblab HD77 Battery Replacement: 手順 11、 2の画像 2
    • Turn the speaker over to the side with the charging port dock, and gently pull the two halves apart by firmly grasping each half until they separate.

  12. Treblab HD77 Battery Replacement: 手順 12、 3の画像 1 Treblab HD77 Battery Replacement: 手順 12、 3の画像 2 Treblab HD77 Battery Replacement: 手順 12、 3の画像 3
    • Pinch the thin wire under the circuit board that connects it to the motherboard, and gently remove the wire from the circuit board.

    • The cord is very thin and lightweight so use caution when handling.

  13. Treblab HD77 Battery Replacement: 手順 13、 3の画像 1 Treblab HD77 Battery Replacement: 手順 13、 3の画像 2 Treblab HD77 Battery Replacement: 手順 13、 3の画像 3
    • Orient the speaker so the motherboard is on the bottom half, facing up, and the circuit board cutout is facing you.

    • Using your thumb and pointer finger, grip the plug connected to the large red and black wires just below the extruded tip, and gently lift until the plug comes out.

  14. Treblab HD77 Battery Replacement: 手順 14、 3の画像 1 Treblab HD77 Battery Replacement: 手順 14、 3の画像 2 Treblab HD77 Battery Replacement: 手順 14、 3の画像 3
    • Using your thumb and pointer finger, grip the plug connected to the smaller red and black wires just below the extruded tip, and gently lift until the plug comes out.

  15. Treblab HD77 Battery Replacement: 手順 15、 3の画像 1 Treblab HD77 Battery Replacement: 手順 15、 3の画像 2 Treblab HD77 Battery Replacement: 手順 15、 3の画像 3
    • The battery is located on the half without the motherboard and has a layer of foam surrounding it.

    • Lift the battery out of the shell using your thumb on the edge of the battery.

終わりに

To reassemble your device, follow these instructions in reverse order.

2 の人々がこのガイドを完成させました。

作成者

3人の作成者と共同で作成されました。

Matthew Szabo

メンバー登録日: 11/04/25

775 ポイント

4のガイドは作成済み

チーム

UMass Dartmouth, Team 3-5, Biswokarma Fall 2025 UMass Dartmouth, Team 3-5, Biswokarma Fall 2025人のメンバー

UMASSD-BISWOKARMA-F25S3G5

5 メンバー

5のガイドは作成済み

1件のガイドコメント

any ideas what the batteries are?

Cheffrank Mach - 返信 共有

コメントを追加

統計データ:

過去 24時間: 0

過去 7 日: 4

過去 30 日: 31

今までの合計 251