メインコンテンツにスキップ

Toshiba Satellite U840W Speakers Replacement

必要な工具と部品

  1. Toshiba Satellite U840W Speakers Replacement, Toshiba Satellite U840W Disassembly Guide: 手順 1、 2の画像 1 Toshiba Satellite U840W Speakers Replacement, Toshiba Satellite U840W Disassembly Guide: 手順 1、 2の画像 2
    • There are ten 5mm screws surrounding the edge of the cover.

    • A rubber cap covers the eleventh 5mm screw (in the center).

    • Remove the screws using a Phillips #00 screwdriver.

  2. Toshiba Satellite U840W Speakers Replacement: 手順 2、 3の画像 1 Toshiba Satellite U840W Speakers Replacement: 手順 2、 3の画像 2 Toshiba Satellite U840W Speakers Replacement: 手順 2、 3の画像 3
    • Pry between the casing and cover using a plastic wedge tool.

    • Use the wedge tool to move along the case & slowly pry it open.

    • The wire for the 12v charging port connects the cover to the casing.

  3. Toshiba Satellite U840W Speakers Replacement: 手順 3、 3の画像 1 Toshiba Satellite U840W Speakers Replacement: 手順 3、 3の画像 2 Toshiba Satellite U840W Speakers Replacement: 手順 3、 3の画像 3
    • Disconnect this connector from the motherboard to avoid damaging the motherboard or charging port cable.

  4. Toshiba Satellite U840W Speakers Replacement: 手順 4、 1の画像 1
    • Disconnect the battery.

    • Hold down the power button for ~10 seconds to discharge any stored electricity from the motherboard.

  5. Toshiba Satellite U840W Speakers Replacement, Speakers: 手順 6、 2の画像 1 Toshiba Satellite U840W Speakers Replacement, Speakers: 手順 6、 2の画像 2
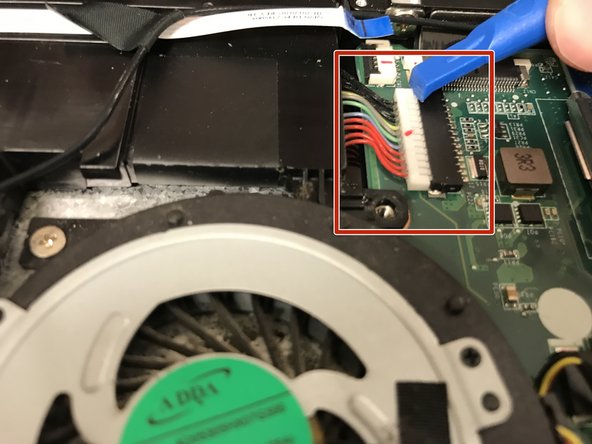
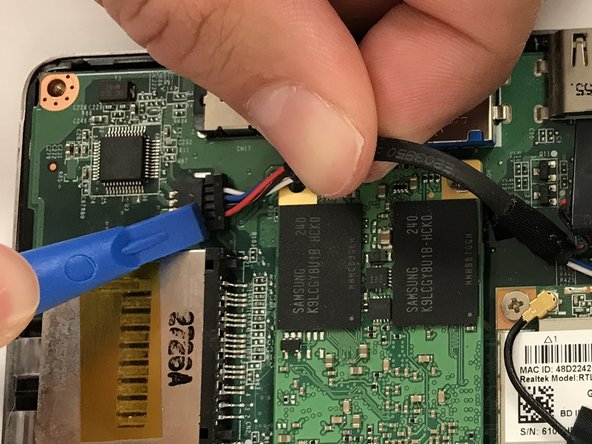
    • Remove the two 5mm screws using a Phillips #00 screwdriver.

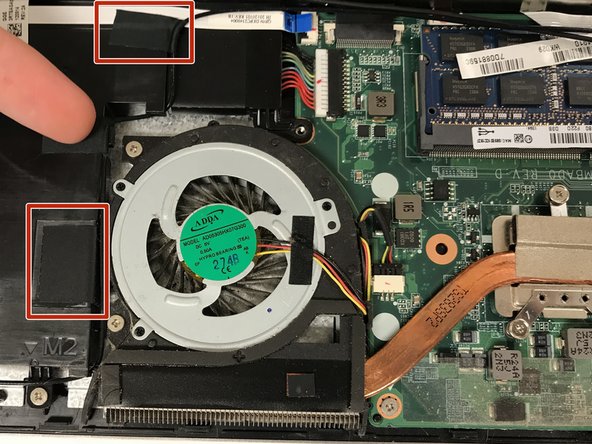
    • Remove the left speaker.

  6. Toshiba Satellite U840W Speakers Replacement: 手順 7、 3の画像 1 Toshiba Satellite U840W Speakers Replacement: 手順 7、 3の画像 2 Toshiba Satellite U840W Speakers Replacement: 手順 7、 3の画像 3
    • Remove tape holding the speaker wire.

    • Follow length of wire to the connector while removing the tape.

    • Remove connector.

  7. Toshiba Satellite U840W Speakers Replacement: 手順 8、 1の画像 1
    • Follow steps "6" and "7" to remove the right speaker.

終わりに

To reassemble your device, follow these instructions in reverse order.

作成者

1人の作成者と共同作成されました。

Thomas Marlett

メンバー登録日: 02/04/19

242 ポイント

1ガイドが承認済み

チーム

Gateway, Team S1-G1, Saknee Spring 2019 Gateway, Team S1-G1, Saknee Spring 2019人のメンバー

GCC-SAKNEE-S19S1G1

4 メンバー

5のガイドは作成済み

0 件のコメント

コメントを追加

統計データ:

過去 24時間: 0

過去 7 日: 2

過去 30 日: 3

今までの合計 319