メインコンテンツにスキップ

Toilet Pull Chain Spring Clasp Replacement

必要な工具と部品

  1. Toilet Pull Chain Spring Clasp Replacement, Tank Lid: 手順 1、 3の画像 1 Toilet Pull Chain Spring Clasp Replacement, Tank Lid: 手順 1、 3の画像 2 Toilet Pull Chain Spring Clasp Replacement, Tank Lid: 手順 1、 3の画像 3
    • Lift the tank lid up and away from the toilet tank.

    • Use sturdy hands when lifting the tank lid, it might be heavy. Secure your fingers firmly on opposite sides and place the lid on a safe flat surface.

  2. Toilet Pull Chain Spring Clasp Replacement, Shutting off the Water Supply to a Toilet: 手順 2、 2の画像 1 Toilet Pull Chain Spring Clasp Replacement, Shutting off the Water Supply to a Toilet: 手順 2、 2の画像 2
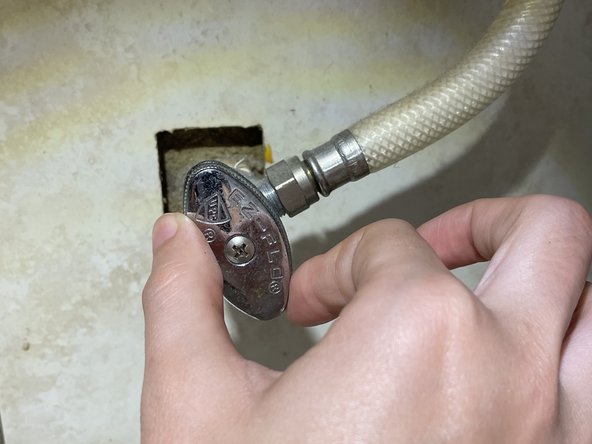
    • Shut off the stop valve underneath the toilet by turning it clockwise until it becomes hand tight.

    • The appearance of this valve may differ from toilet to toilet, but most operate the same. Some valves require multiple turns to stop the water while others only require a quarter turn.

  3. Toilet Pull Chain Spring Clasp Replacement, Draining a Toilet Tank: 手順 3、 2の画像 1 Toilet Pull Chain Spring Clasp Replacement, Draining a Toilet Tank: 手順 3、 2の画像 2
    • Push down the flush lever.

    • Hold the lever down until water stops draining from the tank.

    • A small amount of water will remain in the bottom of the tank.

    • If the flush lever or pull chain have become disconnected, lift up the toilet flapper to drain the tank.

  4. Toilet Pull Chain Spring Clasp Replacement, Disassembling Toilet Pull Chain Spring Clasp from Tank Lever: 手順 4、 3の画像 1 Toilet Pull Chain Spring Clasp Replacement, Disassembling Toilet Pull Chain Spring Clasp from Tank Lever: 手順 4、 3の画像 2 Toilet Pull Chain Spring Clasp Replacement, Disassembling Toilet Pull Chain Spring Clasp from Tank Lever: 手順 4、 3の画像 3
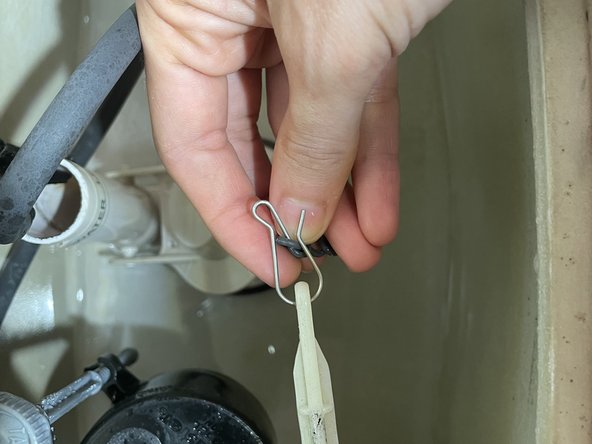
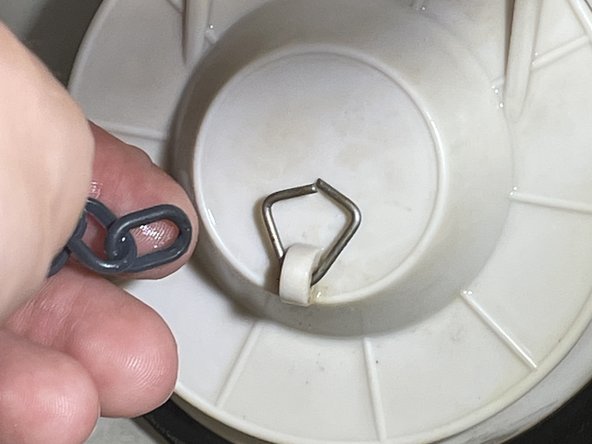
    • Squeeze open the spring clasp that connects the pull chain to the tank lever.

    • Disconnect the spring clasp from the tank lever.

    • Use both hands to disconnect the spring clasp from the tank lever.

  5. Toilet Pull Chain Spring Clasp Replacement, Disassembling Toilet Pull Chain Spring Clasp Bottom Part: 手順 5、 3の画像 1 Toilet Pull Chain Spring Clasp Replacement, Disassembling Toilet Pull Chain Spring Clasp Bottom Part: 手順 5、 3の画像 2 Toilet Pull Chain Spring Clasp Replacement, Disassembling Toilet Pull Chain Spring Clasp Bottom Part: 手順 5、 3の画像 3
    この手順で使用する道具:
    Tweezers
    $4.99
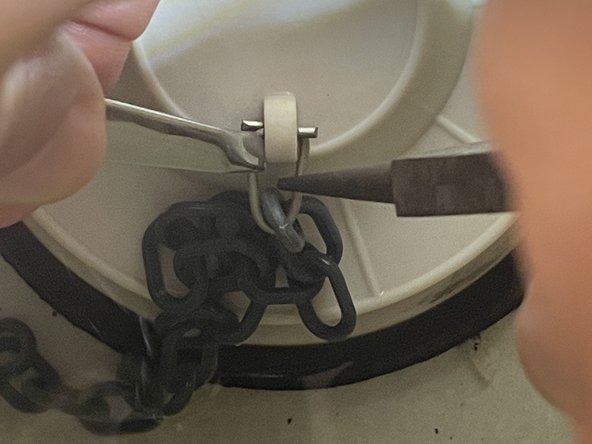
    • Use tweezers to grab the folded aluminum that is holding the chain.

    • Use pincers to grab the other side of the aluminum and pull on opposite directions to unfold the aluminum and release the chain.

    • Use the second picture as a reference to place the tweezers and pincers. Then pull-on opposite sides to open. View the last picture for results.

    • To reassemble your device, instead of pulling to opposite sides, fold the aluminum to its original form with the new chain inside.

終わりに

To reassemble your device, follow these instructions in reverse order.

ある他の人がこのガイドを完成しました。

作成者

3人の作成者と共同で作成されました。

SABRINA A VALDES-RAMOS

メンバー登録日: 03/23/22

145 ポイント

1ガイドが承認済み

0件のガイドコメント

コメントを追加

統計データ:

過去 24時間: 1

過去 7 日: 6

過去 30 日: 26

今までの合計 736