メインコンテンツにスキップ
リペアコミュニティに参加 - アカウントの作成

Texas Instruments TI-30X IIS Battery Replacement

必要な工具と部品

    1. Texas Instruments TI-30X IIS Battery Replacement, Device Inspection: 手順 1、 3の画像 1 Texas Instruments TI-30X IIS Battery Replacement, Device Inspection: 手順 1、 3の画像 2 Texas Instruments TI-30X IIS Battery Replacement, Device Inspection: 手順 1、 3の画像 3
      • Ensure that your calculator is a TI-30X IIS by looking in the top right corner of the front face.

      • Look at the rear face of the calculator and locate the four case screws. There are two at the top and two at the bottom.

      FixBotに聞いてみる

      コメントを追加

    2. Texas Instruments TI-30X IIS Battery Replacement, Removing Screws: 手順 2、 2の画像 1 Texas Instruments TI-30X IIS Battery Replacement, Removing Screws: 手順 2、 2の画像 2
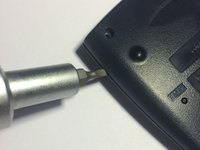
      • Use a Philips 00 screwdriver to remove the four case screws on the rear face of the calculator.

      • Be sure to save the screws in a secure place as they are small and easy to lose. They will be needed later for reassembly.

      FixBotに聞いてみる

      コメントを追加

    3. Texas Instruments TI-30X IIS Battery Replacement, Unclipping Case: 手順 3、 3の画像 1 Texas Instruments TI-30X IIS Battery Replacement, Unclipping Case: 手順 3、 3の画像 2 Texas Instruments TI-30X IIS Battery Replacement, Unclipping Case: 手順 3、 3の画像 3
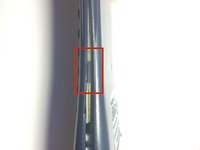
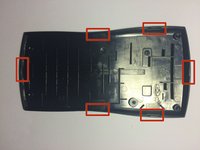
      • With all four screws removed, use a flathead screwdriver or similar flat object to separate the front and rear casings.

      • There are six clips that keep the cases together. These areas will require extra force to separate, but use caution to not fracture the plastic pieces.

      FixBotに聞いてみる

      コメントを追加

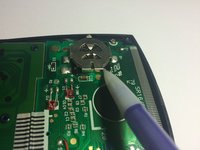
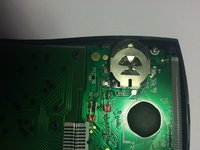
    4. Texas Instruments TI-30X IIS Battery Replacement, Removing Battery: 手順 4、 3の画像 1 Texas Instruments TI-30X IIS Battery Replacement, Removing Battery: 手順 4、 3の画像 2 Texas Instruments TI-30X IIS Battery Replacement, Removing Battery: 手順 4、 3の画像 3
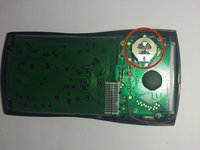
      • With the rear case off, the battery is exposed and accessible.

      • Using a pointed tool, slide the battery out of its terminal towards the near edge.

      • Once the battery is protruding from the contacts, remove it with your fingers.

      FixBotに聞いてみる

      コメントを追加

    5. Texas Instruments TI-30X IIS Battery Replacement, Replacing Battery: 手順 5、 1の画像 1
      • Properly dispose of the old battery.

      • Replace the battery with an identical one, positive terminal up and negative terminal facing down towards the circuit board.

      • Following the previous steps in the reverse order to reassemble the calculator.

      FixBotに聞いてみる

      コメントを追加

終わりに

To reassemble your device, follow these instructions in reverse order.

キャンセル: このガイドを終了できませんでした。

20 の人々がこのガイドを完成させました。

作成者

5人の作成者と共同で作成されました。

Ryan

メンバー登録日: 03/01/15

515 ポイント

1ガイドが承認済み

0件のガイドコメント

コメントを追加

統計データ:

過去 24時間: 9

過去 7 日: 50

過去 30 日: 183

今までの合計 37,613