メインコンテンツにスキップ

この修理ガイドは変更されています。最新の未承認バージョンに切り替えます。

Sony Cyber-shot DSC-W150 LCD Screen Replacement

必要な工具と部品

  1. Sony Cyber-shot DSC-W150 LCD Screen Replacement, Back Casing: 手順 1、 1の画像 1
    • The screws from the camera are extremely small, so it is a good idea to have a small container to hold all the screws as you remove them.

  2. Sony Cyber-shot DSC-W150 LCD Screen Replacement: 手順 2、 1の画像 1
    • Take your screwdriver and remove the four silver bottom screws of the camera.

    • The picture shows the lens facing away from you and the LCD facing you.

  3. Sony Cyber-shot DSC-W150 LCD Screen Replacement: 手順 3、 1の画像 1
    • On the right side of the camera, remove the two silver screws using the screwdriver.

    • The picture shows the lens facing away from you and the LCD screen facing you.

  4. Sony Cyber-shot DSC-W150 LCD Screen Replacement: 手順 4、 1の画像 1
    • On the left side of the camera, remove the two silver screws using the screwdriver.

    • The picture shows the lens facing away from you and the LCD screen facing you.

  5. Sony Cyber-shot DSC-W150 LCD Screen Replacement: 手順 5、 1の画像 1
    • Gently detach the back cover by holding onto both sides of the camera and pulling them apart.

  6. Sony Cyber-shot DSC-W150 LCD Screen Replacement: 手順 6、 1の画像 1
    • After detaching the back cover, carefully pull it off.

  7. Sony Cyber-shot DSC-W150 LCD Screen Replacement: 手順 7、 1の画像 1
    • The back cover should now be separated from the camera.

  8. Sony Cyber-shot DSC-W150 LCD Screen Replacement, Front Casing: 手順 8、 1の画像 1
    • Keep track of the small screws that you remove.

    • Opening, removing, and/or replacing the front casing may void your manufacturer's warranty.

  9. Sony Cyber-shot DSC-W150 LCD Screen Replacement: 手順 9、 1の画像 1
    • Remove the two screws at the top of the camera casing.

  10. Sony Cyber-shot DSC-W150 LCD Screen Replacement: 手順 10、 1の画像 1
    • After removing the screws, gently pop open the plastic piece, as shown by firmly pulling it with your fingers.

  11. Sony Cyber-shot DSC-W150 LCD Screen Replacement: 手順 11、 1の画像 1
    • After popping open the plastic piece, there is a screw that needs to be removed.

    • Remove the screw connecting the front casing to the electrical components.

  12. Sony Cyber-shot DSC-W150 LCD Screen Replacement: 手順 12、 1の画像 1
    • On the casing on the opposite side of the camera, gently loosen and remove the casing by firmly pulling with your fingers.

    • Be cautious not to break the fragile pieces or scratch the LCD screen.

  13. Sony Cyber-shot DSC-W150 LCD Screen Replacement: 手順 13、 1の画像 1
    • Remove the two screws connecting the front casing to the electrical components using a screwdriver.

  14. Sony Cyber-shot DSC-W150 LCD Screen Replacement: 手順 14、 1の画像 1
    • Gently loosen the front casing by gently using your fingers to pull it apart.

    • Be cautious not to scratch any of the exposed electrical components.

  15. Sony Cyber-shot DSC-W150 LCD Screen Replacement: 手順 15、 1の画像 1
    • Fully remove the front casing from the camera and set it aside.

  16. Sony Cyber-shot DSC-W150 LCD Screen Replacement, LCD Screen: 手順 16、 1の画像 1
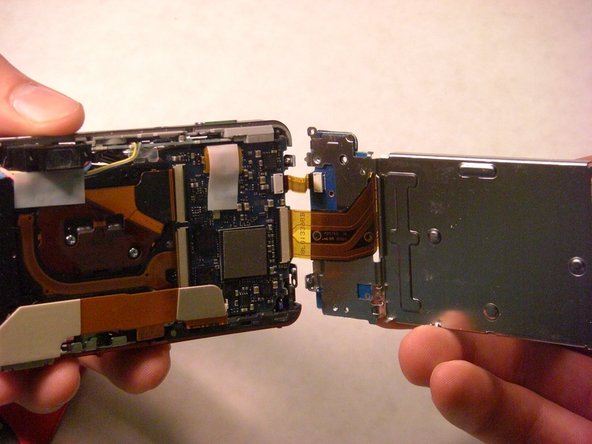
    • Remove the last screw holding the LCD/control panel to the rest of the camera on the right hand side. Looking at the right side of the camera, this last screw is in the bottom left corner. (There were two other screws that were removed when taking the back cover off, thus it is important to pay attention to which hole this screw comes out of for reassembly.)

  17. Sony Cyber-shot DSC-W150 LCD Screen Replacement: 手順 17、 2の画像 1 Sony Cyber-shot DSC-W150 LCD Screen Replacement: 手順 17、 2の画像 2
    • At this point, all screws on the left and right sides of the camera should be removed.

    • Paying careful attention to the right side's electrical wiring, gently pull the left side of the LCD plate away from the rest of the camera.

    • DO NOT detach the electrical wiring connecting the right side of the LCD and the camera.

  18. Sony Cyber-shot DSC-W150 LCD Screen Replacement: 手順 18、 1の画像 1
    • NOTE: This picture is simply used to identify the action required to release the electrical ribbons, but not the proper location for this step.

    • This step applies to the larger electrical ribbon connecting the LCD screen and circuit board.

    • Using a spudger, wedge the flat tipped end between the black bar and the circuit board.

    • Carefully lift the black bar into the vertical position.

  19. Sony Cyber-shot DSC-W150 LCD Screen Replacement: 手順 19、 1の画像 1
    • After raising the black bar, the electrical ribbon is free from its port.

    • Use tweezers to carefully pull larger electrical ribbon from its circuit board port.

  20. Sony Cyber-shot DSC-W150 LCD Screen Replacement: 手順 20、 1の画像 1
    • The smaller electrical ribbon, to the left of the larger ribbon, does not have a black bar securing it in place.

    • Use tweezers to carefully pull smaller electrical ribbon from its circuit board port.

  21. Sony Cyber-shot DSC-W150 LCD Screen Replacement: 手順 21、 1の画像 1
    • Desolder the small electrical ribbon that connects the control panel to the LCD screen.

    • Now the LCD/control panel is completely removed from the part and ready to be replaced.

終わりに

To reassemble your device, follow these instructions in reverse order.

4 の人々がこのガイドを完成させました。

作成者

9人の作成者と共同で作成されました。

Brent Clavin

メンバー登録日: 04/15/10

90 ポイント

1ガイドが承認済み

チーム

Cal Poly, Team 33-73, Johann Spring 2010 Cal Poly, Team 33-73, Johann Spring 2010人のメンバー

CPSU-JOHANN-S10S33G73

3 メンバー

2のガイドは作成済み

0 件のコメント

コメントを追加

統計データ:

過去 24時間: 1

過去 7 日: 5

過去 30 日: 22

今までの合計 9,973