メインコンテンツにスキップ

Sony CFD-8 Motor Belt Replacement

必要な工具と部品

  1. Sony CFD-8 Motor Belt Replacement, Battery: 手順 1、 3の画像 1 Sony CFD-8 Motor Belt Replacement, Battery: 手順 1、 3の画像 2 Sony CFD-8 Motor Belt Replacement, Battery: 手順 1、 3の画像 3
    • Remove the battery cover on the back of the boombox by applying downward pressure to the two clamps.

    • Be sure to unplug the boombox from the wall before attempting to open it for repair.

  2. Sony CFD-8 Motor Belt Replacement: 手順 2、 2の画像 1 Sony CFD-8 Motor Belt Replacement: 手順 2、 2の画像 2
    • Push against the positive end of each battery. Once it is loose, lift the battery out. Repeat for all six batteries.

    • The top row of batteries have the positive side pointing right. The bottom row of batteries have the positive side pointing left.

  3. Sony CFD-8 Motor Belt Replacement, Front Panel: 手順 3、 3の画像 1 Sony CFD-8 Motor Belt Replacement, Front Panel: 手順 3、 3の画像 2 Sony CFD-8 Motor Belt Replacement, Front Panel: 手順 3、 3の画像 3
    • Hold the boombox handle at an angle to access the screws behind the CD player.

    • Use a Phillips #1 screwdriver to unscrew the top two 14 mm screws. You may need a flashlight to see the screws.

  4. Sony CFD-8 Motor Belt Replacement: 手順 4、 2の画像 1 Sony CFD-8 Motor Belt Replacement: 手順 4、 2の画像 2
    • Remove four 14 mm screws using a Phillips #1 screwdriver. Two of these screws are at the bottom of the boombox and the other two are on either side of the boombox as highlighted in the related images.

    • All four screws have black arrows (not visible in the photo) indicating their location on the boombox.

  5. Sony CFD-8 Motor Belt Replacement: 手順 5、 3の画像 1 Sony CFD-8 Motor Belt Replacement: 手順 5、 3の画像 2 Sony CFD-8 Motor Belt Replacement: 手順 5、 3の画像 3
    • Gently separate the front panel from the back panel.

    • Remove the two connections holding the front panel to boombox.

    • One connection is located on the upper left hand side of the main circuit board.

    • The other is a large white strip slightly to the right of the cassette player.

    • Do not touch the cylindrical parts on the circuit board. These are capacitors and may deliver a shock!

    • Remove the front panel.

  6. Sony CFD-8 Motor Belt Replacement, Remove Gear Assembly: 手順 6、 1の画像 1
    • Unscrew the 3x12 screws circled in the photo using a #1 Phillips screwdriver.

  7. Sony CFD-8 Motor Belt Replacement, Disconnect Wires: 手順 7、 1の画像 1
    • Carefully disconnect the wire connection by pulling at its base.

  8. Sony CFD-8 Motor Belt Replacement, Remove Motor: 手順 8、 3の画像 1 Sony CFD-8 Motor Belt Replacement, Remove Motor: 手順 8、 3の画像 2 Sony CFD-8 Motor Belt Replacement, Remove Motor: 手順 8、 3の画像 3
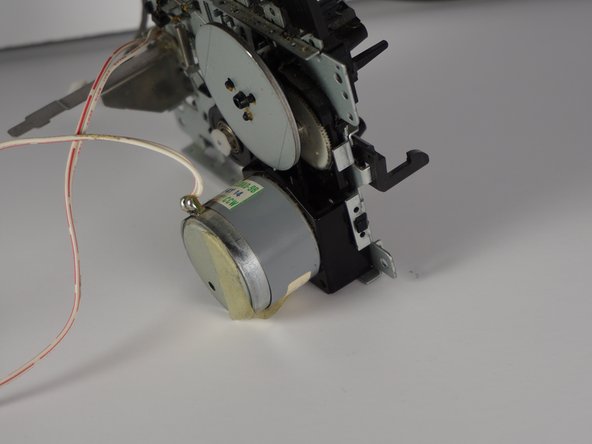
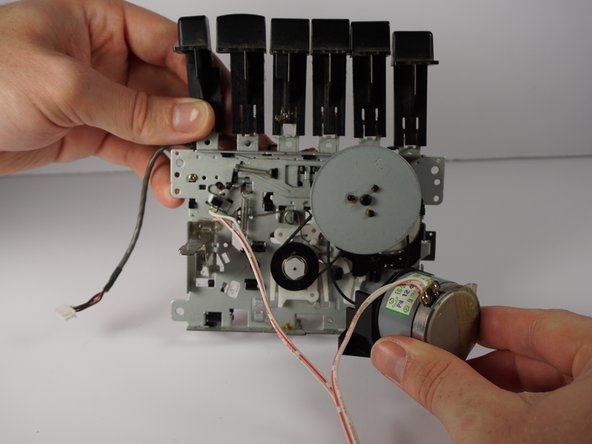
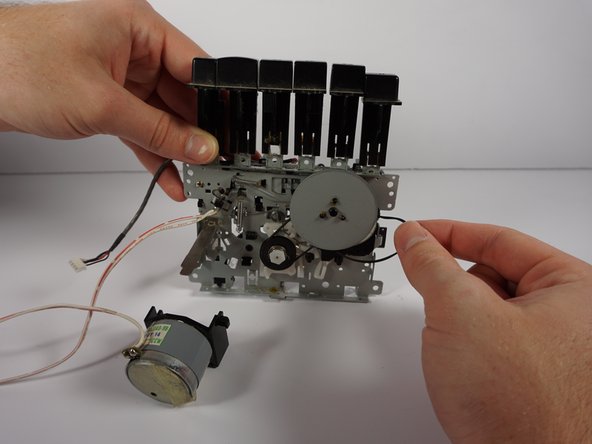
    • Unscrew the 5mm screw shown in the photo.

    • Note the small latch on the side of assembly as you remove the motor.

  9. Sony CFD-8 Motor Belt Replacement, Replace Motor Belt: 手順 9、 2の画像 1 Sony CFD-8 Motor Belt Replacement, Replace Motor Belt: 手順 9、 2の画像 2
    • Remove the motor belt from its axle.

終わりに

To reassemble your device, follow these instructions in reverse order.

4 の人々がこのガイドを完成させました。

作成者

3人の作成者と共同で作成されました。

Wil Gilbreath

メンバー登録日: 10/14/14

205 ポイント

1ガイドが承認済み

チーム

Cal Poly, Team 10-38, Amido Fall 2014 Cal Poly, Team 10-38, Amido Fall 2014人のメンバー

CPSU-AMIDO-F14S10G38

5 メンバー

7のガイドは作成済み

3 件のコメント

need belt for cassette replace

joe jefferson - 返信

need the belt for the cassette player

joe jefferson - 返信

First, be sure to have a #1 pt screwdriver with at least a 5” shaft(not counting the handle) length. Second, pay attention to where the screws under the handle are located. Third, mark the top of the connectors with a sharpie or such instrument to be sure you are replacing the connector in the correct position.

Don Gunkel - 返信

コメントを追加

統計データ:

過去 24時間: 0

過去 7 日: 10

過去 30 日: 34

今までの合計 13,220