メインコンテンツにスキップ
リペアコミュニティに参加 - アカウントの作成

Sony BDP-BX520 Disc Reader Replacement

必要な工具と部品

  1. Sony BDP-BX520 Disc Reader Replacement, Disc Tray Cover: 手順 1、 1の画像 1
    • Plug in the Blu-Ray player, then press the power button, making sure the Blu-Ray player is powered on.

    • Press the eject button on either the top of the Blu-Ray player or on the remote to open the disc tray.

    FixBotに聞いてみる
  2. Sony BDP-BX520 Disc Reader Replacement: 手順 2、 1の画像 1
    • Grab the sides of the disc tray cover and carefully pull each side upwards, starting with the left side. This will unhook the cover from the tray.

    FixBotに聞いてみる
  3. Sony BDP-BX520 Disc Reader Replacement: 手順 3、 1の画像 1
    • Close the disc tray, then power off and unplug the Blu-Ray player.

    FixBotに聞いてみる
  4. Sony BDP-BX520 Disc Reader Replacement, Top Case: 手順 4、 1の画像 1
    • Locate the three 8 mm screws on the back of the Blu-Ray player.

    • Using the Phillips #2 screwdriver, unscrew each of the screws and set them aside.

    FixBotに聞いてみる
  5. Sony BDP-BX520 Disc Reader Replacement: 手順 5、 2の画像 1 Sony BDP-BX520 Disc Reader Replacement: 手順 5、 2の画像 2
    • Gently pull the top case back to remove it from the Blu-Ray player.

    FixBotに聞いてみる
  6. Sony BDP-BX520 Disc Reader Replacement, Front Panel: 手順 6、 1の画像 1
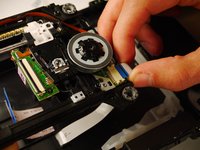
    • Insert the nylon or metal spudger under the clip on the side near the front of the device. Lift the clip so it is free from the device.

    • Lifting these clips may require you to hold one clip open while you move on to the next clip.

    FixBotに聞いてみる
  7. Sony BDP-BX520 Disc Reader Replacement: 手順 7、 1の画像 1
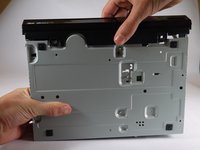
    • Flip device over so the bottom faces you.

    • Insert the nylon or metal spudger and lift the two clips on the bottom of the device.

    FixBotに聞いてみる
  8. Sony BDP-BX520 Disc Reader Replacement: 手順 8、 1の画像 1
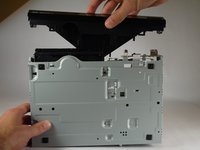
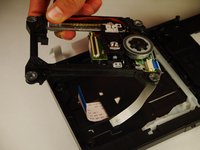
    • Lift the clip on the opposite side of the device with the nylon or metal spudger.

    FixBotに聞いてみる
  9. Sony BDP-BX520 Disc Reader Replacement: 手順 9、 2の画像 1 Sony BDP-BX520 Disc Reader Replacement: 手順 9、 2の画像 2
    • Grasp the front case firmly and lift from the rest of the device.

    • Lifting may require some force.

    FixBotに聞いてみる
  10. Sony BDP-BX520 Disc Reader Replacement, Disc Reader: 手順 10、 1の画像 1
    • Do not touch the circuit boards or the internal parts of the device while it is powered on. This could short out the circuits and possibly cause you harm.

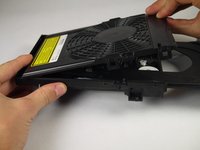
    • Plug in the device and power it on by pushing the right button on the front of the device. The light should turn on.

    FixBotに聞いてみる
  11. Sony BDP-BX520 Disc Reader Replacement: 手順 11、 1の画像 1
    • Eject the disc tray by pushing the left button on the front of the device.

    • Unplug the device once the disc tray is open.

    FixBotに聞いてみる
  12. Sony BDP-BX520 Disc Reader Replacement: 手順 12、 1の画像 1
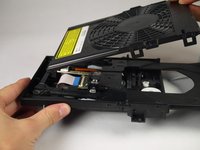
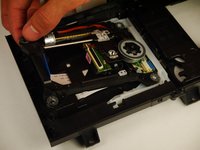
    • Insert the nylon or metal spudger under the clip and lift it up. There are 4 clips that need to be lifted, two on each side

    FixBotに聞いてみる
  13. Sony BDP-BX520 Disc Reader Replacement: 手順 13、 2の画像 1 Sony BDP-BX520 Disc Reader Replacement: 手順 13、 2の画像 2
    • Once the clips are free, lift the top cover of the disc tray up.

    • This should take minimal force.

    FixBotに聞いてみる
  14. Sony BDP-BX520 Disc Reader Replacement: 手順 14、 1の画像 1
    • Unscrew the two silver 8mm Phillips 1 screws from the disc reader.

    FixBotに聞いてみる
  15. Sony BDP-BX520 Disc Reader Replacement: 手順 15、 3の画像 1 Sony BDP-BX520 Disc Reader Replacement: 手順 15、 3の画像 2 Sony BDP-BX520 Disc Reader Replacement: 手順 15、 3の画像 3
    この手順で使用する道具:
    Tweezers
    $4.99
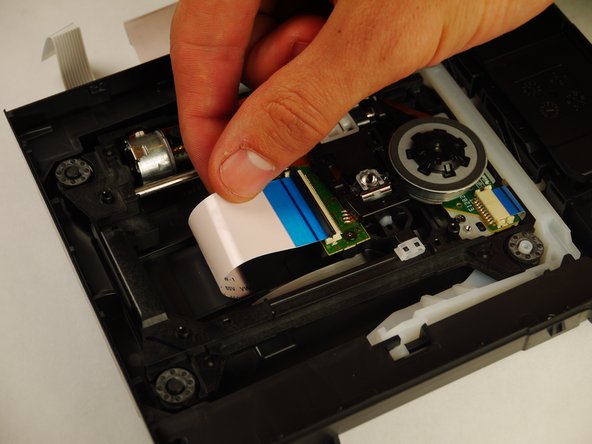
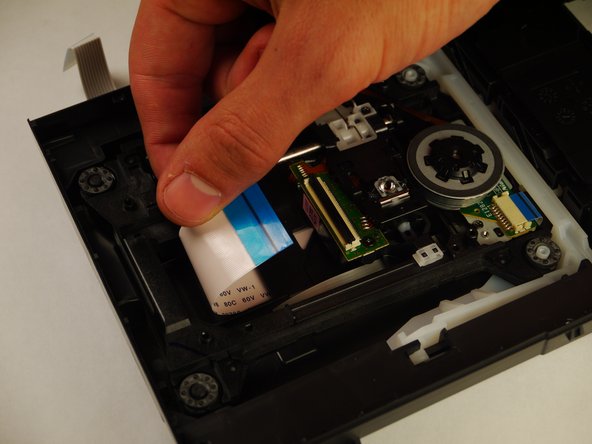
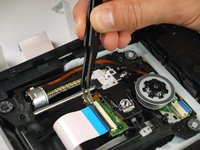
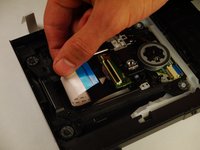
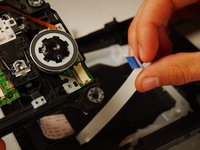
    • Use the tweezers to lift both sides of the black clip holding the white 14 pin ribbon in place.

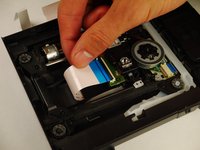
    • Once free the white 24 pin ribbon should slip right out.

    FixBotに聞いてみる
  16. Sony BDP-BX520 Disc Reader Replacement: 手順 16、 2の画像 1 Sony BDP-BX520 Disc Reader Replacement: 手順 16、 2の画像 2
    • Carefully lift up the disc reader. It is still attached by a cable underneath!

    FixBotに聞いてみる
  17. Sony BDP-BX520 Disc Reader Replacement: 手順 17、 2の画像 1 Sony BDP-BX520 Disc Reader Replacement: 手順 17、 2の画像 2
    • Gently pull out the white 13 pin cable from the disc reader.

    FixBotに聞いてみる
終わりに

To reassemble your device, follow these instructions in reverse order.

ある他の人がこのガイドを完成しました。

作成者

3人の作成者と共同で作成されました。

Kyle Smit

メンバー登録日: 01/31/15

243 ポイント

2のガイドは作成済み

チーム

Cal Poly, Team 8-41, Amido Winter 2015 Cal Poly, Team 8-41, Amido Winter 2015人のメンバー

CPSU-AMIDO-W15S8G41

4 メンバー

8のガイドは作成済み

0件のガイドコメント

コメントを追加

統計データ:

過去 24時間: 1

過去 7 日: 7

過去 30 日: 41

今までの合計 1,581