メインコンテンツにスキップ

このバージョンは誤った内容を含んでいる可能性があります。最新の承認済みスナップショットに切り替えてください。

必要な工具と部品

  1. この手順は未翻訳です。 翻訳を手伝う。

    : 手順 1、 2の画像 1 : 手順 1、 2の画像 2
    • Using a Phillips #00 precision screwdriver, remove the seven 4mm screws (5 on the bottom of the device and 1 on each of the two sides) holding the back panel to the camera.

    • On the NX300M model, there is an additional screw under the text AMOLED behind display which should be removed before detaching the back panel of the camera.

  2. この手順は未翻訳です。 翻訳を手伝う。

    : 手順 2、 1の画像 1
    • Using a Phillips #00 precision screwdriver, remove the last 4 mm screw located inside the input ports' compartment.

  3. この手順は未翻訳です。 翻訳を手伝う。

    : 手順 3、 3の画像 1 : 手順 3、 3の画像 2 : 手順 3、 3の画像 3
    • Place a plastic opening tool into the gap between the back panel and camera body, from both the top and the bottom of camera. Carefully pry open the camera and separate the back panel.

  4. この手順は未翻訳です。 翻訳を手伝う。

    : 手順 4、 3の画像 1 : 手順 4、 3の画像 2 : 手順 4、 3の画像 3
    • Using tweezers or your fingers, pull the display's black ribbon from the motherboard. This frees the back panel altogether.

    • To safely remove ribbons, you would need to first unlock the holding mechanism by lifting up the black strip atop the ribbon adapter.

  5. この手順は未翻訳です。 翻訳を手伝う。

    : 手順 5、 3の画像 1 : 手順 5、 3の画像 2 : 手順 5、 3の画像 3
    • Using a Phillips #00 precision screwdriver, remove the four 1mm screws that are holding the black supports to the panel.

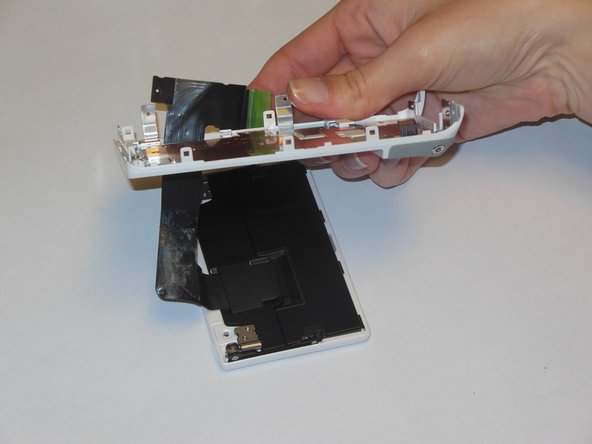
    • Remove the little ribbon tab from the contact pad using tweezers or your fingers, then peel off the black ribbon from the metallic panel.

    • Feed the ribbon through the slot on the back panel to free the LCD Screen. You need to bend the ribbon to get the small tabs through it.

  6. この手順は未翻訳です。 翻訳を手伝う。

    : 手順 6、 2の画像 1 : 手順 6、 2の画像 2
    • Using a Phillips #00 precision screwdriver, remove the five 3mm screws.

    • Using a plastic opening tool, slowly lift up the entire metal piece from the back of the camera.

    • If the panel has never been removed from the camera before, it will be glued firmly to the back panel and will require some force to remove. To prevent breaking the back panel, work the plastic opening tool under different areas of the metal plate until it is completely released.

    • There are two small magnetic blocks housed underneath the metallic plate. These are for securing the swivel screen in place while it is closed.

  7. この手順は未翻訳です。 翻訳を手伝う。

    : 手順 7、 3の画像 1 : 手順 7、 3の画像 2 : 手順 7、 3の画像 3
    • Once you remove the metallic panel, peel off the black pad from the buttons using tweezers.

    • Using tweezers, remove any button you need to by pulling on the plastic strips near the connection point to the back panel.

    • If most of the menu buttons need to be replaced, it is better to replace all of the buttons, since the plastic connector pieces break easily during removal.

  8. この手順は未翻訳です。 翻訳を手伝う。

    : 手順 8、 1の画像 1
    • The menu buttons are now free from the camera.

ゴール

作成者

4人の作成者と共同で作成されました。

Andres Perez

メンバー登録日: 01/21/15

951 ポイント

5のガイドは作成済み

チーム

USF Tampa, Team 9-6, Blackwell Winter 2015 USF Tampa, Team 9-6, Blackwell Winter 2015人のメンバー

USFT-BLACKWELL-W15S9G6

4 メンバー

10のガイドは作成済み

0 件のコメント

コメントを追加

統計データ:

過去 24時間: 1

過去 7 日: 9

過去 30 日: 20

今までの合計 1,232