メインコンテンツにスキップ

この翻訳は、ソースガイドの最新の更新を反映していない可能性があります。 翻訳の更新に協力してください。 または ソースガイドを参照してください

必要な工具と部品

  1. , バックカバー: 手順 1、 1の画像 1
    • スマートフォンの電源を切ります。

    • Note8の裏面に留められた接着剤を柔らかくするために、iOpenerを用意します

    • 電源ボタンの側面に沿って、Note8の裏面にiOpenerを置きます。

  2. : 手順 2、 3の画像 1 : 手順 2、 3の画像 2 : 手順 2、 3の画像 3
    • 吸盤ハンドルを使ってバックカバーを持ち上げて、生じた隙間に開口ピックを差し込みます。

    • バックカバーはわずかにエッジがカーブしているため、開口ピックを下側から低い角度で差し込んでください。

    • デバイス横の中央部分から作業を始めて、吸盤ハンドルを引き上げながら、ピックで接着剤を切開します。

    • 開口ピックをテコのように大きく動かしすぎないでください。バックカバーを破損することがあります。吸盤ハンドルを引き上げながら、開口ピックをスライドして接着剤を切開します。

    • 開口ピックを下側コーナーに向けて動かし、接着剤がケースに再装着しないよう、その場に残しておきます。

    • 別の開口ピックを使って上部コーナーまで移動します。

    • ここに翻訳を挿入する

  3. この手順は未翻訳です。 翻訳を手伝う。

    : 手順 3、 3の画像 1 : 手順 3、 3の画像 2 : 手順 3、 3の画像 3
    • Again take another opening pick and carefully move it around the corner and along the top edge.

    • Reheat with an iOpener if necessary.

    • Leave the pick at the top right corner to keep the adhesive from resealing.

  4. この手順は未翻訳です。 翻訳を手伝う。

    : 手順 4、 3の画像 1 : 手順 4、 3の画像 2 : 手順 4、 3の画像 3
    • Rotate the device and start to separate the adhesive at the bottom with another opening pick.

    • Leave the pick at the bottom right corner to keep the adhesive from resealing.

  5. この手順は未翻訳です。 翻訳を手伝う。

    : 手順 5、 3の画像 1 : 手順 5、 3の画像 2 : 手順 5、 3の画像 3
    • When the adhesive has been separated on all three sides properly you will be able to slowly lift the back cover.

    • Don't force it open. Use an iOpener to again soften the adhesive if the back cover won't come off or starts to bend.

    • Pay attention to the fingerprint sensor connector when flipping the back cover open. You might need to disconnect it as described in the next step.

  6. : 手順 6、 1の画像 1
    • ピンセットを使って、指紋センサーの接続を外します。

    • コネクタは、バックカバーをパカッと開いたときにすでに外れているかもしれません。

  7. : 手順 7、 1の画像 1
    • バックカバーを取り外します。

    • 再組み立ての準備をするには、スマートフォンに残った接着剤を取り除き、イソプロピルアルコールと糸くずの出ない布で接着剤の箇所を拭き取ってください。

  8. : 手順 8、 1の画像 1
    • #00プラスネジを10本外します。

  9. : 手順 9、 2の画像 1 : 手順 9、 2の画像 2
    • 開口ピックの上端を、NFCアンテナおよび充電コイルアセンブリとケースの間に差し込みます。

    • ケースからアセンブリ上部を持ち上げます。

  10. : 手順 10、 1の画像 1
    • 充電コイル全体とNFCアンテナアセンブリを注意深く引き上げます。

    • アセンブリの左下部分は、フレームにわずかに接着されています。

  11. , バッテリーの接続を外す: 手順 11、 1の画像 1
    • スパッジャーの平面側先端を使って、バッテリーコネクタの接続を外します。

  12. , ディスプレイの交換: 手順 12、 1の画像 1
    • スマートフォンの底部にあるラウドスピーカーアセンブリに留められた#00プラスネジを6本外します。

  13. この手順は未翻訳です。 翻訳を手伝う。

    : 手順 13、 2の画像 1 : 手順 13、 2の画像 2
    • Use the flat end of a spudger to pry up the loudspeaker assembly.

    • You will be prying above the mainboard and the antenna cable. Pry carefully to avoid damaging any close components.

    • Remove the loudspeaker assembly.

  14. : 手順 14、 2の画像 1 : 手順 14、 2の画像 2
    • スパッジャーの平面側先端を使って、ディスプレイケーブルとタッチスクリーンケーブル両方の接続を外します。

  15. この手順は未翻訳です。 翻訳を手伝う。

    : 手順 15、 1の画像 1
    • Prepare an iOpener and apply it to the display for at least two minutes to loosen the adhesive beneath.

    • You may need to reheat and reapply the iOpener several times to get the phone warm enough. Follow the iOpener instructions to avoid overheating.

    • If your display glass is cracked, keep further breakage contained and prevent bodily harm during your repair by taping over the glass.

    • Lay overlapping strips of clear packing tape over the Note8's display until the whole face is covered.

    • This will keep glass shards contained and provide structural integrity when prying and lifting the display.

    • Wear safety glasses to protect your eyes from any glass shaken free during the repair.

  16. この手順は未翻訳です。 翻訳を手伝う。

    : 手順 16、 3の画像 1 : 手順 16、 3の画像 2 : 手順 16、 3の画像 3
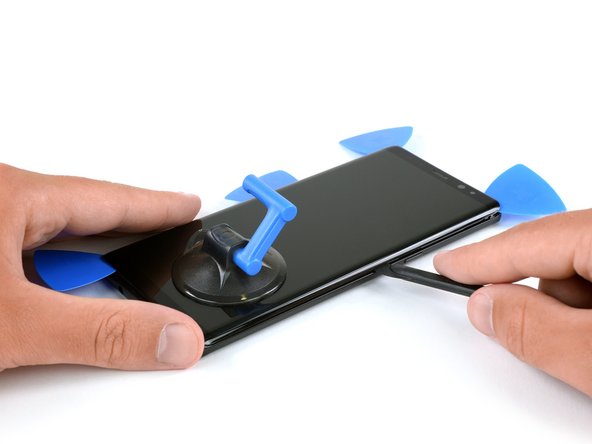
    • Once the screen is warm to the touch, apply a suction cup to the lower edge of the phone.

    • If the phone's screen is cracked, the suction cup may not stick. Try lifting it with strong tape, or superglue the suction cup in place and allow it to cure so you can proceed.

    • Lift on the suction cup, and insert a halberd spudger or an opening pick under the display assembly.

    • Due to the curved glass, you will be pushing up, rather than inserting parallel to the plane of the phone.

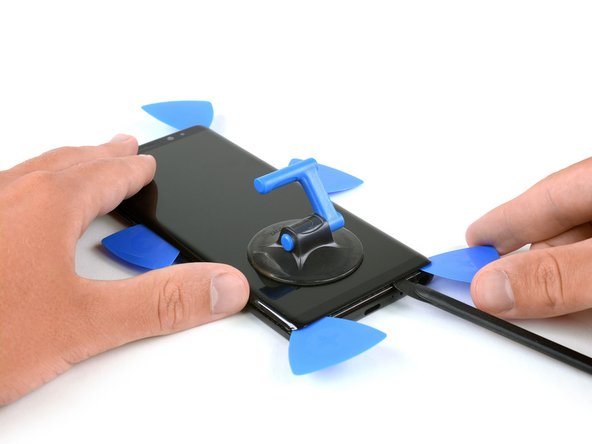
    • Start to slide the halberd spudger/opening pick along the lower edge of the phone to cut the adhesive. Leave an opening pick at the corner to prevent the adhesive from resealing.

    • The screen's flex cable is located just below the midpoint on the side of the power button, and may interfere with your cutting tool.

    • Continue to slide the halberd spudger/opening pick along the side of the phone and insert another opening pick.

  17. この手順は未翻訳です。 翻訳を手伝う。

    : 手順 17、 3の画像 1 : 手順 17、 3の画像 2 : 手順 17、 3の画像 3
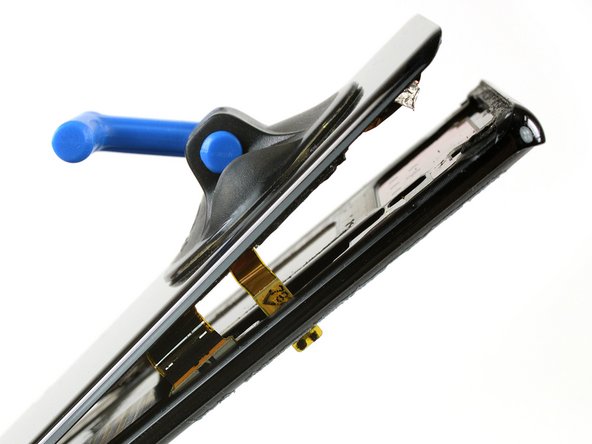
    • Slide the halberd spudger/opening pick to the upper corner of the phone to cut the adhesive and insert and opening pick to prevent the adhesive from sticking to the display.

    • Go slowly so that the tool doesn't slip out of the seam. If cutting becomes too difficult, reheat and reapply the iOpener.

    • Repeat the previous heating and cutting procedure for the remaining sides of the phone. Insert an opening pick on every corner and on both sides of the Note8.

    • Use a little extra caution when prying near the top edge so as not to damage the front-facing sensors and earpiece speaker.

  18. この手順は未翻訳です。 翻訳を手伝う。

    : 手順 18、 2の画像 1 : 手順 18、 2の画像 2
    • Both, the flex cable of the touchscreen and the display cable are threaded through the mid frame. The openings in the midframe are rather small and it can be a bit of a fumbling to pull them out.

    • Once you cut the adhesive on all sides of the phone you can use the small suction cup to slowly lift it upwards.

  19. この手順は未翻訳です。 翻訳を手伝う。

    : 手順 19、 1の画像 1
    • Before installing a new display, it's very important to remove all traces of the old adhesive from the frame, while taking special care to remove any small glass fragments in case your display was broken.

    • Remove any remaining adhesive from the phone, and clean the glued areas with isopropyl alcohol (90+%) and a lint-free cloth.

    • If the frame is bent, or if any glue or glass remnants are left behind, the new display will not mount correctly and may be damaged. If necessary, replace the frame.

ゴール

99 の人々がこのガイドを完成させました。

以下の翻訳者の皆さんにお礼を申し上げます:

en jp

23%

railgunさんは世界中で修理する私たちを助けてくれています! あなたも貢献してみませんか?
翻訳を始める ›

作成者

2人の作成者と共同で作成されました。

Dominik Schnabelrauch

メンバー登録日: 11/23/16

204,241 ポイント

682のガイドは作成済み

チーム

iFixit iFixit人のメンバー

Staff

135 メンバー

17,228のガイドは作成済み

21 件のコメント

I’m sorry, but this is just a preview question. When the guide says display, does it mean only the glass screen or the LCD and digetizer as well?

Adrian Gomez - 返信

Hello Adrian Gomez. Here “display” refers to the glass, digitizer and LCD combo—those are fused together.

Tobias Isakeit -

For this repair, do I need to buy the 230 dollar screen part as well?

Litagano Motscoud - 返信

This guide here is for replacing only the screen without the frame (which we currently don’t have in store). The 230 dollar part includes the frame and the according guide can be found here: Samsung Galaxy Note8 Display Assembly with Frame Replacement

Tobias Isakeit -

Hi

I replace the new disply the camera ( front is working ) is not working I tried many things such as factory settings put it didn’t work

now I orderd a new camera hope it works or there is another way to solve it

nasser

zarmat2002 - 返信

コメントを追加

統計データ:

過去 24時間: 22

過去 7 日: 108

過去 30 日: 465

今までの合計 132,670