メインコンテンツにスキップ

Samsung Chromebook 3 Battery Replacement

必要な工具と部品

  1. Samsung Chromebook 3 Battery Replacement, Bottom Case: 手順 1、 2の画像 1 Samsung Chromebook 3 Battery Replacement, Bottom Case: 手順 1、 2の画像 2
    • Place the Chromebook face down so that the bottom case is exposed.

    • Using a Phillips #00 screwdriver, remove nine 4.6mm screws from the back casing.

  2. Samsung Chromebook 3 Battery Replacement: 手順 2、 3の画像 1 Samsung Chromebook 3 Battery Replacement: 手順 2、 3の画像 2 Samsung Chromebook 3 Battery Replacement: 手順 2、 3の画像 3
    • Use a iFixit opening tool to gently pry the case up from the vent on the hinge side of the Chromebook.

    • You should hear a popping sound as the connectors disengage inside the case.

  3. Samsung Chromebook 3 Battery Replacement: 手順 3、 1の画像 1
    • Lift the case up and off the device

  4. Samsung Chromebook 3 Battery Replacement, Battery: 手順 4、 2の画像 1 Samsung Chromebook 3 Battery Replacement, Battery: 手順 4、 2の画像 2
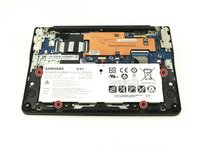
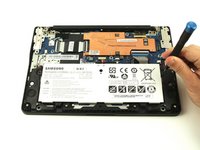
    • Locate the battery and remove the four 4.6mm screws at the corners which attach it to case using a Phillips #00 screwdriver.

  5. Samsung Chromebook 3 Battery Replacement: 手順 5、 2の画像 1 Samsung Chromebook 3 Battery Replacement: 手順 5、 2の画像 2
    • Use a spudger to gently pry the power cable cord upwards from the motherboard.

  6. Samsung Chromebook 3 Battery Replacement: 手順 6、 1の画像 1
    • Lift the battery up and out from the case.

終わりに

To reassemble your device, follow these instructions in reverse order.

5 の人々がこのガイドを完成させました。

作成者

1人の作成者と共同作成されました。

Austin Blakely

メンバー登録日: 03/11/19

19,476 ポイント

53のガイドは作成済み

チーム

iFixit iFixit人のメンバー

Staff

135 メンバー

16,731のガイドは作成済み

コメント 1 件

Can you fix my chromebook

Peter Hancocks - 返信

コメントを追加

統計データ:

過去 24時間: 0

過去 7 日: 3

過去 30 日: 17

今までの合計 1,503